I wrote this article as a technical introduction to the Scroll zkEVM for smart contract developers who want to try out the network.
In this article, we will:
Learn about Scroll zkEVM and how to start with its' Alpha testnet.
Set up a dev environment with Foundry and write a smart contract that dispenses ETH on the Alpha testnet based on a pseudo-random number-generating function.
Tweak the smart contract to fit in with the exact specifications required for the Alpha testnet
Deploy our smart contract with the help of a Solidity script.
Verify our smart contract on the Alpha testnet straight out of Foundry's command line.
By the end of this article, you will learn how to deploy your smart contracts to Scroll's Alpha testnet with Foundry.

Scroll zkEVM is a soon-to-launch layer-2 blockchain solution specifically designed to serve as a tool to increase Ethereum's scalability.
The distinguishing feature of Scroll and similar platforms like the Polygon zkEVM is the use of zero-knowledge proofs (ZK proofs) that work by bundling large groups of transactions and writing them to Ethereum all at once, significantly reducing the transaction fees compared to processing each transaction individually on Ethereum.
The best thing about zkEVMs like Scroll: A smart contract developer doesn't need to understand the underlying ZK technology to deploy EVM-compatible smart contracts on a much cheaper and scalable solution.
Prerequisites
Make sure you have some Goerli ETH in your wallet. Yes, I know Goerli is deprecated, but you'll need it for now.
A basic understanding of blockchains and some experience with Solidity.
If you haven't worked with Foundry before, I recommend you check out the README from this Github repo I made for a workshop a while back.
No need to watch the whole video; just quickly glance through the README file if you have never worked with Foundry before.
First things First: Bridge it!
Without going into much ZK-specific stuff, please know that ETH on the Scroll network mirrors ETH on the Ethereum mainnet. Mirroring means that the Scroll team has deployed bridging smart contracts on the Scroll network(Alpha testnet for now) and the corresponding ETH network(Goerli testnet for now).
So to get some ETH to pay for gas on the Alpha testnet, you need to deposit some Goerli ETH into the bridge contract on Goerli.
Mirroring also works the other way around.
To get started:
Go to Scroll's UI interface which allows you to interact with the bridge contract.
Connect your Metamask wallet to the webpagẹ.
Ensure you are sending ETH to the Scroll network, not the other way around. Follow the UI (it's intuitive, really) and confirm the bridge.
After confirmation, you may need to wait 30-45 minutes before receiving ETH on the Alpha testnet. So you need to be patient for a while there.
You are ready to go once you have some ETH on the Alpha testnet!
Initializing a Foundry Project
Foundry is one of the latest smart contract development frameworks to have entered the arena and is becoming increasingly popular.
To install Foundry, reference the below commands or check out Foundry-book.
Run this command to download foundryup
curl -L https://foundry.paradigm.xyz | bash
Then restart your terminal and then install Foundry by running:
foundryup
Once you installed everything, open up a new terminal in a new directory. You can initialize a new Foundry project using the following command:
forge init
A few notes:
- All the smart contracts are created inside the
src directory by default.
- The
forge install command can install new packages as git submodules inside the lib directory.
- By default, all test contracts are defined under the
test directory and are usually suffixed with .t.sol, meaning a contract file named hello.sol will have a file named hello.t.sol per usual convention. You can execute all test files with the forge test command.
- You can control Foundry's behavior by configuring the
foundry.toml file. This page on Github provides a complete reference to the toml file. I also compiled a gist that contains a list of default values.
- The
script directory contains all the deployment and executable scripts for your Foundry project.
Every time you make any changes to the code, you can compile all the smart contracts using:
forge build
Opcodes and Bytecode: A Crash Course
Before writing the smart contract itself, let us look at some concepts that will be useful in understanding the bigger picture.
So for those unaware, the EVM doesn't execute Solidity or any other smart contract development language. The EVM isn't even aware those languages exist, nor does it care. This translates to the Scroll zkEVM too.
What happens is that any smart contract code is broken down into EVM-executable instructions set known as the Bytecode, which is what the EVM actually executes.
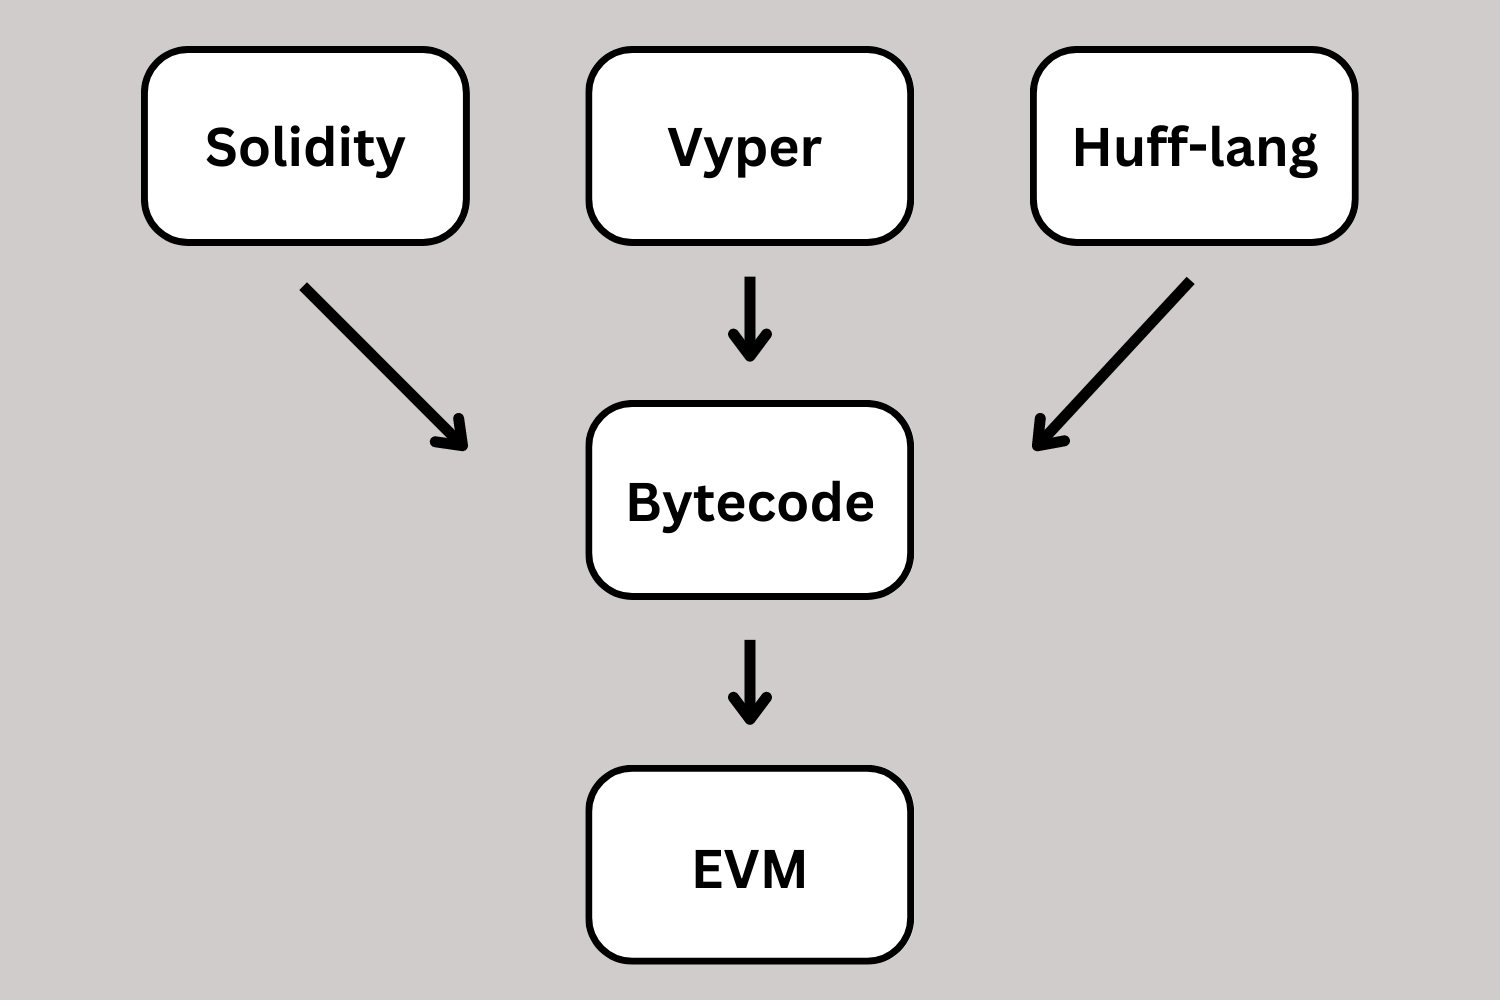
Ok, but what are opcodes, and why do we care? Remember how I said that bytecode is an 'instructions set'?
Well, each opcode is an instruction that, combined with other opcodes, makes up the bytecode for any smart contract. Opcodes are the lowest computation level you must handle as a blockchain developer. A smart contract language is an abstraction built on top of these Opcodes.
For example, if you've ever used block.number in Solidity, you invoke the NUMBER opcode. A complete reference for all the opcodes supported by the EVM (not to be confused with Scroll's zkEVM) can be found on Ethereum foundation's website.
Allow me to impress upon you the meaning of this whole thing clearly with an example.
Take a look at this straightforward smart contract:
// SPDX-License-Identifier: MIT
pragma solidity ^0.8.0;

contract Adder {
    function add(uint256 a, uint256 b) public pure returns (uint256) {
        uint256 sum = a + b;
        return sum;
    }
}
Nothing more than a function that returns the sum of two numbers. What will the equivalent opcode instructions look like? Just check out this Gist I made. You can also check out this contract on Etherscan to verify the Bytecode and Opcodes for yourself.
This section might seem like an unwelcome detour, but trust me, and it'll make much more sense in the following sections.
Writing the Smart Contract
Finally, let's get this done.
Go into the src directory and create a new file named ScrollTutorial.sol.
Paste the following code inside it:
pragma solidity ^0.8.19;
contract Dispenser {
mapping(address => bool) public hasWithdrawn;
function withdraw() public {
require(
!hasWithdrawn[msg.sender],
"You have already withdrawn once, sorry!. Try again from a different address!"
);
require(
address(this).balance > 0.5 ether,
"Not enough funds in the contract right now"
);
uint256 randomNumber = uint256(
keccak256(
abi.encodePacked(
blockhash(block.number - 100),
block.prevrandao,
block.coinbase
)
)
) % 2;
require(
randomNumber == 0,
"Sorry but the hash generated was an odd number, try again from a different address!"
);
hasWithdrawn[msg.sender] = true;
payable(msg.sender).transfer(0.5 ether);
}
function deposit() public payable {}
}
This is a straightforward smart contract. Let us understand the code quickly:
We want each address to be able to withdraw 0.5 ETH only once; the mapping hasWithdrawn keeps track of all addresses that have successfully withdrawn ETH.
The deposit function is a simple payable function that allows our contract to receive ETH.
The withdraw function is where all the magic happens.
Let us look into the withdraw function in more detail.
The first two require statements at the beginning of the function to ensure that each address can withdraw only once and that there is enough ETH in the contract for the transaction.
The randomNumber variable is a pseudo-random number we generate using a few real-time values. We will look into them in more detail shortly.
The abi.encodePacked function takes all the arguments it receives and concatenates them into a single bytes string.
The keccak256 function will generate the Keccak-256 hash of whatever input it receives. We modulo whatever this function outputs with 2 to check if the generated hash is even or not.
Next, we payout the ETH if the hash is even and update the mapping.
To compile the smart contract, run the following command in your terminal:
forge build
Pro-tip #1: PREVRENDAO is a relatively new opcode that replaces the DIFFICULTY opcode and is only supported by solidity versions 0.8.18 and above. Make sure to configure the solidity version accordingly.
Problems with Our Code
Oh boy, there's a lot to unpack here!
This ocde is far from production-worthy code, but let's discuss a more fundamental problem first.
Recall that I linked a list of opcodes that the EVM supports.
Unfortunately, as of now, Scroll's zkEVM does NOT support all those opcodes.
It does support most of them, but if you're developing a smart contract for a zkEVM (any zkEVM), you must understand the differences in opcode support between the network and the EVM.
Recheck the code and look at the values we use to generate our random number. Let us take a look at what won't work in our smart contract:
| Opcode | Solidity Equivalent | Behavioral difference |
| BLOCKHASH | blockHash(BlockNum) | We use the hash of a block 100 behind the latest as part of our random number's hash. However, the Scroll zkEVM does NOT support fetching the hash of such an old block. If the block number exceeds the supported range, a 0 will be returned. Ethereum support: [LATEST-1] - [LATEST-256] Scroll zkEVM support: [LATEST-1] |
| PREVRANDAO | block.prevrendao | Think of PREVRENDAO as a pseudo-random source number, you can read more about it here. Ethereum behaviour: Returns a pseudo-random number Scroll zkEVM behaviour: Returns 0, no randomness |
| COINBASE | block.coinbase | EVM behavior: Returns the address of the block's validator. This number is pseudo-random since ETH validators are chosen randomly. Scroll behavior: Returns only a single address for now, no randomness |
So, in essence, all three values we concatenate to get our randomNumber have a pseudo-random behavior on the EVM. However, they either fail to work or return a constant value, which makes them useless for our purposes.
But honestly, even if Scroll supported all those opcodes, this would still not be a production-worthy contract. No serious smart contract relies on hashing together block values to generate a random number. To deploy a smart contract that leverages randomness, look at Chainlink's VRF service.
Tweaking the Smart Contract
Since Chainlink does not support Scroll, we will fall back to pseudo-randomness.
This time we will slightly change the withdraw function in two ways:
We now let the user pass an argument while calling the withdraw function. We will use that argument as a part of the hash of the randomNumber, so the user has some control over the hash generated.
We replace the other two values with the block hash of the previous block and the current block's timestamp. Not a good source of randomness at all, but for now, this is the best solution I am aware of.
Feel free to enlighten me if you have a better solution.
pragma solidity ^0.8.19;
contract Dispenser {
mapping(address => bool) public hasWithdrawn;
function withdraw(uint seedValue) public {
require(
!hasWithdrawn[msg.sender],
"You have already withdrawn once, sorry!. Try again from a different address!"
);
require(
address(this).balance > 0.5 ether,
"Not enough funds in the contract right now"
);
uint256 randomNumber = uint256(
keccak256(
abi.encodePacked(
blockhash(block.number - 1),
block.timestamp,
seedValue
)
)
) % 2;
require(
randomNumber == 0,
"Sorry but the hash generated was an odd number."
);
hasWithdrawn[msg.sender] = true;
payable(msg.sender).transfer(0.5 ether);
}
function deposit() public payable {}
}
Deploying and Verifying Our Smart Contract
We will need to pass a few values to Foundry to deploy our smart contract. We could do this directly in the command line while deploying our contract, but it is more convenient to do so in a dotenv file. Create a new .env file in the directory you have your project in.
We need to pass two values into the env file:
RPC_URL: Foundry will need an RPC URL to connect to the Alpha testnet. We can get a public RPC URL for the Alpha tesntet from Scroll's docs.
PRIVATE_KEY: We will need the private key for a wallet with some ETH on the Alpha testnet to sign transactions. Your env file should look something like this:
RPC_URL=https://alpha-rpc.scroll.io/l2
PRIVATE_KEY=1dh12j1XXXXXXXXXXXXXh1pqdfjnma91k
Save your env file. Run this command to load these variables to your terminal:
source .env
Now that we securely set up all our sensitive information let us write a script to deploy our contract. You can also use the forge create command to deploy directly from the command line, but I feel scripting is more elegant.
Create a ScrollTutorial.s.sol file inside the script directory. Inside the file, paste the following code:
pragma solidity ^0.8.13;
import "forge-std/Script.sol";
import {Dispenser} from "../src/ScrollTutorial.sol";
contract MyScript is Script {
function run() external {
uint256 PrivateKey = vm.envUint("PRIVATE_KEY");
vm.startBroadcast(PrivateKey);
Dispenser dispenser = new Dispenser();
vm.stopBroadcast();
}
}
Let us go through what is happening here:
In the first two lines, we import the scripting utilities from the forge standard library and our smart contract.
The forge-std library provides us with the vm.sol interface to use valuable cheat codes. The envUint function can be used to access our private keys in the env file.
Any transaction between the startBroadcast and stopBroadcast can be sent on-chain. In our case, we need to create a new instance of our smart contract.
Save the scripting file. We are now ready to deploy. In your terminal, run the following command:
forge script script/ScrollTutorial.s.sol:MyScript --rpc-url $RPC_URL --broadcast --legacy -vvvv
Pro-tip #2: Foundry allows us to configure the verbosity of our command line by using the '-v' flag. I prefer to use maximum verbosity most of the time. You can read more about this here.
Pro-tip #3: For zkEVMs like Scroll and zkSync, you might need to pass the '--legacy' flag to your contract deployments through Foundry since they typically don't support EIP-1559.
Scroll's docs give us an API URL for the Blockscout explorer that allows us to verify our contracts. Run this command in the terminal to verify your contract:
forge verify-contract <CONTRACT_ADDRESS> src/ScrollTutorial.sol:Dispenser --chain-id 534353 --verifier-url https://blockscout.scroll.io/api/ --verifier blockscout
Note: The Blockscout API seems to be down, and its behavior has been acknowledged as inconsistent by the Scroll docs. I couldn't verify my contract from the command line, and you may also face the same issue. You can verify it from Blockscout's UI, though.
Once your contract has been verified, you can interact with it from Blockscout's UI.
Conclusion
In this article, we talked about the Scroll zkEVM and how you can deploy a smart contract onto this network with minimal configuration as a smart contract developer. Scroll Mainnet's launch is right around the corner; this is the best time to get started with this fantastic new technology.