

BUIDL a Solana Program - Explained for a Web2 Dev


💥 What Skills Will I Upload to You?
When I started a few months ago, the most challenging part wasn’t learning how to build on Ethereum, Solana, or blockchain Z but instead grasping the flow and concepts of working with blockchains in general. This article is what I wished someone had written for me initially: let me look over their shoulder and see something happening instead of talking about proof of work, proof of stake, etc. Let me experience it first!
Every blockchain have their forte and do things differently, but guess what? They are all blockchains, and they have stuff in common, so we will:
- 🍭 Taste the difference between working with a blockchain vs. traditional web services.
- 🧾 Learn the language of blockchains: transactions and Instructions.
- 🪐 Understand how to store data in Solana.
- 🚀 Ship your first Solana program!
- 🦄 Optional: complete the circle by building a frontend app to talk to your program.
TLDR: Try it live! fullstack code here

🎙 Enter Joke to Earn!
In this tutorial, we will create a program on the Solana blockchain to let people read and send jokes, but instead of storing the data on a server, we will be using the Solana blockchain.
👨🏻🏫 Smart Contract 101
So what is a program?
A program (or smart contract in Ethereum) is just some code that will be living and run by the blockchain.
And what is a blockchain?
Without writing a whole white paper about it, a blockchain is just a public database for our interest.
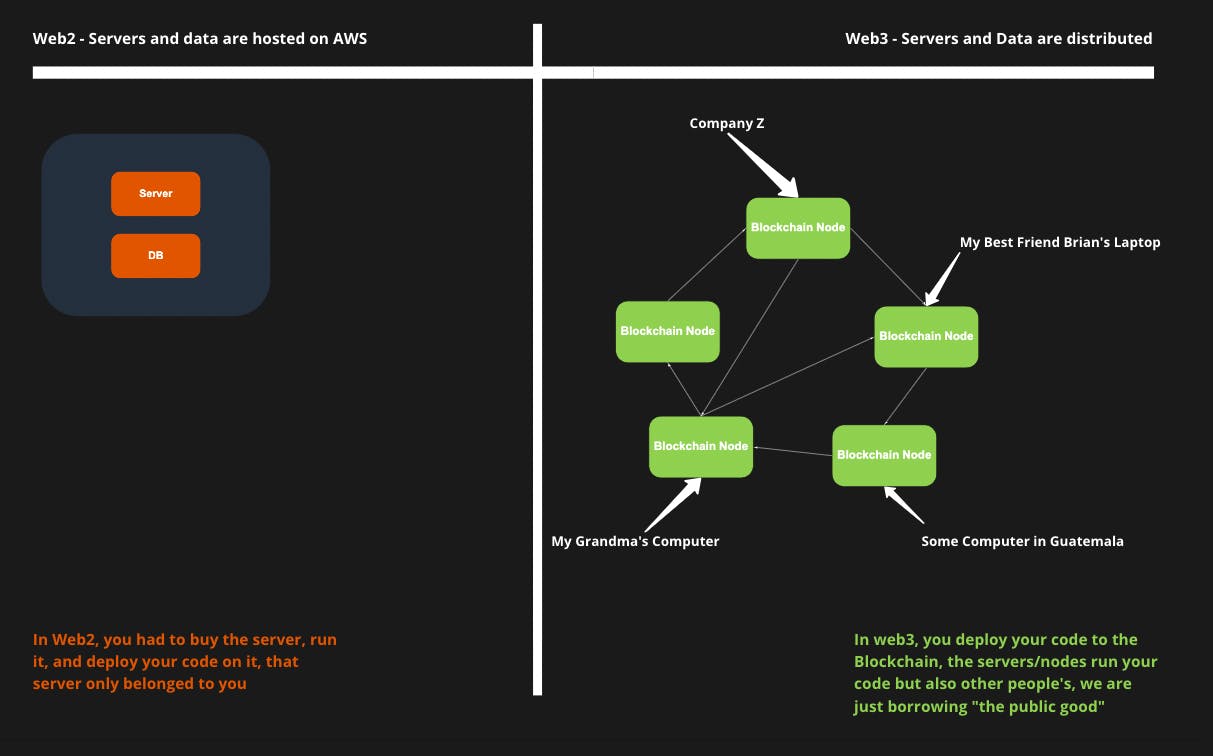
In a traditional Web2 stack, you had your server and database living on Google Cloud, AWS, etc.
In Web3, we deploy our code and store data on a public and distributed database that belongs and can be used by everyone! That is a very simplified way of seeing a blockchain, but in our context of writing a smart contract, that is enough for us to understand.
So here you have it, a Solana program or smart contract is a piece of code running on a distributed database.
Momentum! Not textbooks.
There are so many things to learn about all the different blockchains! If you had to learn blockchain from the bottom up, you would get into a rabbit hole, so instead, we will focus on getting sh*t done!
I won't explain every keyword or detail but instead focus on what is happening and the flow of things.
Once you get the feel of how things work, I recommend you dive deeper and, little by little look, behind the curtains. I will create a series to dive deeper into how blockchains work later.
⚓️ Anchor the Boat
We will use the Anchor framework to develop our first Solana program. It removes tons of the boilerplate code you would write if you just used bare bone Rust with Solana. We write Solana programs in Rust.
💻 Installing Stuff
Install Rust!
curl --proto '=https' --tlsv1.2 -sSf https://sh.rustup.rs | sh
source $HOME/.cargo/env
rustup component add rustfmt
Install Solana!
sh -c "$(curl -sSfL https://release.solana.com/v1.9.5/install)"
The installer may prompt you to modify your path; just follow the instructions.
Install NodeJS and NPM with NVM!
curl -o- https://raw.githubusercontent.com/nvm-sh/nvm/v0.39.1/install.sh | bash
nvm install node
Install Yarn!
npm install -g yarn
If you already have NPM installed via Brew or NVM, I suppose you know what you are doing, so just get Yarn installed the way you like.
Why do we even need Yarn? Isn't it for JavaScript? Indeed! Anchor needs it to test our Solana programs using NodeJS.
Install Anchor!
cargo install --git https://github.com/project-serum/anchor anchor-cli --locked
Let's ensure we installed everything correctly; otherwise, you might end up with incomprehensible errors later, such as the dreaded error: no such subcommand: build-bpf. If you have no idea what I am talking about, just know that I suffered 😆
Copy-paste the whole thing in your terminal!
solana --version
rustup --version
rustc --version
cargo --version
yarn --version
🎬 Init
Set Solana to use a local network instead of a real blockchain network.
solana config set --url localhost
Init the project!
export proj=joketoearn
anchor init $proj
cd $proj
🚀 Your First Program
I will be using ⚓️ emoji when we implement the Solana program and 🧢 when we call that program like a frontend app.
⚓️ Implement the Solana Program Using Anchor
Since we are creating a social joke app, let's add a function to send jokes.
Open programs/joketoearn/src/lib.rs and copy-paste this instead of the boilerplate code:
use anchor_lang::prelude::*;

declare_id!("Fg6PaFpoGXkYsidMpWTK6W2BeZ7FEfcYkg476zPFsLnS");

#[program]
pub mod joketoearn {
    use super::*;
    pub fn create_joke(ctx: Context<CreateJokeCtx>, joke_content: String) -> ProgramResult {
        msg!("joke_content: {}", &joke_content);
        Ok(())
    }
}

#[derive(Accounts)]
pub struct CreateJokeCtx {}
⚠️ Your `declare_id must be different than mine; just use yours if it differs.
This is not a Rust tutorial, nor do we want to learn all the keywords as they constantly evolve with the frameworks, but here are the essential pieces:
declare_idis the id/address of your program; why do you need an id? Well, since your program lives in communion with other programs on the blockchain, we need a way to identify your program.- We define our
create_jokefunction, which takes ajoke_content: Stringand prints it withmsg! - Every function we create in Anchor needs that first argument
ctx: Context<>, it is a way to tell Anchor what metadata we need for our function; we will see later below how to use it.
🧢 Put on Your Frontend Cap, Let's Try the Program
Ok, let's try to call our program. Instead of implementing a frontend app, we can leverage the tests that Anchor has set up for us. Earlier, we installed JavaScript libraries, now is the time to use them; Anchor set up for you a NodeJS app to use as a client.
When running anchor test, this is not just a unit test; this will actually:
- Spin up a local Solana blockchain node.
anchor build+anchor deployyour program on it.- Run the tests.
The workflow is similar to how you would be calling your Solana program from a client such as an iOS or a web app, or even a backend service. The tests will help us skip all the frontend setup we would have to do otherwise.
Let's implement the tests jump to tests/joketoearn.ts and replace the content with:
import * as anchor from '@project-serum/anchor';
import { Program } from '@project-serum/anchor';
import { Joketoearn } from '../target/types/joketoearn';
describe('joketoearn', () => {
anchor.setProvider(anchor.Provider.env());
const program = anchor.workspace.Joketoearn as Program<Joketoearn>;
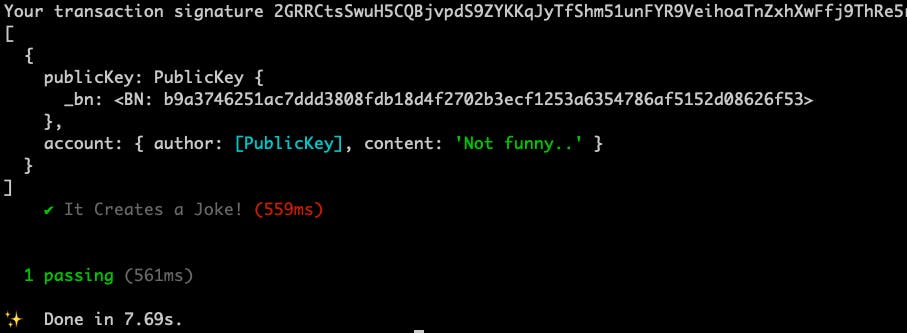
it('It Creates a Joke!', async () => {
const tx = await program.rpc.createJoke('Not funny..');
console.log("Your transaction signature", tx);
});
});
👨🏻🍳 Here's the recipe to call a blockchain program
- Get a connection to a blockchain.
- Reference the program you want to talk to.
- Call the function on the program.
1. Connecting to a blockchain
Provider is a helper to provide a connection to a blockchain.
Remember? Your code is deployed on the blockchain, and where is that blockchain? There are different endpoints for each environment, your localhost, testnet, staging, mainnet (production), etc. In our case, it defaults to localhost.
2. Get our program
Ok, we connected to the localhost blockchain node; now we need to get a hand on our program; why can't we just call a URL like 127.0.0.1:3000/create_joke?
Your program is not exposed on the Internet directly; it lives on the blockchain. Also, a blockchain node doesn’t just execute your program, which means you share the processing power with other people's programs. So we need to specify to the blockchain which program we want to talk to.
For the tests, Anchor already did that for us const program = anchor.workspace.Joketoearn, but you will need to use the program address we declared with declare_id in an actual client.
3. Remote procedure call
Finally, we do a remote procedure call, note that our function create_joke has been renamed createJoke
Let’s run those tests!
anchor test

Check the logs!
cat .anchor/program-logs/Fg6PaFpoGXkYsidMpWTK6W2BeZ7FEfcYkg476zPFsLnS.joketoearn.log
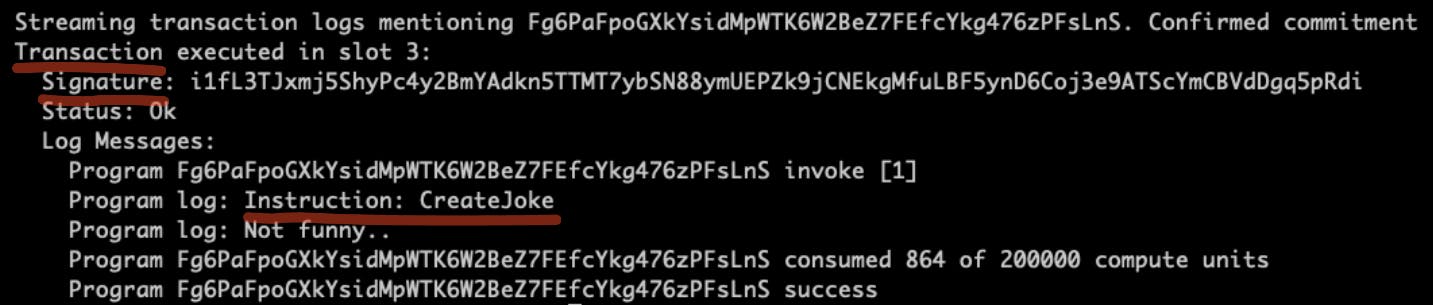
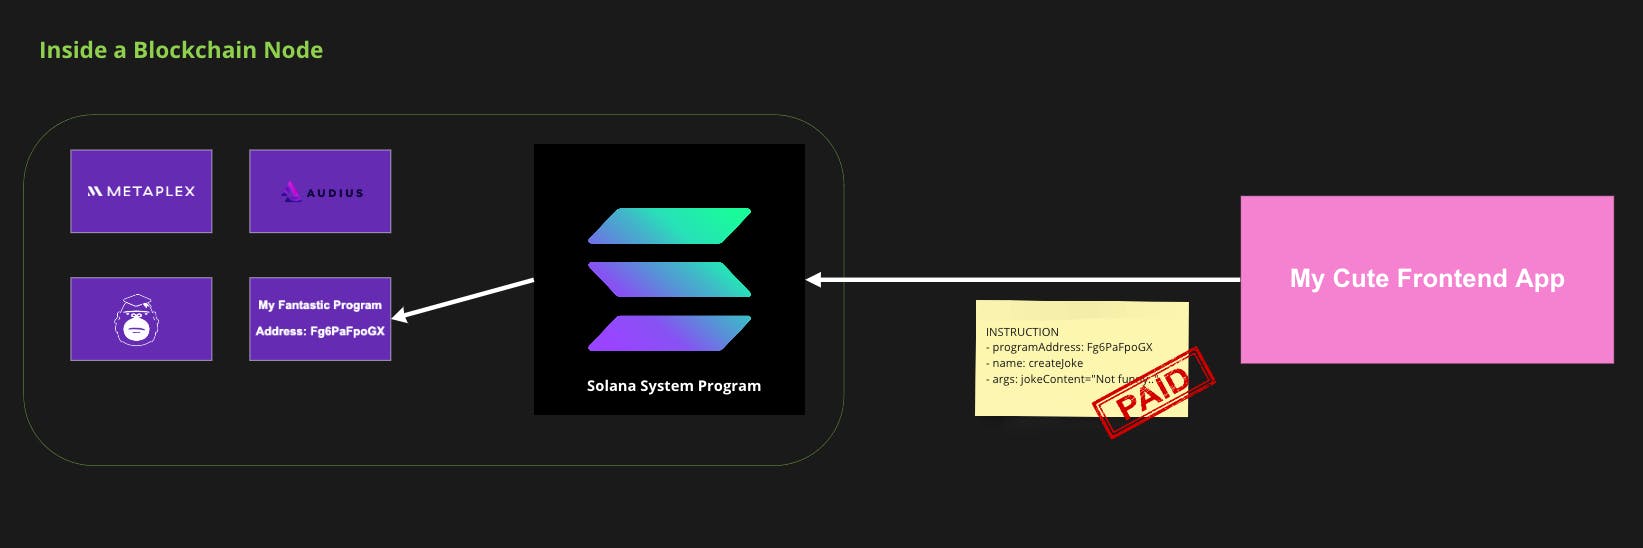
🧐🧐🧐 Transactions? Instructions? Signature?
In the blockchain world, we do not call functions, we craft instructions, and we send those instructions to the blockchain's system program, in that case, Solana System Program.
🥳 REPHRASED: in the blockchain world, we do not call functions or APIs directly; we craft transactions 💌 which instruct 📝 the System Program (the hivemind program 👁) what to do. We also sign ✍️ these letters to prove that we paid for posting 📬 that letter.
A transaction is just a list of instructions; in our case, it does not matter since we will only send one instruction at a time.
It sounds like having a super assembler program on the Internet, where we would instruct that shared assembler program to do stuff.
🚀 Creating Jokes
⚓️ Anchor Side
All right, we know how to talk to Solana, nice. Now that communication basics are out of the way, let's tackle creating these jokes.
Let's define a data structure for it where we will keep:
- The author of the joke.
- The actual joke.
Getting the author's public key
How can we identify the author of the joke? If it were a typical backend tutorial, we would talk about boring stuff like registering a user's email and password, sending him a confirmation email, etc.
HELL NO!
So how do we get the user identifier if we haven't created a user yet?
In Web3, users connect to the blockchain using a wallet app like Metamask or Phantom. So there is no need to create a user; they already have a user ID (ahem... I mean a user’s public address); we just ask for it.
If we think about the UX, it is similar to OAuth, where the user would authenticate with a wallet app instead of Twitter or Google.
🧐 What are Wallets?
Like the traditional apps where we need to log in, you need to be authenticated in the blockchain world every time you do something. But, in blockchain, we don't use logins and passwords; we use a signature ✍️. And a wallet provides a way to sign.
Instead of having a dozen user accounts with Google, Twitter, etc.. you have one identity, that identity, that pen, that signature, that stamp sits with you and be used everywhere. You show the gatekeepers your pen, your signature, the chain acknowledges your identity, and boom, welcome to Web3 land!
By the way, you can also create multiple wallets if you want various identities.
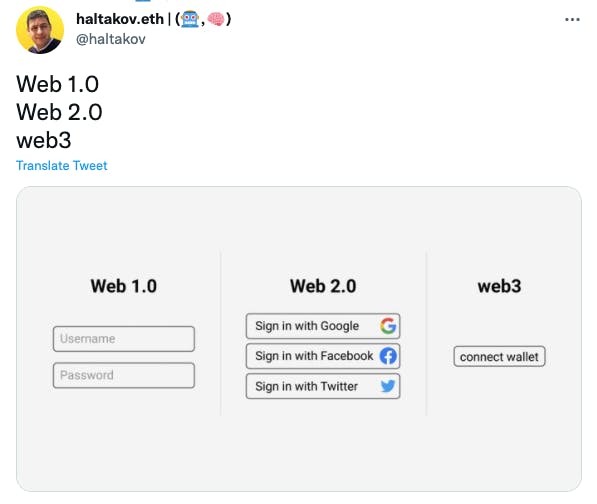
Source: @haltakov.eth
🤷♂️ Why Wallets?
Now you are thinking, we were just fine with user accounts. Who had the bizarre idea to create wallets, and why do you even care? If you want to know more about wallets, please check out this post: blog.matanwrites.com/why-do-we-need-wallets...
⚓️ Ask Anchor for the Author of the Transaction
Remember? When the user calls our create_joke function, he does a transaction. Modify the CreateJokeCtx:
#[derive(Accounts)]
pub struct CreateJokeCtx<'info> {
    pub authority: Signer<'info>,
    #[account(address = anchor_lang::solana_program::system_program::ID)]
    pub system_program: AccountInfo<'info>
}
authority: Signer: Authority is how we identify who thecreateJoketransaction's signer. Why is the typeSignerwhile we definedauthor: PubKeyin our struct? This is a hint to Anchor to verify that the givenPubKeyis not only a PubKey but also theSignerof the transaction, the person who signed and paid for it.- We also need the
system_program.I am not very sure why Solana cannot find itself!😹 But in all implementations that I have seen, this was required. (I will update if I know more about this) - Lastly, don't worry about all the
accountkeywords; we will deal with them later.
Still, in Anchor, modify create_joke:
pub fn create_joke(ctx: Context<CreateJokeCtx>, joke_content: String) -> ProgramResult {
    msg!("joke_content: {}", &joke_content);

    let pubkey = &*ctx.accounts.authority.key.to_string();
    msg!("pubkey: {}", pubkey);
    Ok(())
}
🧢 Frontend Side, Modify the Tests
Modify tests/joketoearn.ts
it('It Creates a Joke!', async () => {
  // 3. Call our Program

  const tx = await program.rpc.createJoke('Not funny..', {
    accounts: {
      authority: program.provider.wallet.publicKey,
      systemProgram: anchor.web3.SystemProgram.programId,
    },
    //signers: [program.provider.wallet],
  });

  console.log("Your transaction signature", tx);
});
- Take note of wallet.publicKey
is the user's wallet public address; you don't need to add it in thesigners: []` list because Anchor will automatically do that for you. systemProgram,as we said earlier, is necessary; it is Solana Master Program.
Test it!
anchor test
Check the logs!
cat .anchor/program-logs/Fg6PaFpoGXkYsidMpWTK6W2BeZ7FEfcYkg476zPFsLnS.joketoearn.log
You should see:
Program log: joke_content: Not funny..
Program log: pubkey: 5EsbC1VEAKY2qaFp6aszcXrf8VYQnjFZRWTGiGdzyBfK
🧐 IDLs
At this point, you might be thinking, “All of this is mysterious and magical.” I keep throwing code at you, but how are you supposed to know what our program looks like from the frontend side? Here's a secret 🤫, after every anchor build or anchor test, an IDL (interface description language) will be produced. That file describes what our program API looks like; it's here target/idl/joketoearn.json
{
  "version": "0.1.0",
  "name": "joketoearn",
  "instructions": [
    {
      "name": "createJoke",
      "accounts": [
        {
          "name": "authority",
          "isMut": false,
          "isSigner": true
        },
        {
          "name": "systemProgram",
          "isMut": false,
          "isSigner": false
        }
      ],
      "args": [
        {
          "name": "jokeContent",
          "type": "string"
        }
      ]
    }
  ],
  "metadata": {
    "address": "Fg6PaFpoGXkYsidMpWTK6W2BeZ7FEfcYkg476zPFsLnS"
  }
}
- Our
createJokeis an instruction and expects something calledaccounts. - Note the
metadata.addresswhich is the address of our Program.
Another nicety of Anchor tests is that we don't need to care about this, but if you build your frontend, you will have to fetch that IDL, so the frontend knows how to call your program. I will show how to do this in the frontend part.
🚀 Storing and Passing Data with Accounts
🧾 A World of Accounts
It's time to reveal the truth 🤓. I have been hiding this all along, but everything is about these mysterious accounts. You are ready to know.
The translation of our program into an IDL proves it; our createJoke instruction expects an array of accounts:
"instructions": [
    {
      "name": "createJoke",
      "accounts": [
        {
          "name": "authority",
          "isMut": false,
          "isSigner": true
        },
        {
          "name": "systemProgram",
          "isMut": false,
          "isSigner": false
        }
      ],
    ...
It expects an array of accounts because we told Anchor to #[derive(Accounts)] from the CreateJokeCtx Instruction Context
pub fn create_joke(ctx: Context<CreateJokeCtx> ...)

#[derive(Accounts)]
pub struct CreateJokeCtx<'info> {
...
}
🙄 What are These Accounts?
In Solana, programs are stateless; they store data separately into what we call accounts.
⚠️ I was confused initially, but keep that in mind, it is a faux-ami (fake friend in french). It is not what you think, and it is not a traditional email/password/user, etc...
As described by the official docs:
Accounts are similar to files in operating systems such as Linux in that they may hold arbitrary data that persists beyond the lifetime of a program.
An account is just how Solana deals with data on the chain. It is just a buffer of bytes, and there are some rules to encode data properly into that buffer of bytes.
⚓️ Save the Joke as an Account
So hopefully, Anchor is here to the rescue and has been helping us with all these weird # macros. Let's add a struct and define it as an #[account]. This way, Anchor can handle our struct's proper serialization/deserialization into an account shape.
Below pub struct CreateJokeCtx add this:
#[account]
pub struct Joke {
    pub author: Pubkey,  // this is the authority we worked so hard to get earlier
    pub content: String,
}
Create space for the Joke Account We have defined our struct, but we still haven't materialized that data. In Web2, we would:
- Create the struct.
- Save that to the DB.
- End of story.
Web3 glasses on! 🤓
We have a few things to consider. To save our struct, we need to tell Solana:
- How much space do we want in the blockchain. Remember? We are using "public goods" so we can't use as much space as we want.
- Who is going to pay for it? Not me! Same as above, "public goods" = we are renting the space.
- Who owns that data? Yes, you heard the user can own the data; data to the people!
Modify CreateJokeCtx:
#[derive(Accounts)]
pub struct CreateJokeCtx<'info> {
    #[account(init, payer = authority, space = 2000)]
    pub joke_account: Account<'info, Joke>,

    #[account(mut]
    pub authority: Signer<'info>,

    #[account(address = anchor_lang::solana_program::system_program::ID)]
    pub system_program: AccountInfo<'info>
}
Explanation:
#[account(init, payer = authority, space = 2000)]
pub joke_account: Account<'info, Joke>
Ok, these two lines are proper to Anchor. What they mean under the hood is:
- Tell Solana how much space our joke struct represent as an account.
- Tell who will pay for that space, here the authority field (told you not me, so the signer of the transaction).
- Ask Solana to materialize that space.
- Serialize and deserialize the account, an array of bytes into something usable for us: the joke
struct.
Lastly, note the additional #[account(mut)] above authority
#[account(mut)]
pub authority: Signer<'info>
This code says that the transaction create_joke should be allowed to mutate the signer's account. Why? Because we need to make users pay for the space allocated for the joke and deduct sol from their wallets 🥳.
So we can finally modify our create_joke function to:
pub fn create_joke(ctx: Context<CreateJokeCtx>, joke_content: String) -> ProgramResult {
    let joke: &mut Account<Joke> = &mut ctx.accounts.joke_account;
    joke.author = *ctx.accounts.authority.key;
    joke.content = joke_content;
    Ok(())
}
⚠️ space = 2000 You need to figure out how much space you need to store as the price is relative to the space you are creating. For our tutorial, it doesn’t matter, but you should modify this if you deploy on mainnet as users will pay real sol.
**Another paradigm of Web3 is that you need to pay to store your data. In Web2, you used to pay your web server or whatever provider you were using, or maybe they provided everything for free!
In Web3, we store our data to the public blockchain, so we need to pay rent to store that data. Also, what does it mean to own your data? Here it means that only the user can modify the data, so we need a way to manage permissions for data.
🧢 Final Jump to the Other Side
Create an account
So from the other side, what does our program need?
It needs an account for our jokeAccount; look at what we did for the authority and systemProgram accounts previously. Solana can find an account using its public address.
Remember, remember, remember: Accounts are... 🥁🥁 just like files or 📦 to store data.
So Solana was looking for the boxes of the user wallet and the SystemProgram by using SystemProgram.programId and wallet.publicKey:
const tx = await program.rpc.createJoke('not funny..', {
  accounts: {
    jokeAccount: something.publicKey???,

    authority: program.provider.wallet.publicKey,
    systemProgram: anchor.web3.SystemProgram.programId,
  },
  signers: [something],
});
SystemProgram and the user wallet already exist on-chain; that is why Solana can find those by their public addresses. The account does not exist yet, but our program will create it.
Remember? We just defined space etc., above.
So what we need to do here is not to create an account but rather create an address for the account:
  it('It Creates a Joke!', async () => {
    // Create an address for the soon-to-be created Account
    const jokeAccountKeypair = anchor.web3.Keypair.generate()

    // Craft the createJoke Instruction
    const tx = await program.rpc.createJoke('Not funny..', {
      accounts: {
        jokeAccount: jokeAccountKeypair.publicKey,
        authority: program.provider.wallet.publicKey,
        systemProgram: anchor.web3.SystemProgram.programId,
      },
      signers: [jokeAccountKeypair]
    });

    console.log("Your transaction signature", tx);
  });
Speaking of accounts, have you noticed that systemProgram also goes into accounts? Programs and Solana System Program is an account! Solana stores programs as read-only accounts on the chain.
If you are curious about the additional
signers, read the Going Further section later.
🏁🍾 The Grand Final in One Minute
Cool, but we have been working in the dark. It would be nice to retrieve the data to see that it works and pass it to other jokesters.
The good news is we don't have to create another function in our Solana program, nor do we have to pay!
In your tests tests/joketoearn.ts 🧢, just add this to fetch data from all jokes accounts:
...
console.log("Your transaction signature", tx);

// Fetch all joke accounts
const jokes = await program.account.joke.all();
console.log(jokes);
anchor test
🤩 Et voila!
📒 Recap
Congrats!! 👏
This wasn’t a short tutorial, but you acquired new skills and understood the client/blockchain flow. You learned the difference between working with a blockchain compared to traditional web services, you spoke in transactions instead of REST APIs, you grasped the idea of signing, you got horrified by the idea of paying for space and transactions. 🤣
These, my friend, are skills that you can re-apply to any blockchain. If you want to dive deeper into Solana, you can follow the Solana series on my blog. There are also other very cool tutorials here:
- lorisleiva.com/create-a-solana-dapp-from-sc..
- buildspace.so/learn-solana
- dev.to/dabit3/the-complete-guide-to-full-st..
The final code is here: https://github.com/matanwrites/solana-JokeToEarn Live example here: https://solana-joke-to-earn.vercel.app
You should see how Solana does things directly. Anchor is just some sugar that reduces some code, and if you want to dive deeper, you should also understand what Anchor is doing for you. You can take a look at solanacookbook.com and compare it to your Anchor code.
By the way, Solana is not the easiest blockchain. Rust and accounts are a bit more involved. Ethereum developer tools are more mature, and Solidity is simpler to write. But both ecosystems are as exciting, and with time and as more people come in, Solana will evolve as well.
And finally, don't think about Web3 > Web2; a blockchain is just a new tool in your toolbox, a new way of doing things. From a tech perspective, look at the ecosystem and the cultural and social changes these new applications will enable.
Cheers 🍻
🗓 Next
We will complete the circle with the frontend so you can have the full-stack DApp:
- We will deploy our Program to a real Solana chain.
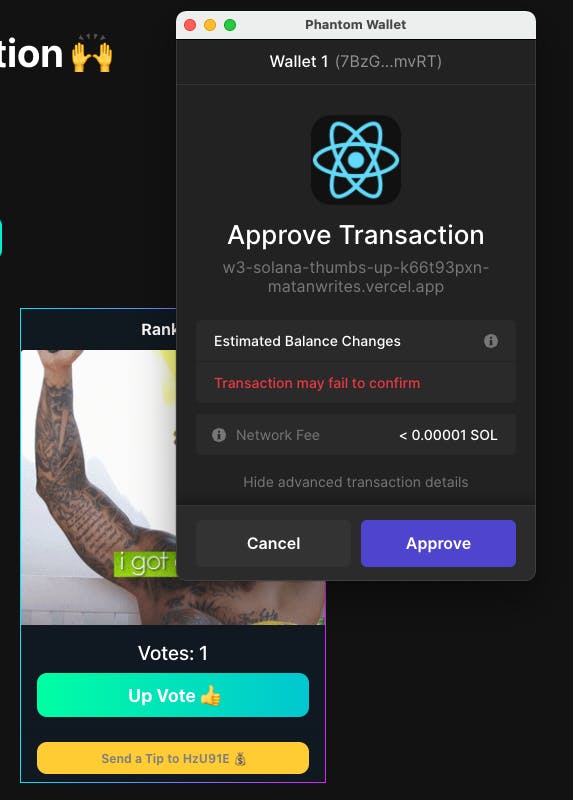
- We will make a simple frontend app to talk to our program.
- We will see how the UX work with a Wallet App and start signing and paying for transactions (you still haven't paid anything because we were using anchor tests 😈)
😱 Going Further
Come back here after you uncharged your brain on love island!
Talking to Other People's Programs
const data = await program.account.ACCOUNT_NAME.all();
This code means you can fetch data from any Solana program deployed on the chain; for that, you would need its IDL:
- Get the address of the program you want to call.
- Get the IDL of the program to know what the program looks like.
You can fetch the IDL with the following code:
anchor idl fetch PROGRAM_ADDRESS
Program addresses are public! Teams and projects are encouraged to publish their addresses. Since your code is on a public blockchain, it is unnecessary to hide it. It opens up so many possibilities.
Can you think about any? I would love to hear your thoughts below!
For example, here's how to get the contract for one of my pet projects: vercel.com/matanwrites/w3-solana-thumbs-up
anchor idl fetch EGWf3mBuwhvjmR134QfzKGMo8EgtsC4ieMP3D6mxWFXq --provider.cluster devnet
Why did we need the additional jokeAccountKeypair as a Signer?
  it('It Creates a Joke!', async () => {
    // Create an address for the soon-to-be created Account
    const jokeAccountKeypair = anchor.web3.Keypair.generate()

    // Craft the createJoke Instruction
    const tx = await program.rpc.createJoke('Not funny..', {
      accounts: {
        jokeAccount: jokeAccountKeypair.publicKey,
        authority: program.provider.wallet.publicKey,
        systemProgram: anchor.web3.SystemProgram.programId,
      },
      signers: [jokeAccountKeypair]
    });

    console.log("Your transaction signature", tx);
  });
To understand that, let's look at what happens in our Solana program in the following code:
#[account(init, payer = authority, space = 2000)]
pub joke_account: Account<'info, Joke>,
- Make the authority (
wallet.publicKey) pay; anchor automatically added the user wallet as a signer. - Once paid, materialize an account.
- Set the account address to the
jokeAccount: jokeAccountKeypair.publicKey.
Now, let's say you are the user, and instead of creating a new jokeAccountKeypair, you replaced it with lauraJokeAccountKeypair. What would happen would be that:
- You will pay for the account.
- The program will materialize the account.
- Set the account address to laura's
jokeAccount! So you will be overriding her joke, basically 😅.
That is why it is crucial to make sure the account's public address is owned by you also, and you prove that by providing the private key to that public key address.
Are You Ready for Checkout?
It's time to pay, literally. Another paradigm of Web3 is that you need to pay to store your data; in Web2, you used to pay your web server or whatever provider you were using, or maybe they provided everything for free! In Web3, we store our data in the public domain, so we need to pay rent to store that data, so let's do that. We need to ask Solana to lend us some land!
Let's see what the market prices are:
Open a new Terminal and run a local ledger:
solana-test-validator
Back to your main terminal, check the rent for 2kb of data:
solana rent 2
Rent per byte-year: 0.00000348 SOL
Rent per epoch: 0.000002477 SOL
Rent-exempt minimum: 0.0009048 SOL
There is a simple solution that everyone is currently going for, instead of regularly paying per epoch, if you spend enough for two years of rent, you are set for life: docs.solana.com/implemented-proposals/rent#...
References
- Solana Wallet Adapter Library
- Solana Programming Model - Accounts
- Solana Cookbook Accounts
- Accounts Constraints with Anchor
- More about Accounts
- Solana Architecture
- Defining the Web3 Stack
Editor: Ϗ