

How to Build a Full Stack Allowlist dApp For Your NFT Collection on Polygon
A Step-by-Step Tutorial to Build and Deploy a Full Stack Allowlist dApp on Polygon using Hardhat, Web3Modal, Next.js, and Alchemy.
What are We Building
In this tutorial, we will be building a full stack allowlist dApp for an NFT collection on Polygon, where users get access to the presale if their wallet address is allowlisted.
For the purposes of this tutorial, we will be "launching" an NFT collection called Dev N Date. There will be 143 allowlist spots available. Only one list spot per wallet address. We will build and deploy a smart contract with a full frontend website where users connect their wallets to join the allowlist.
By the end of this tutorial, you will be able to:
- Build and deploy a smart contract on Polygon.
- Ship a full stack dApp using Vercel.
- Push your locally hosted project repository code to GitHub.

Functionalities
- Users will be able to interact with the contract by connecting their wallets via the frontend of the dApp.
- Users will be able to join the allowlist by adding their wallet addresses to the
allowlistedAddressesarray after the wallet connection.
Tech Stack
Technologies and development tools we'll use in this tutorial include: Polygon, ReactJS, Hardhat, MetaMask, Node.js, Next.js, Alchemy, Web3Modal, and Vercel.
Prerequisites
- An Alchemy account
- Have a MetaMask wallet
- Have Git installed on your machine
- Have Node.js installed on your machine
- Basic understanding of JavaScript and React
- Wallet funded with test MATIC from Polygon Faucet
Set Up Development Environment
Hardhat Project
We will be using Hardhat to develop our smart contract. Hardhat is an Ethereum development environment and framework designed for full stack smart contract development in Solidity.
First, let's create a allowlist-dApp project directory where the Hardhat and Next.js project will live.
Open up a terminal and run these commands:
mkdir allowlist-dApp
cd allowlist-dApp
Now, let's set up the Hardhat project in the allowlist-dApp project directory.
mkdir hardhat
cd hardhat
npm init --yes
npm install --save-dev hardhat
In the same directory where you installed Hardhat, run the following command to create a new project using npx
npx hardhat
Select Create a Javascript project
- Press enter for the already specified
Hardhat Project root - Press enter for the prompt on if you want to add a
.gitignore - Press enter for the prompt "Do you want to install this sample project's dependencies with npm (@nomicfoundation/hardhat-toolbox)?"
Our Hardhat project environment is now set up!
Note: Windows users need to run this additional command to install these libraries:
npm install --save-dev @nomicfoundation/hardhat-toolbox
Environment Variables
Create a .env file in the hardhat project directory and add the following lines of code. Follow the instructions below to complete the .env file:
To get your Alchemy API Key URL, go to the dashboard and click on
+CREATE APP. Fill out the name and details for the application. ChoosePolygonfor CHAIN andPolygon Mumbaifor NETWORK.To get your private key, you need to export it from MetaMask. Open MetaMask, click on the three dots, click on
Account Detailsand thenExport Private Key. Make sure to fund the wallet you're pulling the private key from.
// Go to https://www.alchemyapi.io, sign up, create
// Assign the HTTPS API key URL to the ALCHEMY_API_KEY_URL variable
// by replacing "add-the-alchemy-key-url-here"
ALCHEMY_API_KEY_URL="add-the-alchemy-key-url-here"

// Assign the private key to the MUMBAI_PRIVATE_KEY variable
// by replacing "add-the-mumbai-private-key-here"
// DO NOT FUND THIS ACCOUNT WITH REAL MONEY ONLY TEST MATIC FROM FAUCET
MUMBAI_PRIVATE_KEY="add-the-mumbai-private-key-here"
Install the dotenv package to be able to import the .env file and use it in our hardhat config file.
Open up a terminal pointing to the hardhat project directory and execute this command:
npm install dotenv
Hardhat Configs
Now open the hardhat.config.js file, we will now add the Mumbai network here so we can deploy our contract to Polygon's Mumbai Testnet. Replace all the lines in the hardhat.config.js file with the below lines of code:
require("@nomicfoundation/hardhat-toolbox");
require("dotenv").config({ path: ".env" });

const ALCHEMY_API_KEY_URL = process.env.ALCHEMY_API_KEY_URL;

const MUMBAI_PRIVATE_KEY = process.env.MUMBAI_PRIVATE_KEY;

module.exports = {
  solidity: "0.8.9",
  networks: {
    mumbai: {
      url: ALCHEMY_API_KEY_URL,
      accounts: [MUMBAI_PRIVATE_KEY],
    },
  },
};
Writing the Smart Contract
Once our project is set up, let's create a new file named Allowlist.sol or rename the Lock.sol file inside the contracts folder/directory and replace the file with the below code
Note: Make sure to delete the
Lock.solfile if you choose to create a new file and delete thetestfolder
This Allowlist.sol contract sets the maximum number of wallet addresses that can be allowlisted. The user sets the value at time of deployment. The contract's addAddressToWhitelist function adds the allowlisted addresses to the allowlistedAddress array and keep track of the number of addresses added to not exceed the maximum limit of 143.
//SPDX-License-Identifier: MIT
pragma solidity ^0.8.9;

contract Allowlist {
    uint8 public maxAllowlistedAddresses;

    mapping(address => bool) public allowlistedAddresses;

    uint8 public numAddressesAllowlisted;

    constructor(uint8 _maxAllowlistedAddresses) {
        maxAllowlistedAddresses = _maxAllowlistedAddresses;
    }

    function addAddressToAllowlist() public {
        require(
            !allowlistedAddresses[msg.sender],
            "Wallet address has already been allowlisted"
        );
        require(
            numAddressesAllowlisted < maxAllowlistedAddresses,
            "More wallet addresses cannot be added, maximum number allowed reached"
        );
        allowlistedAddresses[msg.sender] = true;
        numAddressesAllowlisted += 1;
    }
}
Deploy Scripts
We're deploying the contract to Polygon's Mumbai network. Create a new file or replace the default file named deploy.js under the scripts folder.
Now, we will write some code in deploy.js file to deploy the smart contract.
const { ethers } = require("hardhat");

async function main() {
  const allowlistContract = await ethers.getContractFactory("Allowlist");

  const deployedAllowlistContract = await allowlistContract.deploy(143);

  await deployedAllowlistContract.deployed();

  console.log("Allowlist Contract Address:", deployedAllowlistContract.address);
}

main()
  .then(() => process.exit(0))
  .catch((error) => {
    console.error(error);
    process.exit(1);
  });
Compile & Deploy Contract
To compile the contract, open up a terminal pointing at the hardhat project directory and execute this command:
npx hardhat compile
To deploy the contract, open up a terminal pointing at the hardhat directory and execute this command:
npx hardhat run scripts/deploy.js --network mumbai
Save the Allowlist Contract Address: 0x....... that was printed to your console/terminal. Either in your notepad or as a comment in your Allowlist.sol smart contract source code. You'll need this contract address later in the tutorial.
Building The Frontend
We'll use React and Next.js to build our frontend. First, create a new next app. To create our next-app, point to the allowlist-dApp project directory in the terminal and run the following command:
npx create-next-app@latest
Press enter for all prompts. Your folder structure should look something like this:
- allowlist-dApp
    - hardhat
    - my-app
Now run the local development environment by running these commands in the terminal:
cd my-app
npm run dev
Go to http://localhost:3000 where your app should be running locally on your machine. Now lets install Web3Modal library. Web3Modal is an easy to use library to help developers easily allow users to connect to your dApps with various wallets. By default Web3Modal supports injected providers like MetaMask, DApper, Gnosis Safe, Frame, Web3 Browsers, and WalletConnect.
Open up a terminal pointing to the my-app directory and execute this command:
npm install web3modal
Install ethers.js in the same terminal by running this command:
npm install ethers
In your my-app/public folder, download this image and rename it to dev-date.svg. Now go to styles folder and replace all the code in the Home.modules.css file with the following code to add some styling to your dApp:
.main {
  min-height: 90vh;
  display: flex;
  flex-direction: row;
  justify-content: center;
  align-items: center;
  font-family: "Helvetica", Courier, monospace;
}

.footer {
  display: flex;
  padding: 2rem 0;
  border-top: 1px solid #eaeaea;
  justify-content: center;
  align-items: center;
}

.image {
  width: 100%;
  height: 95%;
  margin-left: 10%;
}

.title {
  font-size: 2rem;
  margin: 2rem 0;
}

.description {
  line-height: 1;
  margin: 2rem 0;
  font-size: 1.2rem;
}

.button {
  border-radius: 4px;
  background-color: red;
  border: none;
  color: #ffffff;
  font-size: 15px;
  padding: 20px;
  width: 200px;
  cursor: pointer;
  margin-bottom: 2%;
}
@media (max-width: 1000px) {
  .main {
    width: 100%;
    flex-direction: column;
    justify-content: center;
    align-items: center;
  }
}
Open your index.js file under the pages folder and paste the following code. Make sure you read about React, React Hooks, and React Hooks Tutorial if you are not familiar with them.
import Head from "next/head";
import styles from "../styles/Home.module.css";
import Web3Modal from "web3modal";
import { providers, Contract } from "ethers";
import { useEffect, useRef, useState } from "react";
import { ALLOWLIST_CONTRACT_ADDRESS, abi } from "../constants";
export default function Home() {
const [walletConnected, setWalletConnected] = useState(false);
const [joinedAllowlist, setJoinedAllowlist] = useState(false);
const [loading, setLoading] = useState(false);
const [numberOfAllowlisted, setNumberOfAllowlisted] = useState(0);
const web3ModalRef = useRef();
const getProviderOrSigner = async (needSigner = false) => {
const provider = await web3ModalRef.current.connect();
const web3Provider = new providers.Web3Provider(provider);
const { chainId } = await web3Provider.getNetwork();
if (chainId !== 80001) {
window.alert("Change the network to MUMBAI");
throw new error("Change network to MUMBAI!");
}
if (needSigner) {
const signer = web3Provider.getSigner();
return signer;
}
return web3Provider;
};
const addAddressToAllowlist = async () => {
try {
const signer = await getProviderOrSigner(true);
const AllowlistContract = new Contract(
ALLOWLIST_CONTRACT_ADDRESS,
abi,
signer
);
const tx = await AllowlistContract.addAddressToAllowlist();
setLoading(true);
await tx.wait();
setLoading(false);
await getNumberOfAllowlisted();
setJoinedAllowlist(true);
} catch (err) {
console.error(err);
}
};
const getNumberOfAllowlisted = async () => {
try {
const provider = await getProviderOrSigner();
const AllowlistContract = new Contract(
ALLOWLIST_CONTRACT_ADDRESS,
abi,
provider
);
const _numberOfAllowlisted = await allowlistContract.numAddressesAllowlisted();
setNumberOfAllowlisted(_numberOfAllowlisted);
} catch (err) {
console.error(err);
}
};
const checkIfAddressInAllowlist = async () => {
try {
const signer = await getProviderOrSigner(true);
const allowlistContract = new Contract(
ALLOWLIST_CONTRACT_ADDRESS,
abi,
signer
);
const address = await signer.getAddress();
const _joinedAllowlist = await allowlistContract.allowlistedAddresses(
address
);
setJoinedAllowlist(_joinedAllowlist);
} catch (err) {
console.error(err);
}
};
const connectWallet = async () => {
try {
await getProviderOrSigner();
setWalletConnected(true);
checkIfAddressInAllowlist();
getNumberOfAllowlisted();
} catch (err) {
console.error(err);
}
};
const renderButton = () => {
if (walletConnected) {
if (joinedAllowlist) {
return (
<div className={styles.description}>
Thanks for joining the allowlist!
</div>
);
} else if (loading) {
return <button className={styles.button}>Loading...</button>;
} else {
return (
<button onClick={addAddressToAllowlist} className={styles.button}>
Join Allowlist
</button>
);
}
} else {
return (
<button onClick={connectWallet} className={styles.button}>
Connect Wallet
</button>
);
}
};
useEffect(() => {
if (!walletConnected) {
web3ModalRef.current = new Web3Modal({
network: "mumbai",
providerOptions: {},
disableInjectedProvider: false,
});
connectWallet();
}
}, [walletConnected]);
return (
<div>
<Head>
<title>Allowlist DApp</title>
<meta name="description" content="allowlist-Dapp" />
<link rel="icon" href="/favicon.ico" />
</Head>
<div className={styles.main}>
<div>
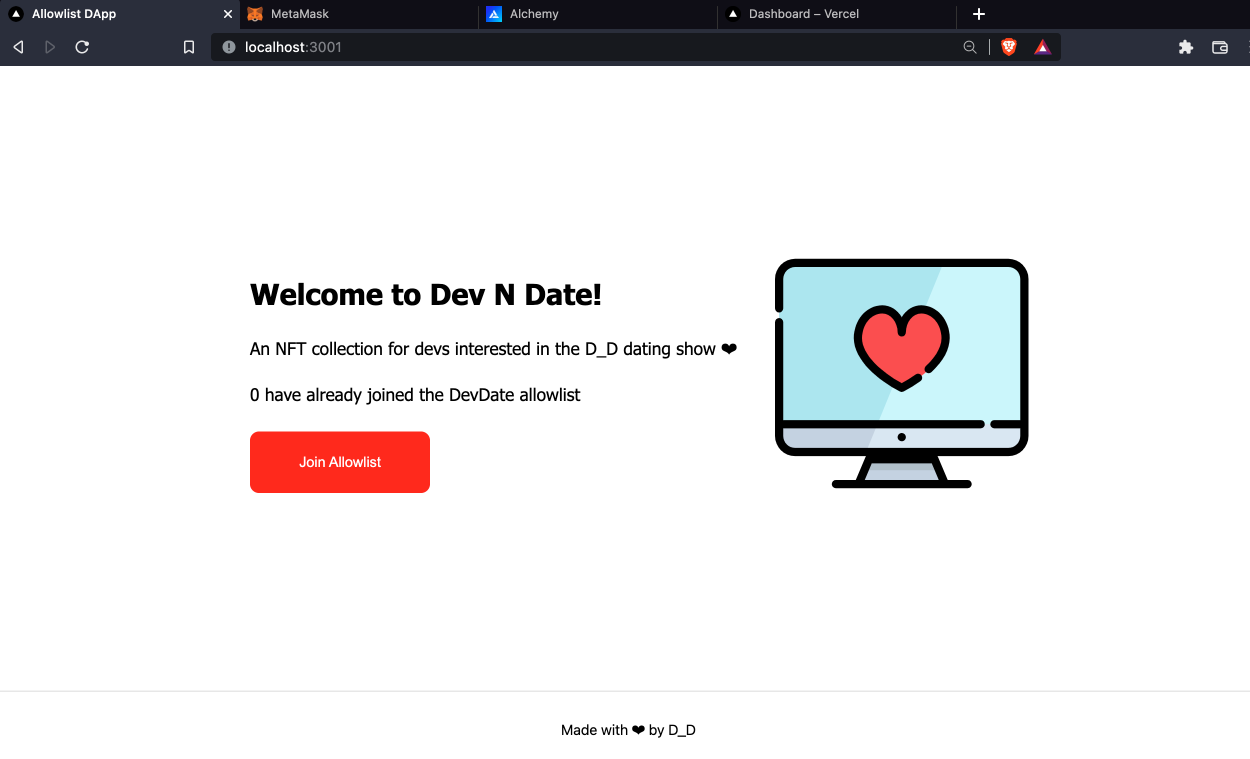
<h1 className={styles.title}>Welcome to Dev N Date!</h1>
<div className={styles.description}>
An NFT collection for developers interested in D_D dating show ❤
</div>
<div className={styles.description}>
{numberOfAllowlisted} have already joined the DevDate allowlist
</div>
{renderButton()}
</div>
<div>
<img className={styles.image} src="./dev-date.svg" />
</div>
</div>
<footer className={styles.footer}>
Made with ❤ by D_D
</footer>
</div>
);
}
Create a new folder under the my-app project directory and name it constants. In the constants folder create a new index.js file and paste the following code:
export const ALLOWLIST_CONTRACT_ADDRESS = "YOUR_ALLOWLIST_CONTRACT_ADDRESS";
export const abi = YOUR_ABI;
Replace YOUR_ALLOWLIST_CONTRACT_ADDRESS with the address of the allowlist contract that you deployed earlier in the tutorial.
Replace YOUR_ABI with the ABI of your allowlist contract. To get the ABI for your contract, go to your hardhat/artifacts/contracts/Allowlist.sol folder and from your Allowlist.json file get the array marked under the "abi" key (it will be a huge array, close to 100+ lines).
In your terminal, pointing to my-app project directory, run the following command:
npm run dev
Congrats buildooor, your allowlist dApp should work without errors!
Push To GitHub
Before proceeding, push all your locally hosted code to GitHub.
Next Steps: Deploy with Vercel
If you're up for it, you can deploy your Next.js frontend application with Vercel.
- Go to Vercel and sign in with your GitHub account.
- Click the
New Projectbutton and select your project repo. - Vercel allows you to customize your
Root Directory. - Click
Editnext toRoot Directoryand set it tomy-app. - Select the Framework as
Next.js. - Click
Deployand now the frontend for your allowlist dApp is deployed!
If you're interested in learning about generative art for your next NFT collection, check out this article from our friends at Surge!
Additional Resources
- Project reference code
- PolygonScan Mumbai Explorer
- How To Push all your code to GitHub here.
- Women Build Web3's #30DaysofWeb3 curriculum.
Where to Find Me
Feel free to reach out to me with any questions on Twitter @theekrystallee or show me what you learned on TikTok @theekrystallee.
Happy building 🧱


