

Build Your Own NFT Collection with QuickNode and Optimism
Actively looking for Smart Contract Developer, DevRel and Technical Writer Role.
ex Smart Contract Developer @Lighthouse | Technical Writer | @QuickNode Ambassador | @chainlink Developer Expert & Community Advocate | Contributor @Developer_DAO, @LearnWeb3DAO and @eden
Built over 70 dapps and published 19 tutorials in web3
Building and deploying your own NFT collection can be time and money-consuming, especially with the gas prices on Ethereum. With the rise of layer-2 solutions and cheap RPCs, this doesn't have to be the case! This tutorial will explain building an NFT Collection using the ERC-721 token standard. You will store all NFT assets and metadata on IPFS with QuickNode and deploy the smart contract on Optimism Goerli Testnet.

Requirements
A basic understanding of Solidity development will be helpful but is not required.
A basic understanding of the ERC-721 token standard will be helpful but is not required.
A basic understanding of the Remix IDE will be helpful but is not required.
Image assets and metadata of the NFT collections.
MetaMask or any other wallet and a small amount of Goerli test ETH.
A free QuickNode account.
What is QuickNode IPFS?
The QuickNode IPFS service lets you store data decentralized using IPFS. Your files are automatically spread and replicated across global data centers, ensuring redundancy and distribution throughout the network.
What is Optimism?
Optimism is a layer-2 scaling solution that Ethereum developers choose for its speed and low transaction costs while maintaining full compatibility with the EVM.
What are the Steps?
Store NFT assets and metadata on QuickNode IPFS.
Create and deploy an ERC-721 contract on the Optimism Goerli Testnet.
Interact with the Smart Contract to mint NFTs
View your NFTs on OpenSea.
Storing Files on IPFS
First, you upload your images and metadata via QuickNode.
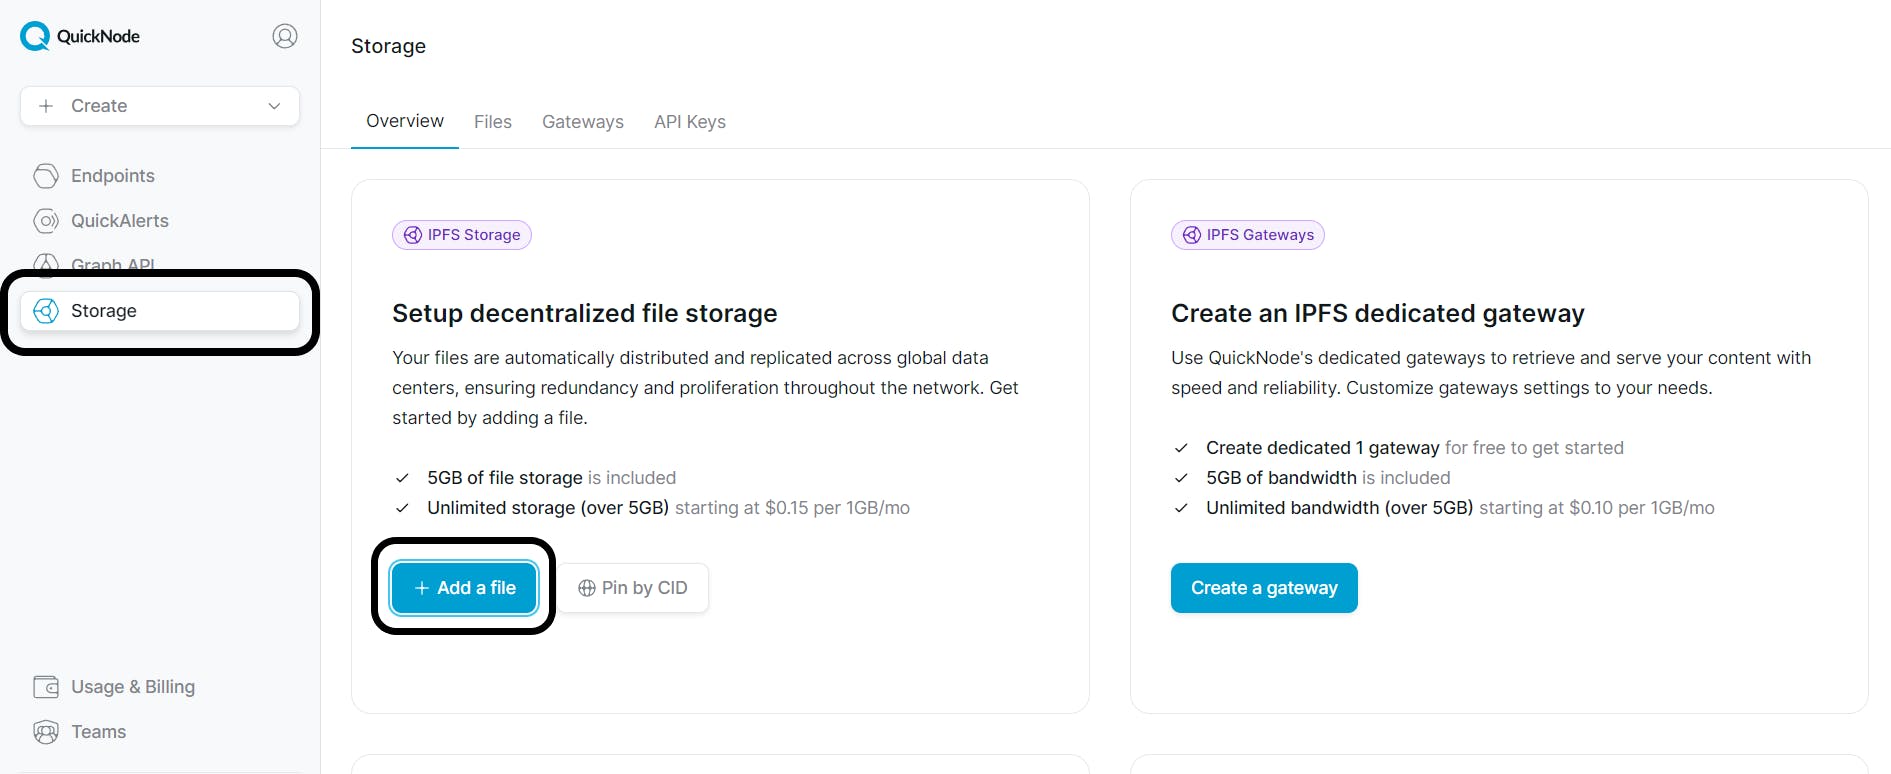
Open the QuickNode website and navigate to the "Storage" section. Click the Add a file button and select the file from your local machine.
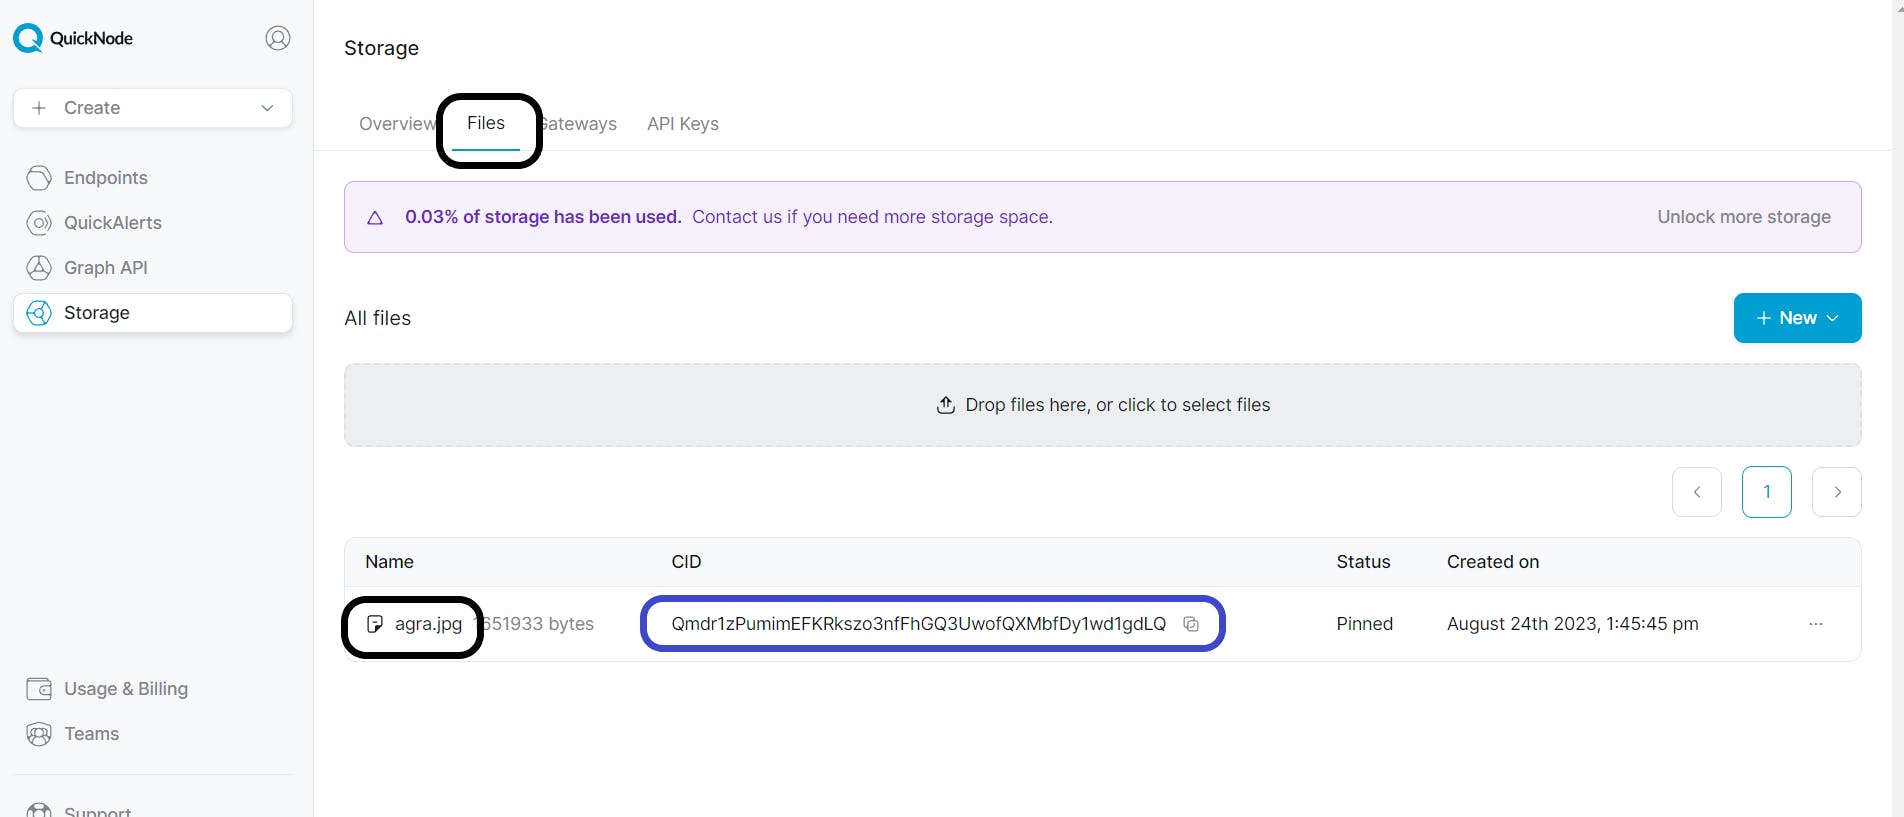
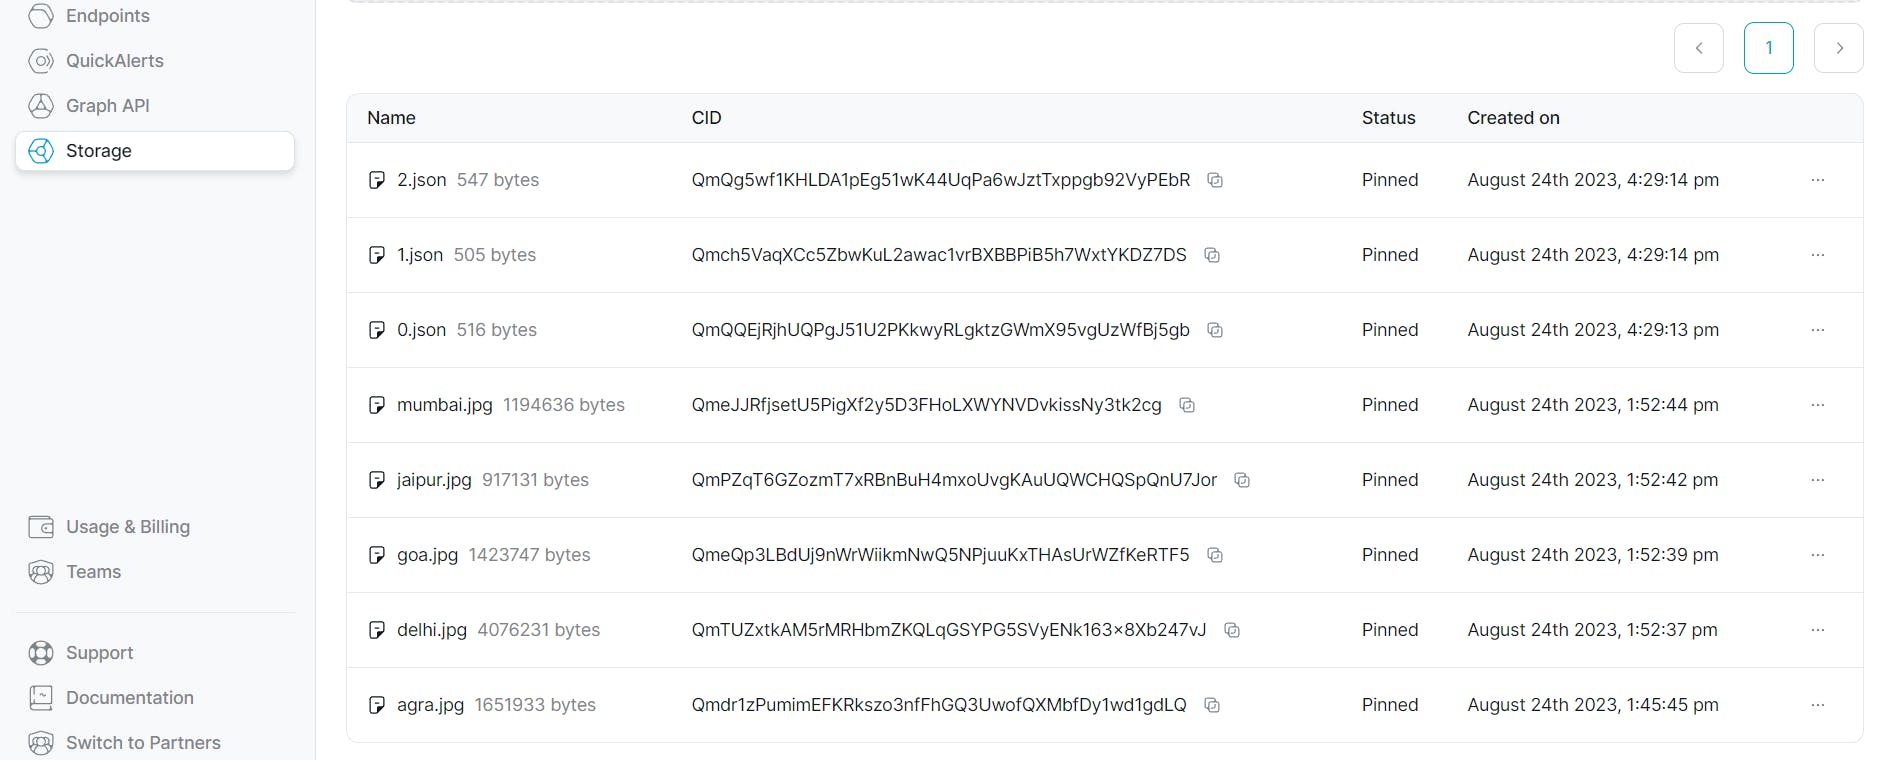
After you upload the file, it will appear like this, showing the file name, CID, status, and other information about the file.
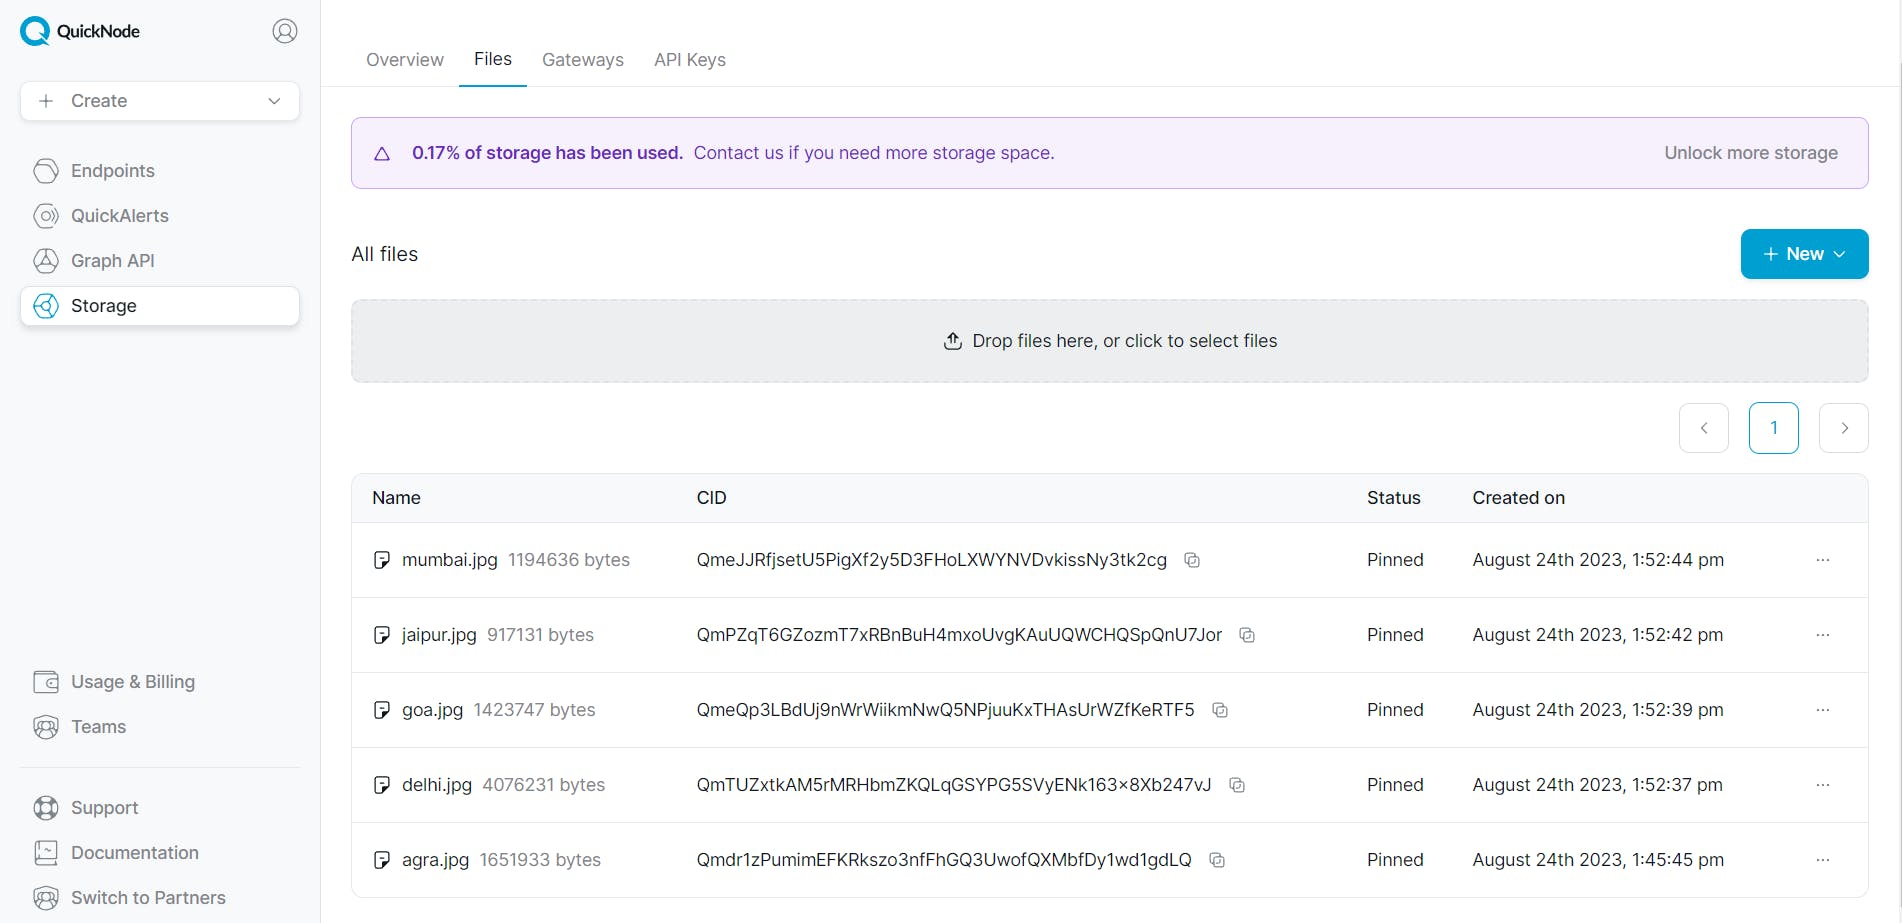
Upload images for each of the NFTs. You'll find all the images on GitHub. The outcome will look similar to this.
Create three JSON metadata files to store information about our NFT collections.
0.json: Agra collection1.json: Delhi collection2.json: Goa collection
The 0.json file should look something like this:
{
  "name": "Agra",
  "description": "Agra is a historic city in northern India, renowned for the iconic Taj Mahal, a marble mausoleum. It's a UNESCO World Heritage site and symbolizes love and architectural splendor. Agra also boasts Agra Fort and Fatehpur Sikri, both reflecting the city's Mughal heritage and attracting countless tourists for their cultural significance.",
  "image": "ipfs://Qmdr1zPumimEFKRkszo3nfFhGQ3UwofQXMbfDy1wd1gdLQ",
  "properties": {
    "rarity": "a bit rare",
    "fanciness": 8
  }
}
name: Contains the name of the NFT.
description: Contains the description of the NFT.
image: Includes the link to the previously obtained image (IPFS URL).
properties: Encompasses the various attributes of the NFT.
Create the remaining JSON files, 1.json and 2.json, for the Delhi and Goa collections. You'll find the Metadata example on GitHub.
Similarly, upload your metadata folder to QuickNode IPFS. Once successfully uploaded, it will appear as shown:
You can view the JSON file by clicking on the filename in the QuickNode IPFS dashboard.
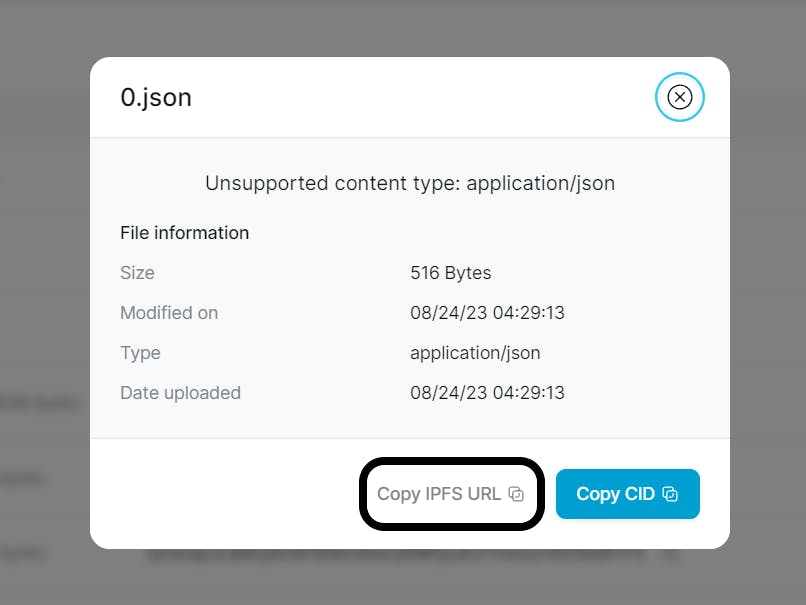
Now, click "COPY IPFS URL" to copy the CID and the gateway link, allowing you to access the file. For example, this is the link to the 0.json file.
https://quicknode.quicknode-ipfs.com/ipfs/QmQQEjRjhUQPgJ51U2PKkwyRLgktzGWmX95vgUzWfBj5gb

Creating & Deploying the NFT Smart Contract
Use the OpenZeppelin contracts library to create an ERC-721 contract and deploy it on the Optimism Goerli Testnet using the Remix IDE. Ensure you have some Goerli Ether, which you can get from the Quicknode Optimism Faucet.
Create a new file named QuickNft.sol in Remix IDE and paste the following code:
// SPDX-License-Identifier: MIT
pragma solidity 0.8.17;

import "@openzeppelin/contracts/token/ERC721/extensions/ERC721Enumerable.sol";
import "@openzeppelin/contracts/access/Ownable.sol";
import "@openzeppelin/contracts/utils/Strings.sol";

error NFT_NOT_EXIST();
error YOU_ALREADY_MINTED_NFT();
error ALL_NFTS_ARE_MINTED();

contract QuickNft is ERC721Enumerable, Ownable {
    uint256 public supplies = 500;
    uint256 public minted;
    string[] public cid = [
        "ipfs://QmQQEjRjhUQPgJ51U2PKkwyRLgktzGWmX95vgUzWfBj5gb",
        "ipfs://Qmch5VaqXCc5ZbwKuL2awac1vrBXBBPiB5h7WxtYKDZ7DS",
        "ipfs://QmQg5wf1KHLDA1pEg51wK44UqPa6wJztTxppgb92VyPEbR"
    ];

    constructor() ERC721("QuickNft", "QNN") {}

    /**
     * @notice function to put NFT on Opensea
     * @param _cidId ID of the metadata of NFT we want to mint
     * @dev tokenURI overrides the Openzeppelin's ERC721 implementation for tokenURI function
     * This function returns the URI from where we can extract the metadata for a given tokenId
     */
    function tokenURI(
        uint256 _cidId
    ) public view virtual override returns (string memory) {
        if (_cidId >= cid.length) revert NFT_NOT_EXIST();
        return string(abi.encodePacked(cid[_cidId]));
    }

    /**
     * @notice function to mint the NFT
     * @param _cidId CID ID to select the metadata of your choice
     */
    function mint(uint256 _cidId) public {
        if (_cidId >= cid.length) revert NFT_NOT_EXIST();
        if (minted + 1 > supplies) revert ALL_NFTS_ARE_MINTED();
        _safeMint(msg.sender, minted);
        unchecked {
            ++minted;
        }
    }

    /**
     * @notice function to get total number of NFTs minted
     */
    function totalNftMinted() public view returns (uint256) {
        return minted;
    }
}
Let's break down the above Solidity smart contract code line by line:
// SPDX-License-Identifier: MIT
This line specifies the license identifier for the contract. In this case, it's indicating that the contract is under the MIT License.
pragma solidity 0.8.17;
This pragma sets the version of Solidity. In this case, the compiler will use version 0.8.17 of Solidity for the compilation.
import "@openzeppelin/contracts/token/ERC721/extensions/ERC721Enumerable.sol";
import "@openzeppelin/contracts/access/Ownable.sol";
import "@openzeppelin/contracts/utils/Strings.sol";
These lines are importing necessary contracts from the OpenZeppelin library. The the ERC721Enumerable contract helps to create an ERC-721 token that supports enumeration (listing tokens), the Ownable contract will provide basic ownership functionality and the Strings contract is used for manipulating strings.
error NFT_NOT_EXIST();
error YOU_ALREADY_MINTED_NFT();
error ALL_NFTS_ARE_MINTED();
These lines define custom error messages that we used in the contract.
contract QuickNft is ERC721Enumerable, Ownable {
This line defines the QuickNft contract, which inherits from ERC721Enumerable and Ownable, so the contract will be both an ERC-721 token (with enumeration capabilities) and have ownership functionality.
uint256 public supply = 500;
uint256 public minted;
These lines declare two state variables. supply represents the total number of NFTs available for minting, and minted keeps track of how many NFTs people minted so far.
string[] public cid = [
    "ipfs://QmQQEjRjhUQPgJ51U2PKkwyRLgktzGWmX95vgUzWfBj5gb",
    "ipfs://Qmch5VaqXCc5ZbwKuL2awac1vrBXBBPiB5h7WxtYKDZ7DS",
    "ipfs://QmQg5wf1KHLDA1pEg51wK44UqPa6wJztTxppgb92VyPEbR"
];
An array cid is defined, containing three IPFS URLs that represent the metadata of the NFTs.
constructor() ERC721("QuickNft", "QNN") {}
The contract's constructor initializes the ERC-721 token with "QuickNft" as the name and "QNN" as the symbol.
function tokenURI(uint256 _cidId) public view virtual override returns (string memory) {
    if (_cidId >= cid.length) revert NFT_NOT_EXIST();
    return string(abi.encodePacked(cid[_cidId]));
}
This function, tokenURI, overrides the default ERC721 behavior and returns the IPFS URL (metadata URI) associated with the given _cidId.
function mint(uint256 _cidId) public {
    if (_cidId >= cid.length) revert NFT_NOT_EXIST();
    if (minted + 1 > supplies) revert ALL_NFTS_ARE_MINTED();
    _safeMint(msg.sender, minted);
    unchecked {
        ++minted;
    }
}
The mint function allows users to mint NFTs. It checks if the _cidId is valid and the total number of minted NFTs is within the available supply. If this is the case, it mints a new NFT for the caller and increments the minted count.
function totalNftMinted() public view returns (uint256) {
    return minted;
}
The totalNftMinted function returns the total count of minted NFTs.
In case you don't have the Optimism Goerli Testnet set up in your wallet, follow these steps:
Creating an Optimism Endpoint on QuickNode
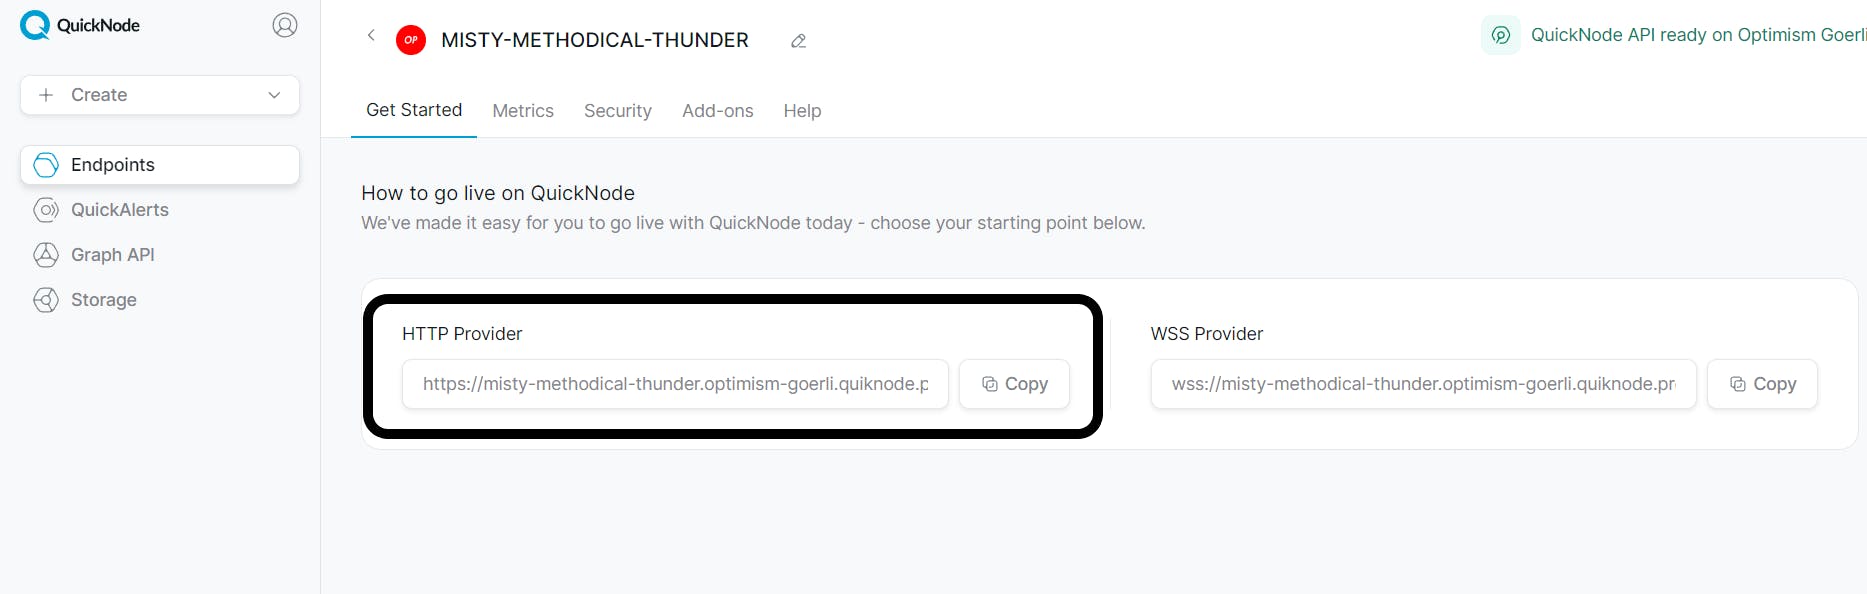
To deploy a smart contract to Optimism's test blockchain, Goerli, you'll need an API endpoint to communicate with the network. Go to the QuickNode Dashboard to configure it.
Once logged in, click the "Create an endpoint" button, then select the "Optimism" chain and "Goerli" network.
After creating your endpoint, copy the HTTP provider link and keep it handy, as you'll need it next.
Configuring Your Web3 Wallet with QuickNode
Configure your RPC settings if you're using MetaMask to deploy this contract. Some compatible wallets are Coinbase Wallet, Rainbow Wallet and TrustWallet.
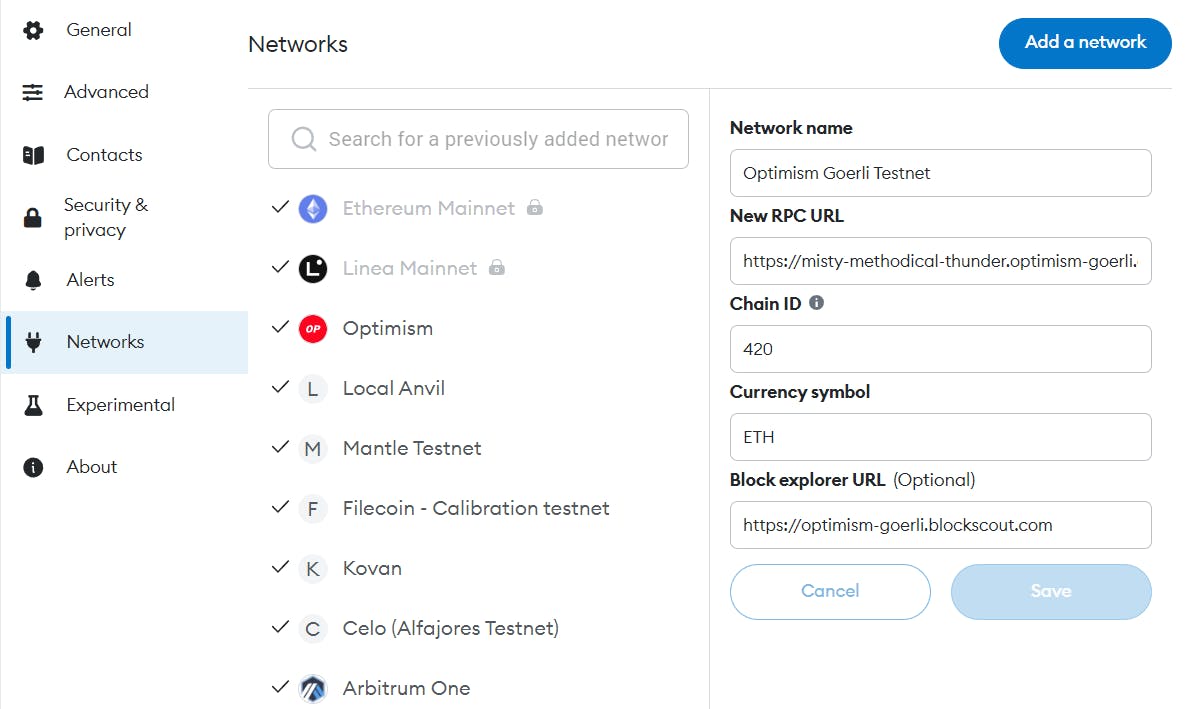
Open up MetaMask and click the network dropdown at the top. After, click the "Add Network" button.
At the bottom of the page, click "Add a network manually" and fill out the following details:
Network name: Optimism Goerli Testnet
New RPC URL: Enter the QuickNode HTTP URL you retrieved earlier
Chain ID: 420
Currency symbol: ETH
Block Explorer URL: https://optimism-goerli.blockscout.com
It should end up looking similar to this:
Compiling the Smart Contract
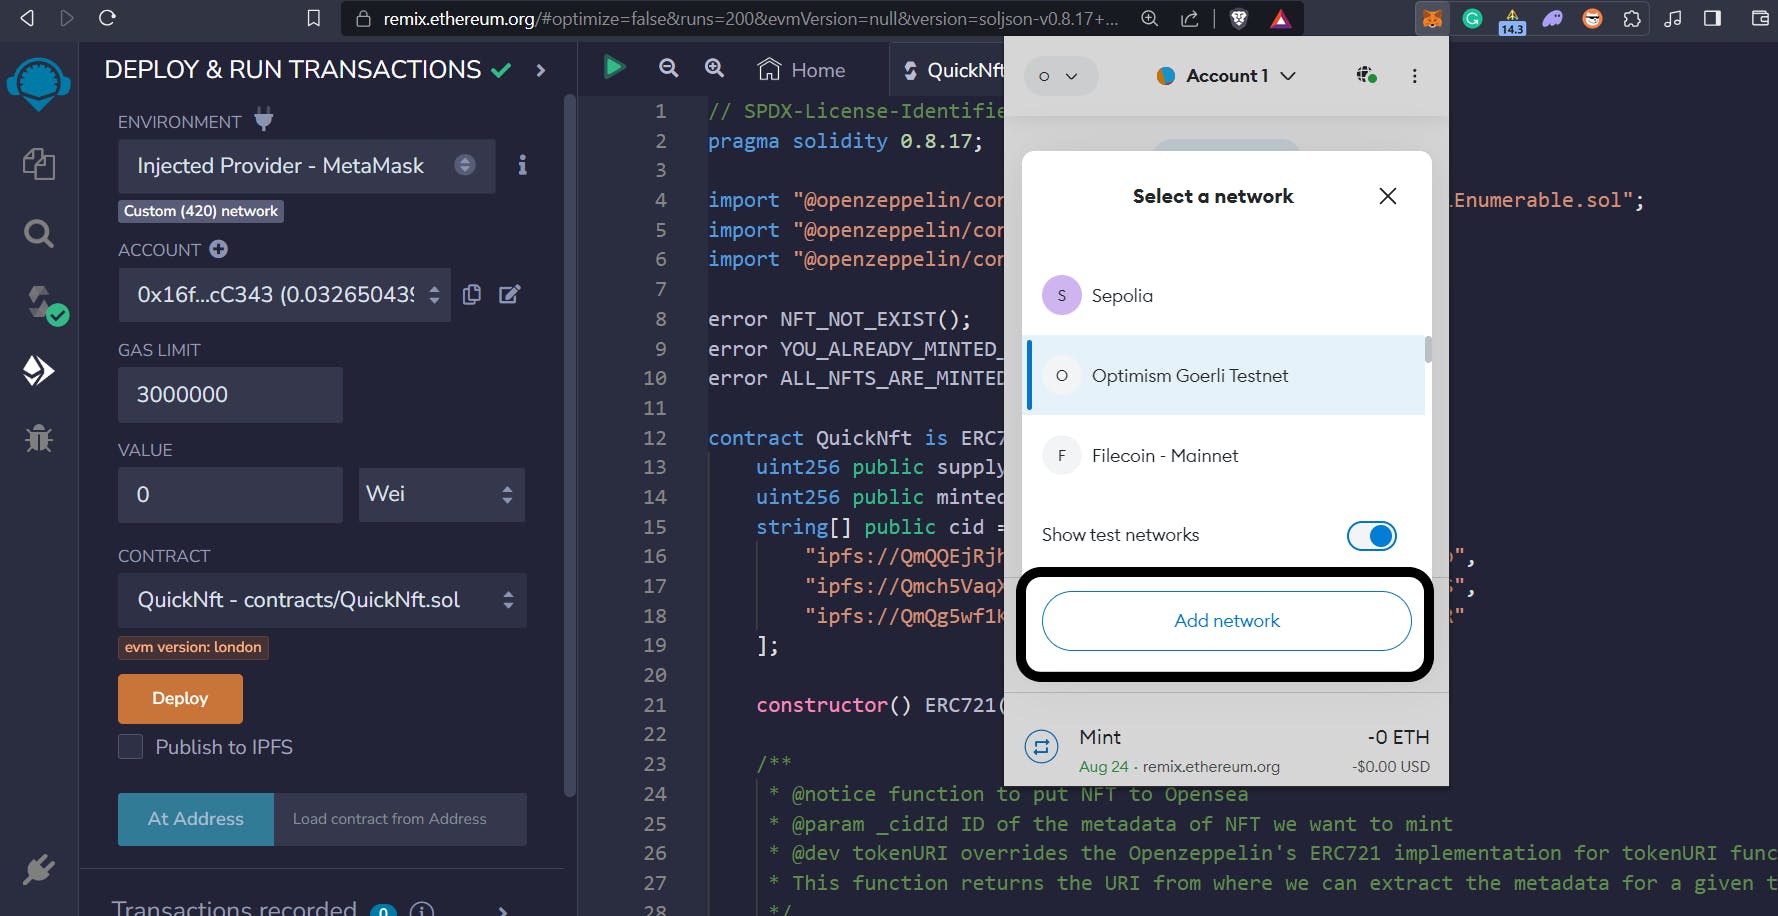
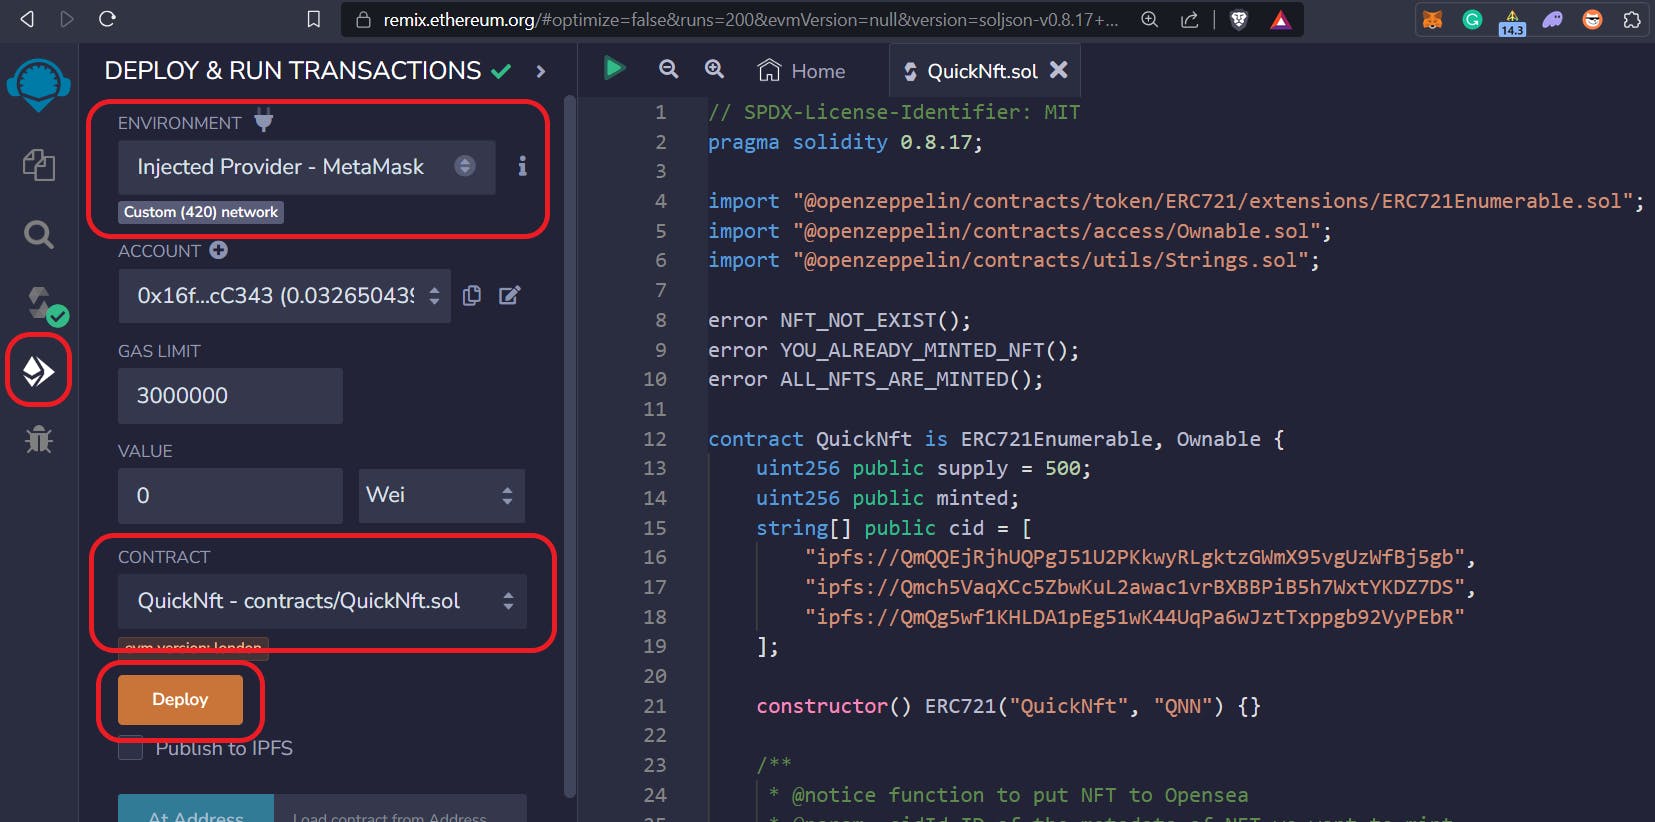
Open Remix IDE, copy and paste the above code, and navigate to the Deploy section. Select 'Injected Web3' as the environment, and deploy it by choosing the correct contract name. You need to select the chain on your MetaMask wallet. In our case, we are deploying it on the Optimism Goerli Testnet with chain ID 420. Click the Deploy button
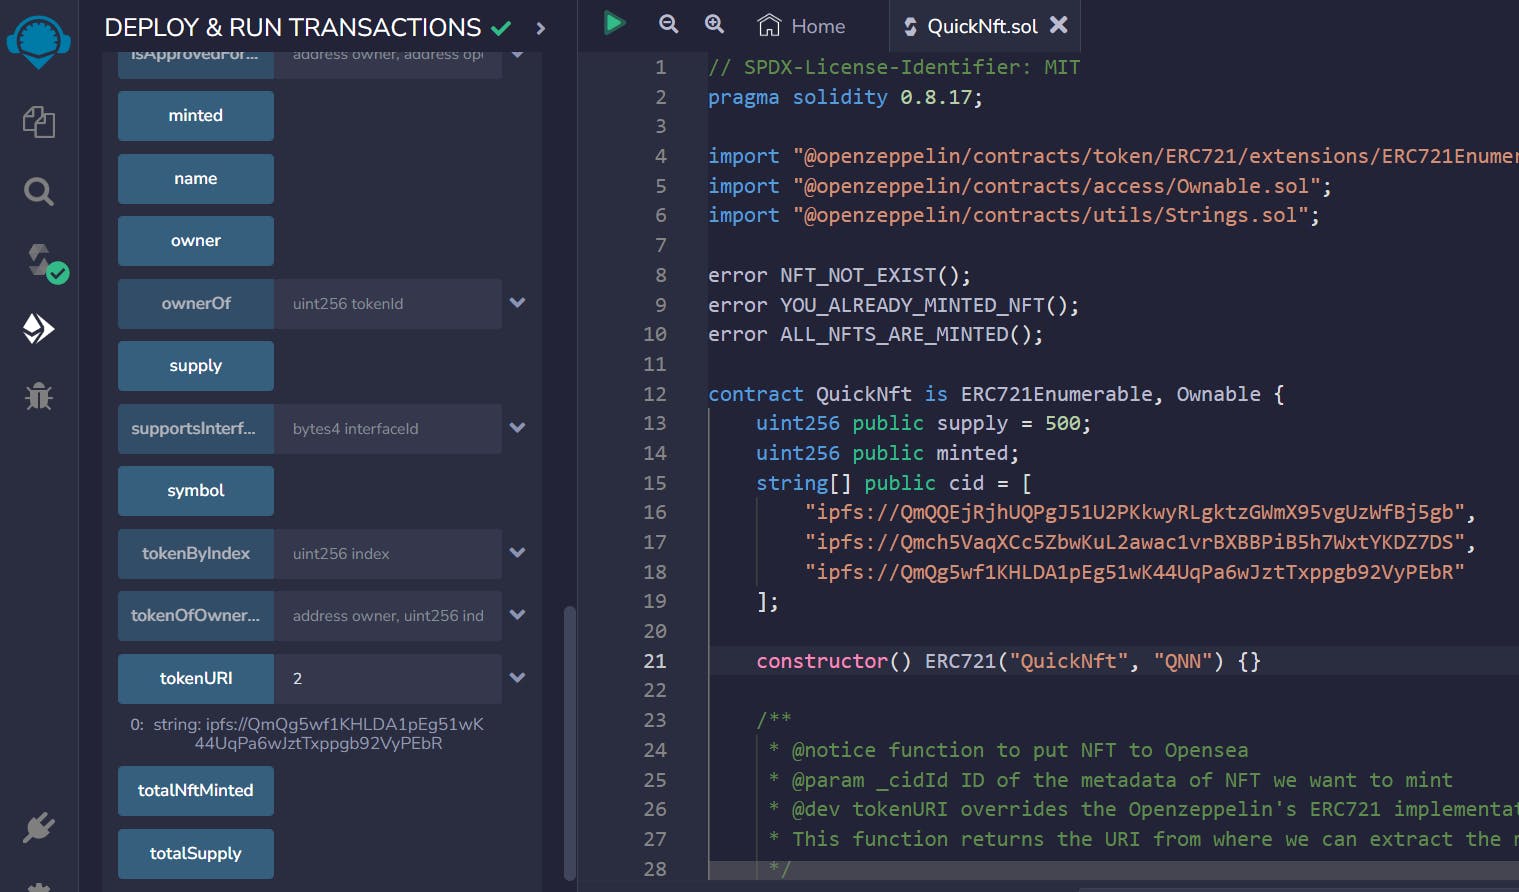
Approve the transaction on MetaMask by clicking the Confirm button. Once the transaction is complete, your contract will be deployed.

Now you can perform functions like mint NFT by entering CID ID. We can also retrieve the NFT URI by entering the CID ID.
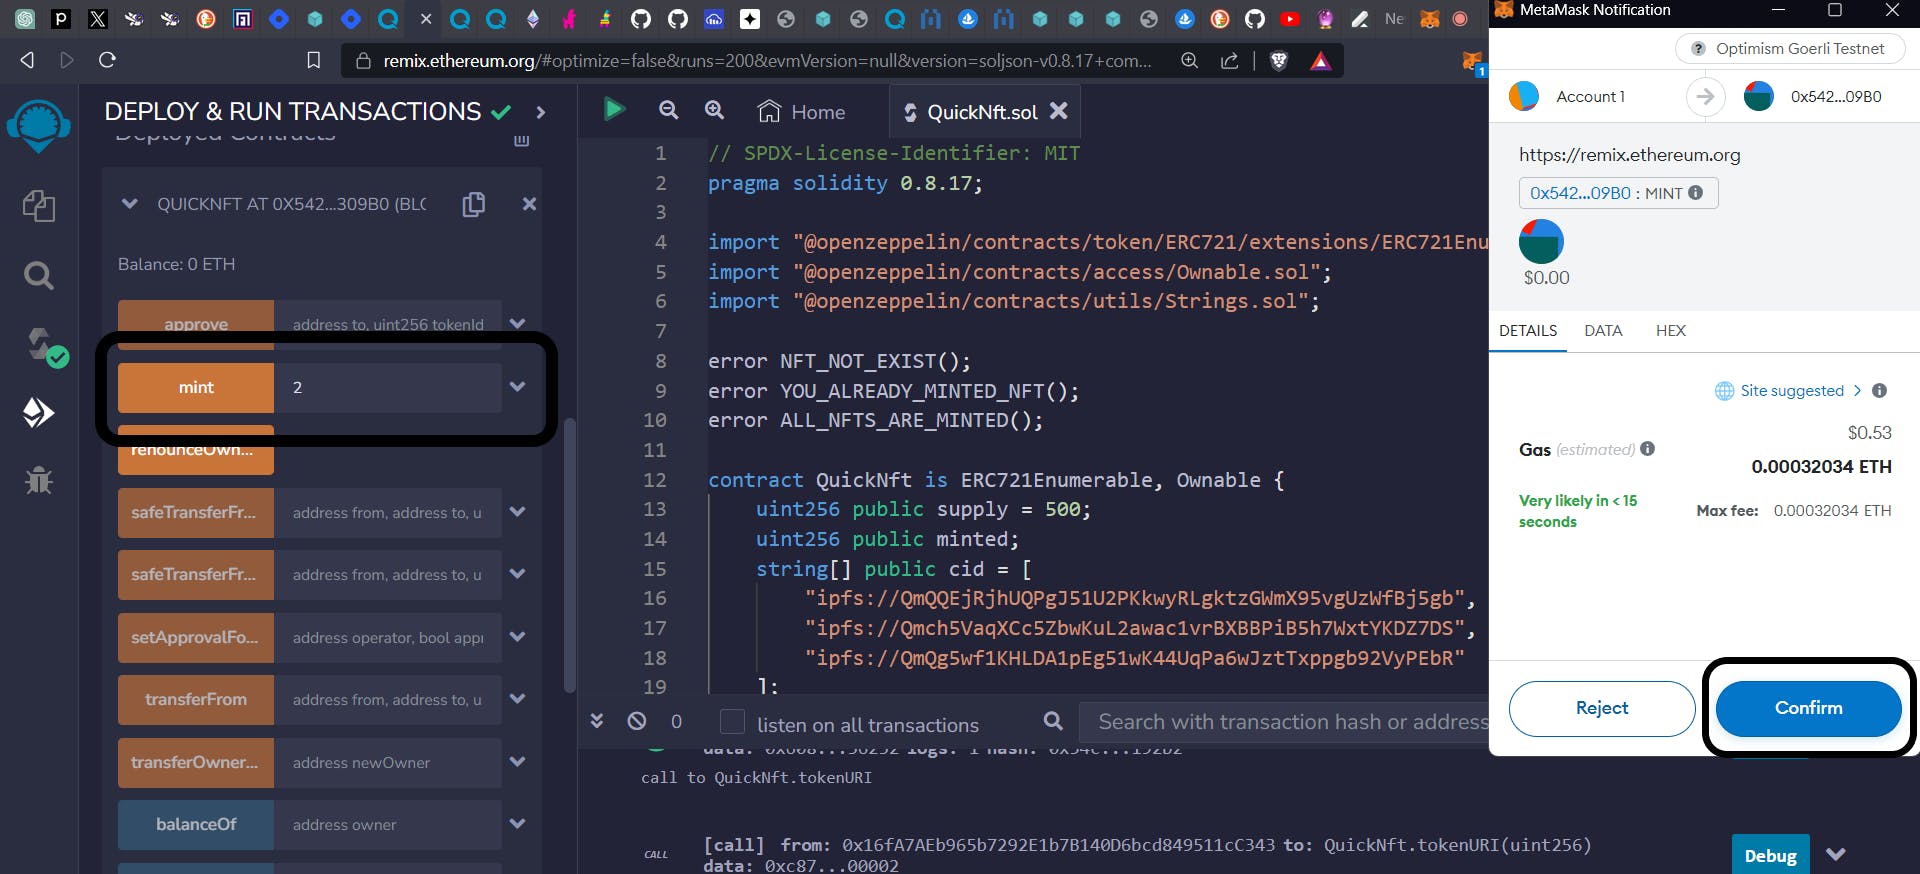
Minting an NFT
Enter the CID ID of the NFT you want to mint and click on the Confirm Button.
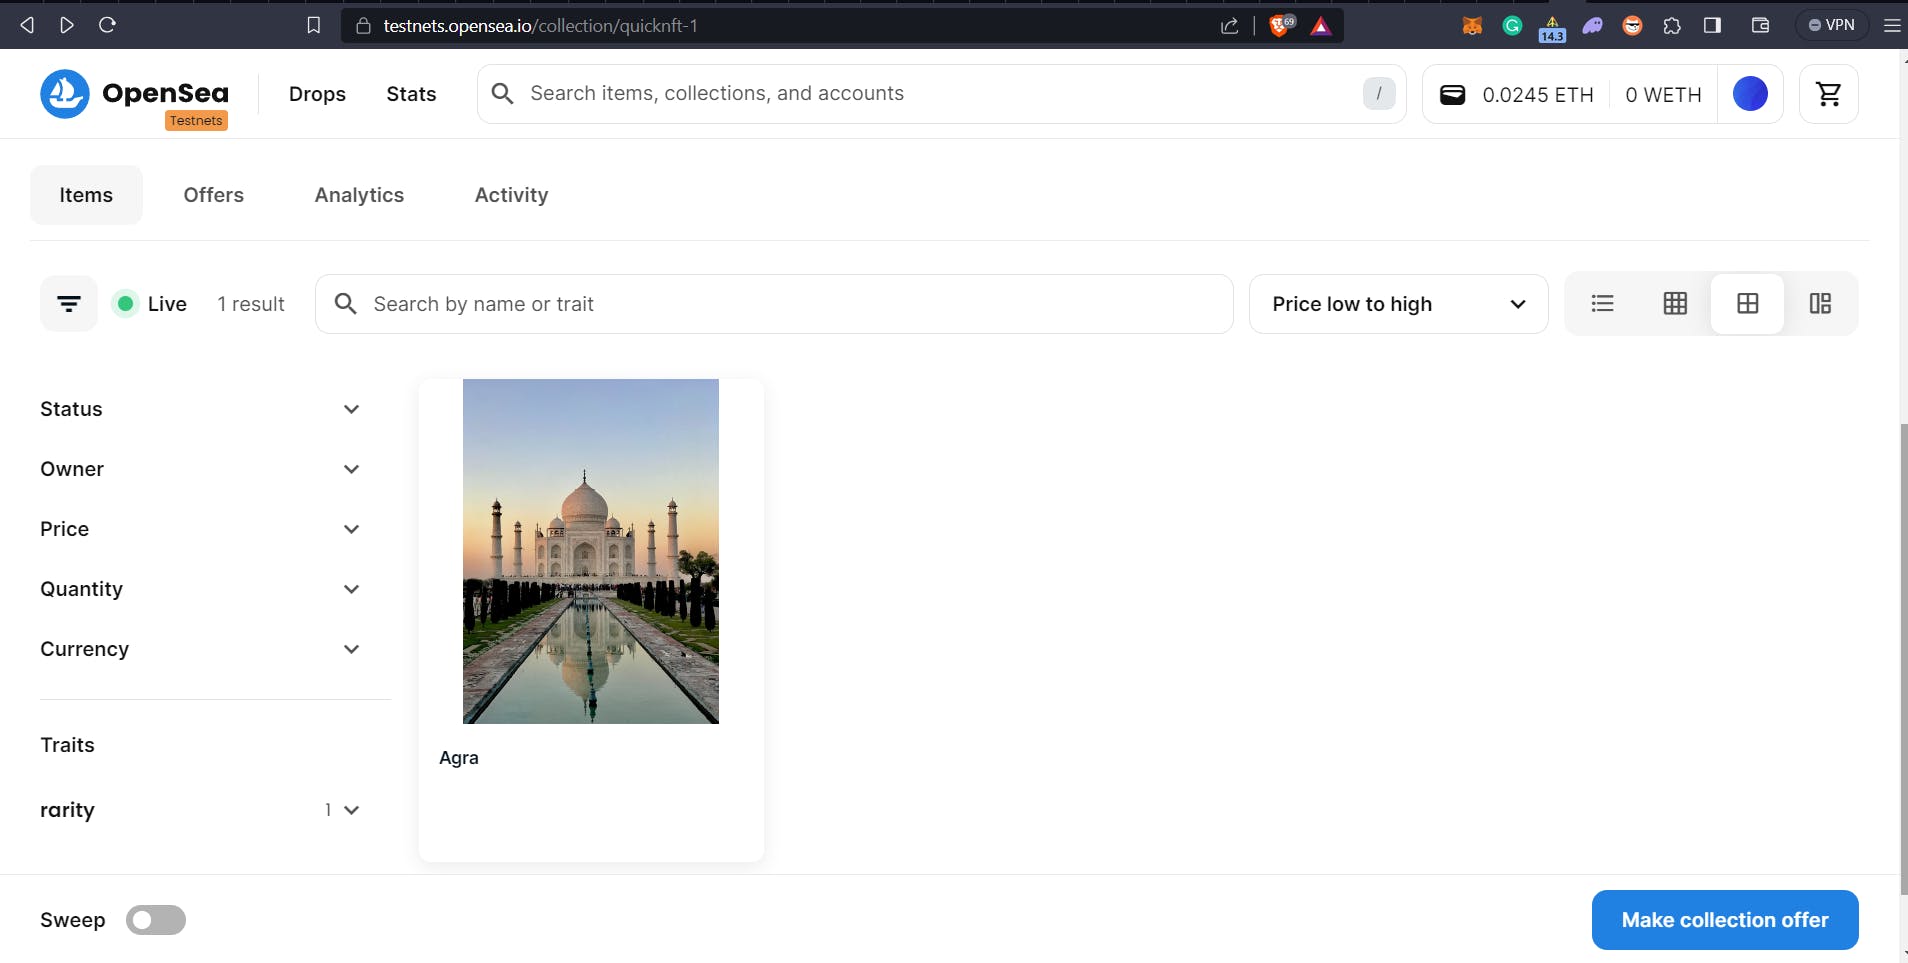
After some time, you can see the NFT on OpenSea.
🎉BOOM 🎉
You've completed the entire tutorial. Give yourself a well-deserved pat on the back. You've learned how to:
Create an NFT Collection using the ERC-721 Token standard.
Store NFT Metadata in a decentralized manner using QuickNode IPFS.
Compile and deploy a Smart Contract on the Optimism Goerli Testnet.
Interact with the smart contract using Remix.
🎉 Bonus for sticking till the end: use code BUILD-AMB-15. This coupon gives you 1 month of the QuickNode Build ($49) plan for free 🎉
###💥 Simply WOW 💥
If you found this tutorial helpful and enjoyable, consider sharing it with your friends. I hope you've gained new insights or even solved a challenge. Thank you for reading, and have a great time!
Feel free to connect with me on Twitter, GitHub, and LinkedIn. I welcome your suggestions and comments!
WAGMI 🚀🚀


