

Building on Bitcoin Layers With the Hiro Platform

Bitcoin is the highest-valued token on the planet, but building on the Bitcoin network was a hassle in the past; as the first blockchain, its support for smart contract development and apps was very basic. This changed with the rise of Bitcoin layer-2 networks like Stacks, which come with powerful smart contract platforms.
In the previous article, you learned the differences between Solidity and Clarity, the programming language used on Stacks. In this article, you will learn how to build smart contracts with Clarity on Stacks and send contract events to a web server with the Chainhook service. All powered by the Hiro Platform.
If you prefer video, check out our workshop with Hiro on YouTube; it contains the same content.
Prerequisites
A Bitcoin wallet that can interact with the Stacks network.
Stacks testnet tokens to pay for the deployments.
A Hiro account to use the Platform IDE.
Node.js to run a server that can handle webhooks.
Setting Up a Hiro Platform Project
To create a contract, you must create a new project on the Hiro Platform. To do so, open the Platform, click “Create Project,” and select “Blank Project”. The Platform will automatically open the project after creation.
The Hiro Platform is the Stacks equivalent to the Remix IDE for Ethereum. It comes preinstalled with all the CLI tools you need for development on Stacks and uses OpenVSCode Server, which is a familiar IDE to most developers.
Building Smart Contracts on Stacks
We will start with the smart contracts. You’ll build your own token, a swap contract for that token, and then leverage a chainhook to listen for contract deployments.
The “Open in Web Editor” button will create a new contract for you and open it in a browser IDE.
Creating a Fungible Token Trait
To create a token contract, we need a trait. This trait defines the function signatures our contract needs to implement to become a SIP-10 token contract (i.e., the Stacks equivalent of ERC-20 contracts on Ethereum).
A trait in Clarity is like an interface in Solidity. In contrast to Solidity, which uses the NPM package manager to install libraries like OpenZeppelin, which helps with contract creation, you need to copy traits manually from templates. The code for SIP token standards is on GitHub.
To create the trait, you open a new terminal, as seen in Figure 1, and execute the following command:
clarinet contract new sip10
The output should look like this:
Created file contracts/sip10.clar
Created file tests/sip10.test.ts
Updated Clarinet.toml with contract sip10
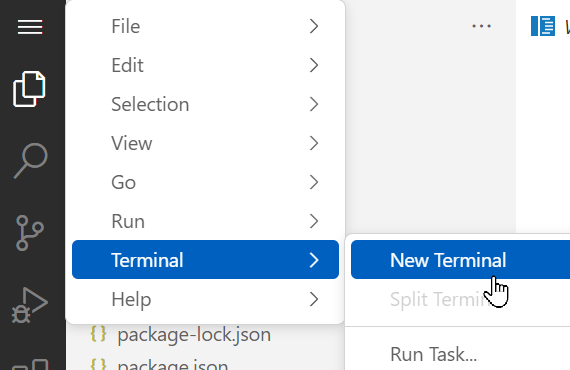
Figure 1: Open terminal
After the command completes, you will have a new contracts/sip10.clar file. Open it and replace its content with this code:
(define-trait sip-010-trait
  (
    (transfer (uint principal principal (optional (buff 34))) (response bool uint))
    (get-name () (response (string-ascii 32) uint))
    (get-symbol () (response (string-ascii 32) uint))
    (get-decimals () (response uint uint))
    (get-balance (principal) (response uint uint))
    (get-total-supply () (response uint uint))
    (get-token-uri () (response (optional (string-utf8 256)) uint))
  )
)
It’s similar to an interface definition in Solidity, as it defines functions a contract has to implement to be standard-conforming. It also enables static checks to validate your contract before deployment.
Implementing the Token Trait
To implement our trait, we create a new contract by running the following command:
clarinet contract new token
It should output the following:
Created file contracts/token.clar
Created file tests/token.test.ts
Updated Clarinet.toml with contract token
Open the new contracts/token.clar file and replace its content with this code:
(impl-trait .sip10.sip-010-trait)

(define-fungible-token clarity-token)

(define-constant ERR_OWNER_ONLY (err u100))
(define-constant ERR_NOT_TOKEN_OWNER (err u101))

(define-constant CONTRACT_OWNER tx-sender)
(define-constant TOKEN_URI u"https://clarity-lang.org")
(define-constant TOKEN_NAME "Clarity Token")
(define-constant TOKEN_SYMBOL "CT")
(define-constant TOKEN_DECIMALS u6)
Let’s go through it step by step.
First, we tell Clarity that the token contract will implement a trait from the SIP-10 contract, allowing us to run a clarinet check to validate that implementation.
Next, we tell Clarity that this contract will be a fungible token, so we can access built-in functions for checking balances and supply or transferring tokens.
Then, we define several constants for error codes and token properties.
Now, we didn’t implement any functions from the trait, so let’s run the following command:
clarinet check
The output should look like this:
note: using deployments/default.simnet-plan.yaml
error: invalid signature for method 'get-balance' regarding trait's specification <sip-010-trait>
x 1 error detected
It tells us we forgot to implement the get-balance function defined by the sip-010-trait.
The check command is helpful because we usually implement already deployed traits, meaning we can’t look at the file that defines the trait. If we run a check, it will tell us the next function we need to implement, and we can repeat this until we have implemented everything correctly.
So, let’s add the missing functions at the bottom of the contracts/token.clar file by pasting the following code:
(define-read-only (get-name)
    (ok TOKEN_NAME)
)

(define-read-only (get-symbol)
    (ok TOKEN_SYMBOL)
)

(define-read-only (get-decimals)
    (ok TOKEN_DECIMALS)
)

(define-read-only (get-balance (who principal))
    (ok (ft-get-balance clarity-token who))
)

(define-read-only (get-total-supply)
    (ok (ft-get-supply clarity-token))
)

(define-read-only (get-token-uri)
    (ok (some TOKEN_URI))
)

;; #[allow(unchecked_data)]
(define-public (transfer
  (amount uint)
  (sender principal)
  (recipient principal)
  (memo (optional (buff 34)))
)
  (begin
    ;; (asserts! (is-eq tx-sender sender) ERR_NOT_TOKEN_OWNER)
    (try! (ft-transfer? clarity-token amount sender recipient))
    (match memo to-print (print to-print) 0x)
    (ok true)
  )
)

(define-public (mint
    (amount uint)
    (recipient principal))
    (begin
        (asserts! (is-eq tx-sender CONTRACT_OWNER) ERR_OWNER_ONLY)
        (ft-mint? clarity-token amount recipient )
    )
))
First, we have several read-only functions, similar to Ethereum's view functions. You can see the calls to the fungible token functions ft-get-balance and ft-get-supply we got by telling Clarity this is a fungible token at the top of the file.
We have a transfer function, which usually checks that the sender argument contains the same as the tx-sender, but for this tutorial, we commented this line out. Then, there is a match function, which will put the memo argument into a to-print variable and pass it to print the memo argument if it exists. Calls to print are the equivalent to emit in Ethereum.
Finally, we have a mint function that creates new tokens.
This is a complete SIP-10-compliant token contract. Next, we implement a simple swap for it.
Implementing a Token Swap
For the swap, we create a new contract with the clarinet CLI again:
clarinet contract new swapper
The output looks like this:
Created file contracts/swapper.clar
Created file tests/swapper.test.ts
Updated Clarinet.toml with contract swapper
Then, we add the following code into the new contracts/swapper.clar file:
(use-trait sip10-token .sip10.sip-010-trait)

(define-public (swap
        (from-token <sip10-token>)
        (to-token <sip10-token>)
        (amount uint)
    )
    (begin
        (try! (contract-call?
            from-token
            transfer
            amount
            tx-sender
            (as-contract tx-sender)
            none
        ))

        (try! (contract-call?
            to-token
            transfer
            amount
            (as-contract tx-sender)
            tx-sender
            none
        ))
        (ok true)
    )
)
This is a naive example of a swap that simply exchanges tokens at a 1:1 rate. It has only one function, which uses our sip-010-trait and expects three arguments: two for the tokens and one for the number of tokens the contract should swap.
To give the creator of a token and the swapper tokens, you must add the following code at the end of contract/token.clar:
(mint u1000000 tx-sender)
(mint u4200000 .swapper)
This will be executed at the deployment of the token contract so that each new token deployed from our contract will give the swapper liquidity instantly.
Deploying the Contracts
To deploy your project, go to the Hiro Platform, open your project, and click the “Deploy Project” button on the top right. You have to connect your wallet and choose “Generate for Testnet”.
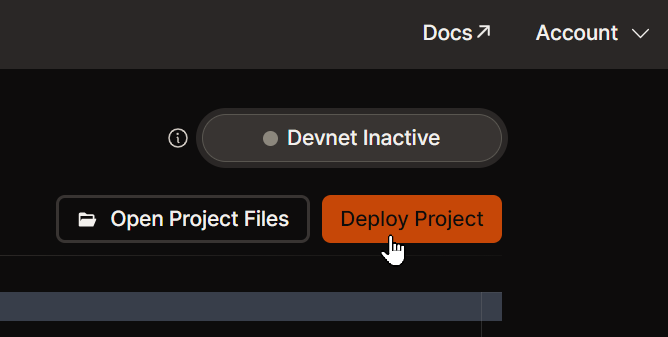
Figure 2: Deploy project.
If you don’t have enough testnet STX, click the “Request STX” button. Receiving the testnet STX can take a few minutes.
You should see the three contracts and click the “Deploy” button, which will trigger three signing requests to your wallet, one for each contract. Deploying the contracts can take a few minutes.
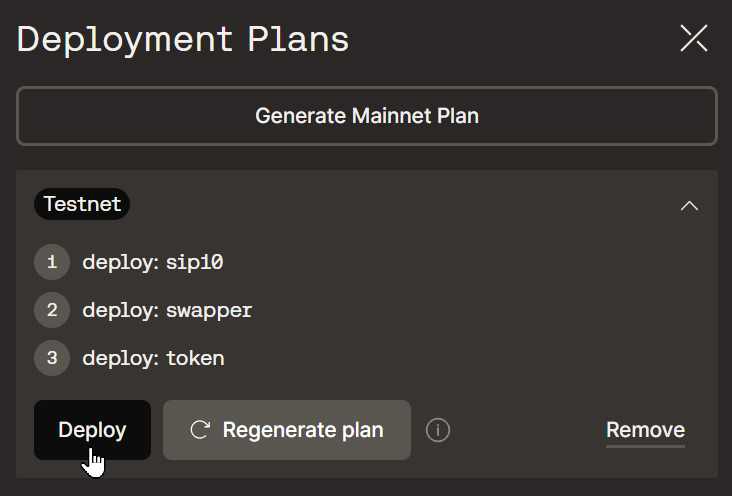
Figure 3: Deployment plans
After a successful deployment, you will see three “Deployed” links, as shown in Figure 4.
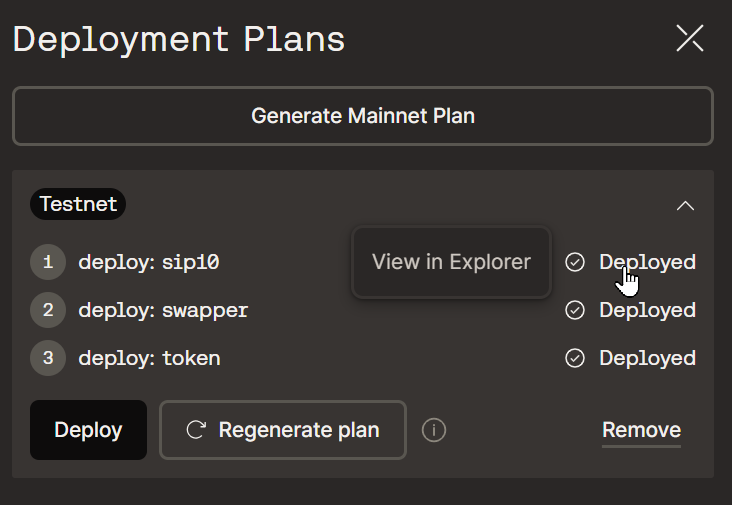
Figure 4: Deployed contracts
Click on one for the token contract to open it in Hiro’s Stacks Explorer. Keep it open; we need it to copy a few values and call a function later.
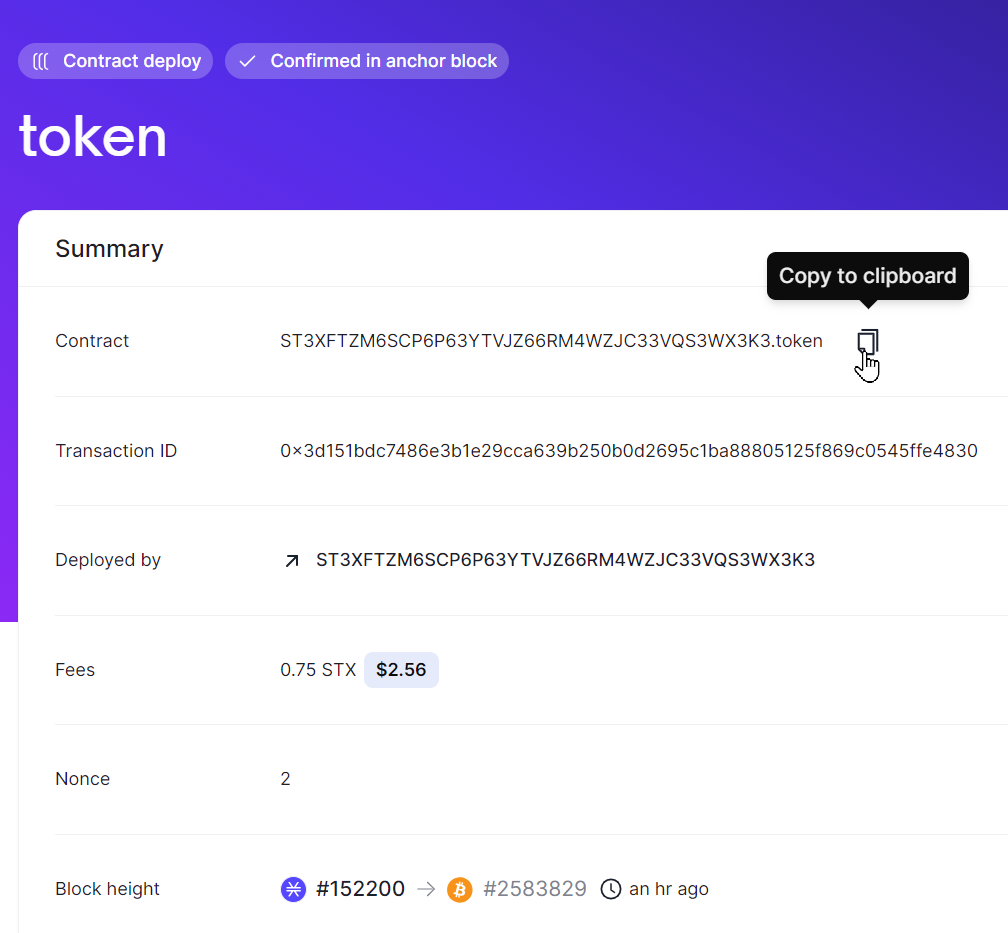
Figure 5: Stacks Explorer
Sending Smart Contract Events to a Web Server
Now that you have built a token and a simple exchange, the next step is letting off-chain applications, like web servers, react to events these contracts emit. For example, to notify you that someone deployed a new contract or to index the contract data off-chain. For this, Hiro created Chainhooks, a service that monitors the Bitcoin and Stacks networks for events and sends them to a web server via a webhook.
Creating a Web Server
First, we create a simple web server with Node.js. For this, we create a new Node.js project and add a dependency with the following commands:
mkdir web-hook-server && cd web-hook-server
npm init -y
npm i -D localtunnel
The localtunnel package lets us make the server accessible for the chainhook later.
Create a server.js file with this code:
const PORT = 8080

require("http")
  .createServer((request, response) => {
    let body = ""
    request.on("data", (chunk) => {
      body += chunk
    })

    request.on("end", () => {
      console.log(JSON.parse(body))
      response.end()
    })
  })
  .listen(PORT)

require("localtunnel")({ port: PORT }).then((tunnel) => {
  console.log(tunnel.url)
})
Start the server to get a public URL when creating the chainhook.
node server.js
Copy the URL for later, but remember you get a new public URL each time you restart the server!
Creating a Chainhook in the UI
To create a chainhook, open your project in the Hiro platform, select the “Chainhooks” tab, and click the “Create Hook” button.

Figure 4: Chainhooks tab
This will open a form where you must enter the chainhook’s configuration. In this example, we want to listen to new contract deployments, so the config should look like in Figure 5.
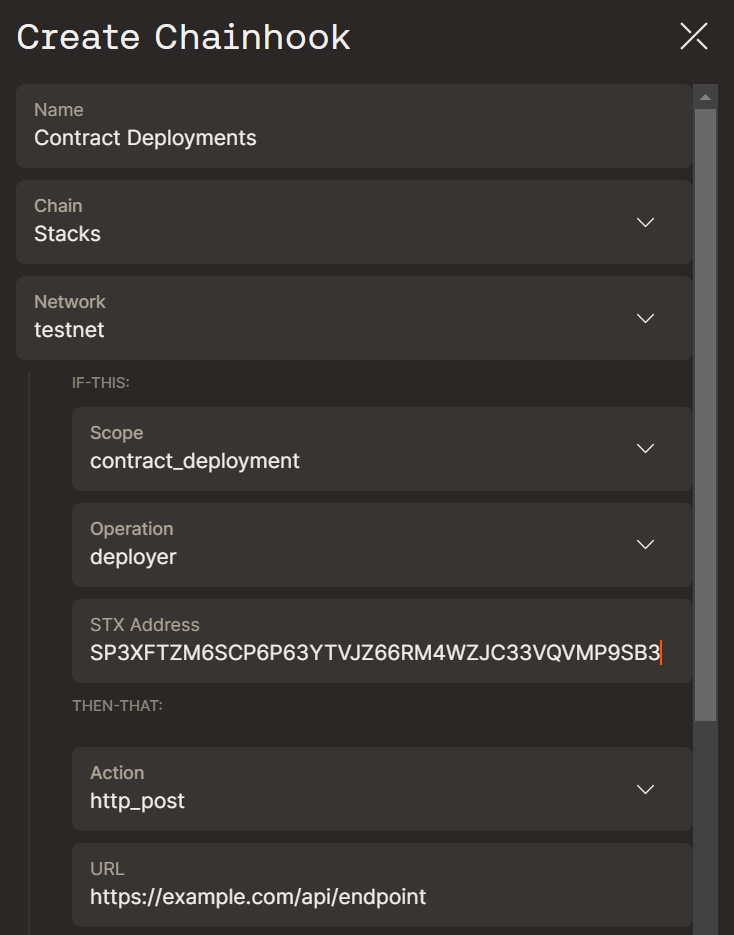
Figure 5: Chainhook configuration
Use the inputs as seen in Figure 5, but make the following changes:
Replace “STX Address” with the “Deployed By” value from the Stacks Explorer.
Replace the “Start Block” with the “Block Height” value from the Stacks Explorer.
Replace the URL with the public URL printed by your web server.
If you don’t set an “End Block”, the chainhook will continue listening to deployment events from your address indefinitely.
Finally, you click the “Create Chainhook” button to deploy the hook. After a few seconds, the Hiro Platform should show the latest activity, as in Figure 6.
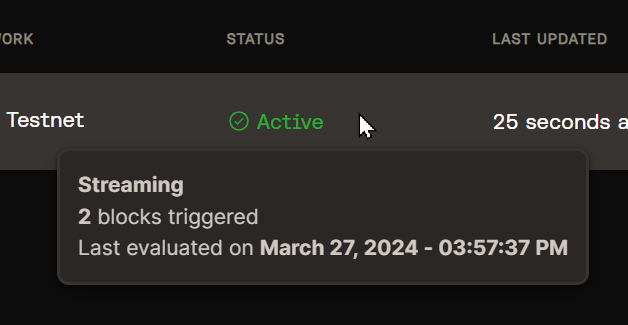
Figure 6: Chainhook activity
Your web server’s output should look similar to this:
{
  apply: [
    {
      block_identifier: [Object],
      metadata: [Object],
      parent_block_identifier: [Object],
      timestamp: 171...939,
      transactions: [Array]
    }
  ],
  chainhook: {
    is_streaming_blocks: false,
    predicate: {
      deployer: 'ST3...3K3',
      scope: 'contract_deployment'
    },
    uuid: '44e...7c6'
  },
  rollback: []
}
Creating a Chainhook Config With the CLI
Creating a chainhook configuration with the chainhook CLI in the Hiro Platform IDE is also possible. Run the following command to create a new file:
chainhook predicates new mint-hook.json --stacks
This will generate a mint-hook.json file. To listen to the mint events of our token contract, you need to replace the networks attribute in that file with the following content:
"networks": {
  "testnet": {
    "start_block": 152190,
    "if_this": {
      "scope": "contract_call",
      "contract_identifier": "ST3...3K3.token",
      "method": "mint"
    },
    "then_that": {
      "http_post": {
        "url": "https://example.com/api/endpoint",
        "authorization_header": ""
      }
    }
  }
}
Make sure you replace the contract_identifier, start_block, and url with the values from the Stacks Explorer after deploying your contracts. Use the Contract ID from the Stacks Explorer, not the Transaction ID.
Create the chainhook by uploading the mint-hook.json file in the Hiro Platform by opening your project, selecting the “Chainhooks” tab, and clicking the “Upload Chainhook” button on the top right.

Figure 7: Upload chainhook
You can call the function with the Stacks Explorer. Copy the “Deployed by” address, scroll down to the “Available Functions”, and select the mint function.
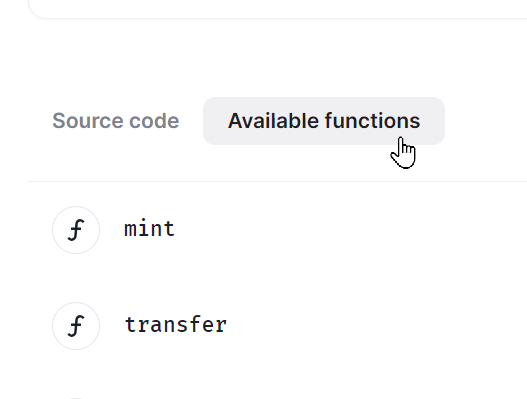
Figure 8: Available functions
In the form, enter 100 as the amount and the copied address as the recipient, and click “Call Function” to open your wallet, where you have to confirm the transaction.
After a few minutes, your transaction is finalized on Stacks. Your chainhook will trigger, leading to the following output on your web server:
{
  apply: [
    {
      block_identifier: [Object],
      metadata: [Object],
      parent_block_identifier: [Object],
      timestamp: 1711553905,
      transactions: [Array]
    }
  ],
  chainhook: {
    is_streaming_blocks: true,
    predicate: {
      contract_identifier: 'ST3...3K3.token',
      method: 'mint',
      scope: 'contract_call'
    },
    uuid: '906...43b6'
  },
  rollback: []
}
With this, you finally know how to relay smart contract events to an API of your choice. You can process it in any way you like. Use it to notify users of swaps or mints, index all token transactions for easy browsing, or even deploy new contracts in reaction to events!
Summary
The Bitcoin ecosystem got a huge upgrade with the Stacks network, and Hiro makes it accessible for developers. With the Hiro Platform, it’s a matter of a few clicks to deploy Clarity smart contracts and listen to chain events


