

Farcaster Frames Explained
Frames excited enough users to make Farcaster worth their time. To be honest, I wouldn’t say I liked Farcaster at first, as it required installing a native app on my phone. In 2024, when it’s called Web3; why would anyone install a native app?!
At least the Warpcast app works in the browser after completing the registration process, so why not try it? Especially with all the hype around Frames. And when I’m already on it, why not write a few words about it?
So, here it is, yet another Farcaster Frames explainer for you!

What are Farcaster Frames?
Technically, Frames are an extension of the Open Graph protocol (OGP) but a peculiar one, as you can use OGP features just as a fallback and not mix them.
In practice, you use the fc:frame or the og: metatags. This is a bit strange, as it doesn’t allow Frames to re-use much of the OGP functionality (i.e., actually extending it). To be more precise, the only thing Frames has in common with OGP is that you can use both to embed preview images into other apps.
In contrast to the static nature of OGP, Frames are interactive. While they can’t play videos (yet, the protocol is still under development), they allow you to add up to four buttons and an input field to the image. As Farcaster authenticates users with a crypto address, you can use Frames to perform crypto actions like minting NFTs directly from a Farcaster client.
How Do Farcaster Frames Work?
For a Frames developer, Frames consists of the following parts:
A frame definition is like a Farcaster app widget that tells the app what to render and where to send the actions.
A frame server handles the actions received from the app and can consult a Farcaster Hub for validation or additional Farcaster data. Let’s look at examples of both.
Figure 1 illustrates how they integrate with the Farcaster stack.
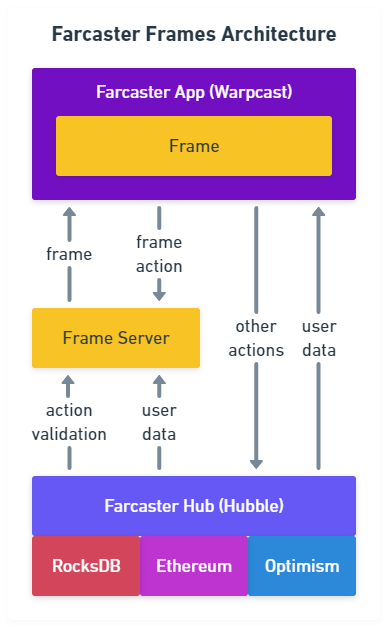
Figure 1: Farcaster Frames Architecture
Frame Definition
Like OGP, Frames are essentially HTML documents with special metatags. Add at least the two required metatags to a document hosted on a public HTTP server to create a frame.
Defining a Minimal Frame
This is a minimal frame-enabled HTML document:
<!doctype html>

<title>Demo Frame</title>

<meta property="fc:frame" content="vNext" />
<meta property="fc:frame:image" content="https://example.com/image.jpg" />
<meta property="og:image" content="https://example.com/image.jpg" />
It only displays a preview image with a 1:1 or 1.91:1 aspect ratio. Putting the URL for that document into a Farcaster post or cast (the actual name of posts on Farcaster) will display the image inside any Farcaster client that supports Frames.
The og:image tag is required as a fallback for clients not supporting Frames.
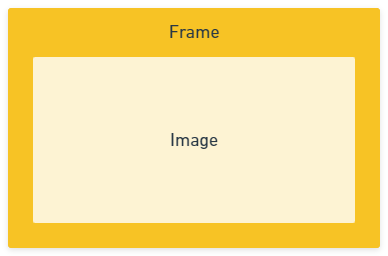
Figure 2: Simple Frame
Note: The first frame is cached, so while you must host it on your server, you can’t change it after a user loads it the first time.
Defining an Advanced Frame
You can use some optional metatags to get the interactive part going. Let’s look at a more complex example:
<!doctype html>

<title>Demo Frame</title>

<meta property="fc:frame" content="vNext" />
<meta property="fc:frame:image" content="https://example.com/image.jpg" />
<meta property="og:image" content="https://example.com/image.jpg" />

<meta property="fc:frame:post_url" content="https://example.com/api" />
<meta property="fc:frame:button:1" content="Button 1" />
<meta property="fc:frame:button:2" content="Button 2" />
<meta property="fc:frame:input:text" content="Input" />
The top section is the same as before, but we have new metatags at the bottom.
Let’s start with the fc:frame:post_url, which brings us to the first crucial point. When a user clicks a button, the Farcaster client will send a POST request to the URL in this tag and expects the response to contain an HTML document with a new frame definition. This allows you to change the content of a frame after it is rendered. After every button click, you can display a new frame with a new image, new buttons, and so on.
The fc:frame:button:1 and fc:frame:button:2 tags define the buttons and their labels. Again, when a user clicks them, by default, the frame sends a POST request to the FC:frame:post_url. This request will contain the index of the button.
The fc:frame:input:text tag lets you add a user input to the POST request.
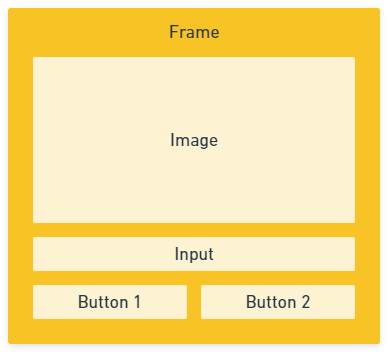
Figure 3: Advanced frame
A frame can only have 4 buttons and 1 input field; however, they can differ in every new frame your server sends in response to a POST request. Also, other metatags allow you to create different button types (e.g., links and redirects) and send each button click to a different server, giving you more flexibility. Find them in the Farcaster docs.
Frame Server
By default, every button click will issue a POST request. Consequently, you must implement a frame server to handle these requests.
The requirements for a frame server are the following:
Has a POST endpoint
Accepts
application/jsonrequestsResponds with valid HTML containing Frames metatags
Takes less than 5 seconds to respond
The frame sends a POST request with JSON data that will look like this:
{
  "untrustedData": {
    "fid": 2,
    "url": "https://example.com/",
    "messageHash": "0xd2b…",
    "timestamp": 1706243218,
    "network": 1,
    "buttonIndex": 2,
    "inputText": "hello world",
    "castId": {
      "fid": 226,
      "hash": "0xa48…"
    }
  },
  "trustedData": {
    "messageBytes": "..."
  }
}
Only use the object in untrustedData for uncritical interactions (i.e., don’t mint an NFT) as attackers can change it.
The trustedData includes a Protocol Buffer encoded string you can use to check for authenticity.
Using Untrusted Farcaster Frame Data
A simple frame server that handles untrusted data, built with Express.js, could look like this:
const express = require("express")
const app = express()

app.use(express.json())

app.get("/frame", (request, response) => {
  response.send(`
    <!doctype html>

    <title>Frame 1</title>

    <meta property="fc:frame" content="vNext">
    <meta property="fc:frame:image" content="https://example.com/image.jpg">
    <meta property="og:image" content="https://example.com/image.jpg">
    <meta property="fc:frame:post_url" content="https://example.com/frame">
    <meta property="fc:frame:button:1" content="Next Frame">
  `)
})

app.post("/frame", (request, response) => {
  const { fid } = request.body.untrustedData

  response.send(`
    <!doctype html>

    <title>Frame 2</title>

    <meta property="fc:frame" content="vNext">
    <meta property="fc:frame:image" content="https://example.com/image.jpg">
    <meta property="og:image" content="https://example.com/image.jpg">
    <meta property="fc:frame:button:1" content="Your FID is: ${fid}">
  `)

})

app.listen(3333, () =>
  console.log("Server started on port 3333")
)
The GET endpoint will deliver the first frame that shows an initial image and a button.
The POST endpoint will use the fid from the request as a label for the next button.
Using Trusted Data from a Farcaster Frame
Here, things get a bit more involved. You should use the object inside trustedData.messageBytes to perform critical interactions. It is encoded with Protocol Buffers to ensure integrity, and you must send it to a Farcaster hub for decoding and validation.
Farcaster Hubs
Farcaster hubs are the servers that make up the Farcaster network. They store and validate the off-chain data and store on-chain data on Optimism and Ethereum. You need a hub to validate your frame messages.
Validating Farcaster Frame Data
To use a hub for validation, send a POST request with the trusted data from your frame server to the /v1/validateMessage endpoint of a Farcaster hub.
Inspired by the frames.js framework, a validation request in JavaScript could look like this:
const binaryData =  new Uint8Array(
  request.body.trustedData.messageBytes.match(/.{1,2}/g)!.map(
    (byte) => parseInt(byte, 16)
  )
)

const response = await fetch(
  "http://example.com:2281/v1/validateMessage", {
  method: "POST",
  headers: {"Content-Type": "application/octet-stream"},
  body: binaryData
}).then(r => r.json())
First, we convert the data into a format fetch understands, then send it to our Farcaster hub of choice, which will validate the content and convert it to JSON.
The response from the hub looks like this:
{
  "valid": true,
  "message": {
    "data": {
      "type": "MESSAGE_TYPE_FRAME_ACTION",
      "fid": 2,
      "timestamp": 48994466,
      "network": "FARCASTER_NETWORK_MAINNET",
      "frameActionBody": {
        "url": "https://example.com/",
        "buttonIndex": 2,
        "inputText": "",
        "castId": {
          "fid": 226,
          "hash": "0xa48d..."
        }
      }
    },
    "hash": "0xd2b...",
    "hashScheme": "HASH_SCHEME_BLAKE3",
    "signature": "3ms...PAA==",
    "signatureScheme": "SIGNATURE_SCHEME_ED25519",
    "signer": "0x78f..."
  }
}
According to the Farcaster docs, the hub will validate the following properties:
the
fid(i.e., the user FID) is registeredthe
signeris active and registered to thefidthe
messageHashis correctthe
signatureis valid and corresponds to thesigner
Fetching Farcaster Casts
The Farcaster hub won’t check if the castId belongs to an existing cast, or if the frame url matches the embedded URL in that cast. You have to check it manually if needed (i.e., if a frame should only work when it is actually shared.
To load the cast that issued the message, you can ask the trusty Farcaster hubs.
const response = await fetch(
  "http://example.com:2281/v1/castById?fid=<CAST_FID>&hash=<CAST_HASH>"
).then(r => r.json())
The response looks like this:
{
  "data": {
    "type": "MESSAGE_TYPE_CAST_ADD",
    "fid": <CAST_FID>,
    "timestamp": 48994466,
    "network": "FARCASTER_NETWORK_MAINNET",
    "castAddBody": {
      "embedsDeprecated": [],
      "mentions": [],
      "parentCastId": {
        "fid": 226,
        "hash": "0xa48d..."
      },
      "text": "Cast Text",
      "mentionsPositions": [],
      "embeds": []
    }
  },
  "hash": "0xd2b...",
  "hashScheme": "HASH_SCHEME_BLAKE3",
  "signature": "3ms...PAA==",
  "signatureScheme": "SIGNATURE_SCHEME_ED25519",
  "signer": "0x78f..."
}
Fetching Farcaster User Data
Getting user data might also be important for your frame; as you might expect, you get it from a hub.
const response = await fetch(
  "http://example.com:2281/v1/userDataByFid?fid=<USER_FID>&user_data_type=1"
).then(r => r.json())
The response looks like this:
{
  "data": {
    "type": "MESSAGE_TYPE_USER_DATA_ADD",
    "fid": <USER_FID>,
    "timestamp": 83433831,
    "network": "FARCASTER_NETWORK_MAINNET",
    "userDataBody": {
      "type": "USER_DATA_TYPE_PFP",
      "value": "https://i.imgur.com/HG54Hq6.png"
    }
  },
  "hash": "0x327…",
  "hashScheme": "HASH_SCHEME_BLAKE3",
  "signature": "XIT..9Cg==",
  "signatureScheme": "SIGNATURE_SCHEME_ED25519",
  "signer": "0x085..."
}
There are even more endpoints to fetch casts and their parents, so check out the Farcaster docs.
Note: As you get all the information from Farcaster hubs, running your own might be a good idea. Check out the Hubble docs to learn how.
Why Do You Need Farcaster Frames?
If you’ve used social media apps like Instagram (IG), you might have noticed the ads on that platform. They are integrated similarly to regular posts but come with a button allowing some interactions. Frames are similar; it's just that they are more powerful. In contrast to the IG ads, you can have more buttons and an input field, and the buttons can have any custom functionality a server can perform, not just the actions Meta allows.
You can build rich social media embeds for your service that minimize the barriers for your users. While you can define buttons that open a website in a browser, you can use the default POST buttons to let them do interactions without leaving Farcaster.
Since you have cryptographic account information, you can even let them perform authenticated actions on your service. In Web3 terms, that might mean minting or receiving tokens, but depending on how you link the Farcaster ID to your user accounts, this might include any action you could model with changing sets of up to 4 buttons, an input field, and an image.
These limitations might seem drastic, but a command shell is also a limited yet powerful tool.
Summary
Farcaster Frames are an exciting addition to the social media and Web3 landscape. They are more powerful than OGP but not too powerful, and constraints can fuel creativity.
Remember that you need an HTTP server to build frames, so while they might seem like a frontend technology, backend skills are required to get them working, including traffic considerations and hosting costs.
Finally, remember that the Farcaster Frames specification is new and will change quite a bit. A few days ago, they added a limit for data URI images that broke several frames. So, if you consider using Farcaster Frames for critical tasks, ensure that you have a developer at hand who can keep them up-to-date!
Additional Resources
The Frames specification in the Farcaster docs.
The frames.js framework helps you build frames quickly.
Phala offers an IPFS-based, decentralized hosting solution for Frames called FrameHub.
The Hubble docs explain how to host a Farcaster Hub.


