

How to Build Your First zkApp on Mina with SnarkyJS
Leverage the power of zero knowledge proofs (ZKPs) to create zkApps for privacy & scalability on Mina Protocol.
Search for a command to run...
Leverage the power of zero knowledge proofs (ZKPs) to create zkApps for privacy & scalability on Mina Protocol.
No comments yet. Be the first to comment.
x402 is a new payment standard that enables micro payments on the web by leveraging blockchain technology. It leverages the existing 402 Payment Required status code to require payment before serving a response and uses crypto-native payments for spe...

The so called AI slop all over the internet is getting less sloppy. NBC News We're living through an extraordinary moment in history. The rapid evolution of generative AI has unleashed an unprecedented creative boom. These tools have democratized co...

In these last few years, layer two blockchains (L2) have become central to Ethereum's scaling efforts. L2s are fast, cheap, and inherit Ethereum's strong security guarantees. Ethereum serves as the settlement layer, and L2s serve as the execution lay...

A blockchain is a peer-to-peer (P2P) network of nodes that maintains a shared ledger. Every node communicates with other nodes in the network using specialized P2P protocols to verify blocks, transactions, store state, etc. When you’re building an ap...

Tokens represent money-like assets, utility (such as governance or access), rewards and points, game items, tickets, and more. Most tokens on Solana follow the SPL token standard or Token-2022 with extensions, which define how tokens are created, tra...

Zero knowledge proofs (ZKPs) are already turning the world of blockchain upside down. Whether it's batching thousands of transactions together or providing verifiable computation at massively decreased gas costs, these mathematical marvels are shaping up to be a boost that will propel blockchain technology into its next era.
Naturally, developers are very excited about the prospect of learning to use new tools powered by ZKPs and building their own zero knowledge applications or zkApps.
Mina is a Layer 1 blockchain built from the ground up using ZKPs. Developers can use the cutting-edge cryptography which powers Mina to build zkApps with SnarkyJS, a TypeScript library.
In this blog, you will build your first zkApp, with SnarkyJS. You will learn the basics of how ZKPs work, how to set up your development environment, and how you can write your own zkApps.
A ZKP allows proving a given statement is true without revealing additional information. If this sounds confusing, let’s look at a real-world example: The popular search game "Where's Waldo".
The game's goal is finding the Waldo character, but how can you show you have discovered Waldo without revealing his location? If you point to Waldo in the picture, anyone would see exactly where to find him!
There's a different way, though:
Take a huge piece of cardboard. It has to be much bigger than the Where’s Waldo game picture.
Cut a Waldo-shaped hole in the cardboard
Lay the cardboard over the game picture and line up the Waldo-shaped hole exactly with the Waldo in the picture
Show the Where’s Waldo game picture with the card laid over it
Now you can prove that you know where Waldo is. Everyone can see Waldo through the hole. If your cardboard was big enough, nobody could see where on the game picture you laid it without looking behind the cardboard. You proved your knowledge of Waldo's location and no additional information, or in programmer terms: Your proof function just returned a boolean but no 2D coordinates.
One of Mina’s architects, Brandon Kase, explains this in more detail in the video above.

Now you know what a zero knowledge proof is... so what? Well, it turns out that ZKPs are extremely powerful and can be used for many use cases including scalability and privacy, both important things to consider when doing blockchain development. Let’s compare ZKPs to a couple of other cryptographic primitives first:
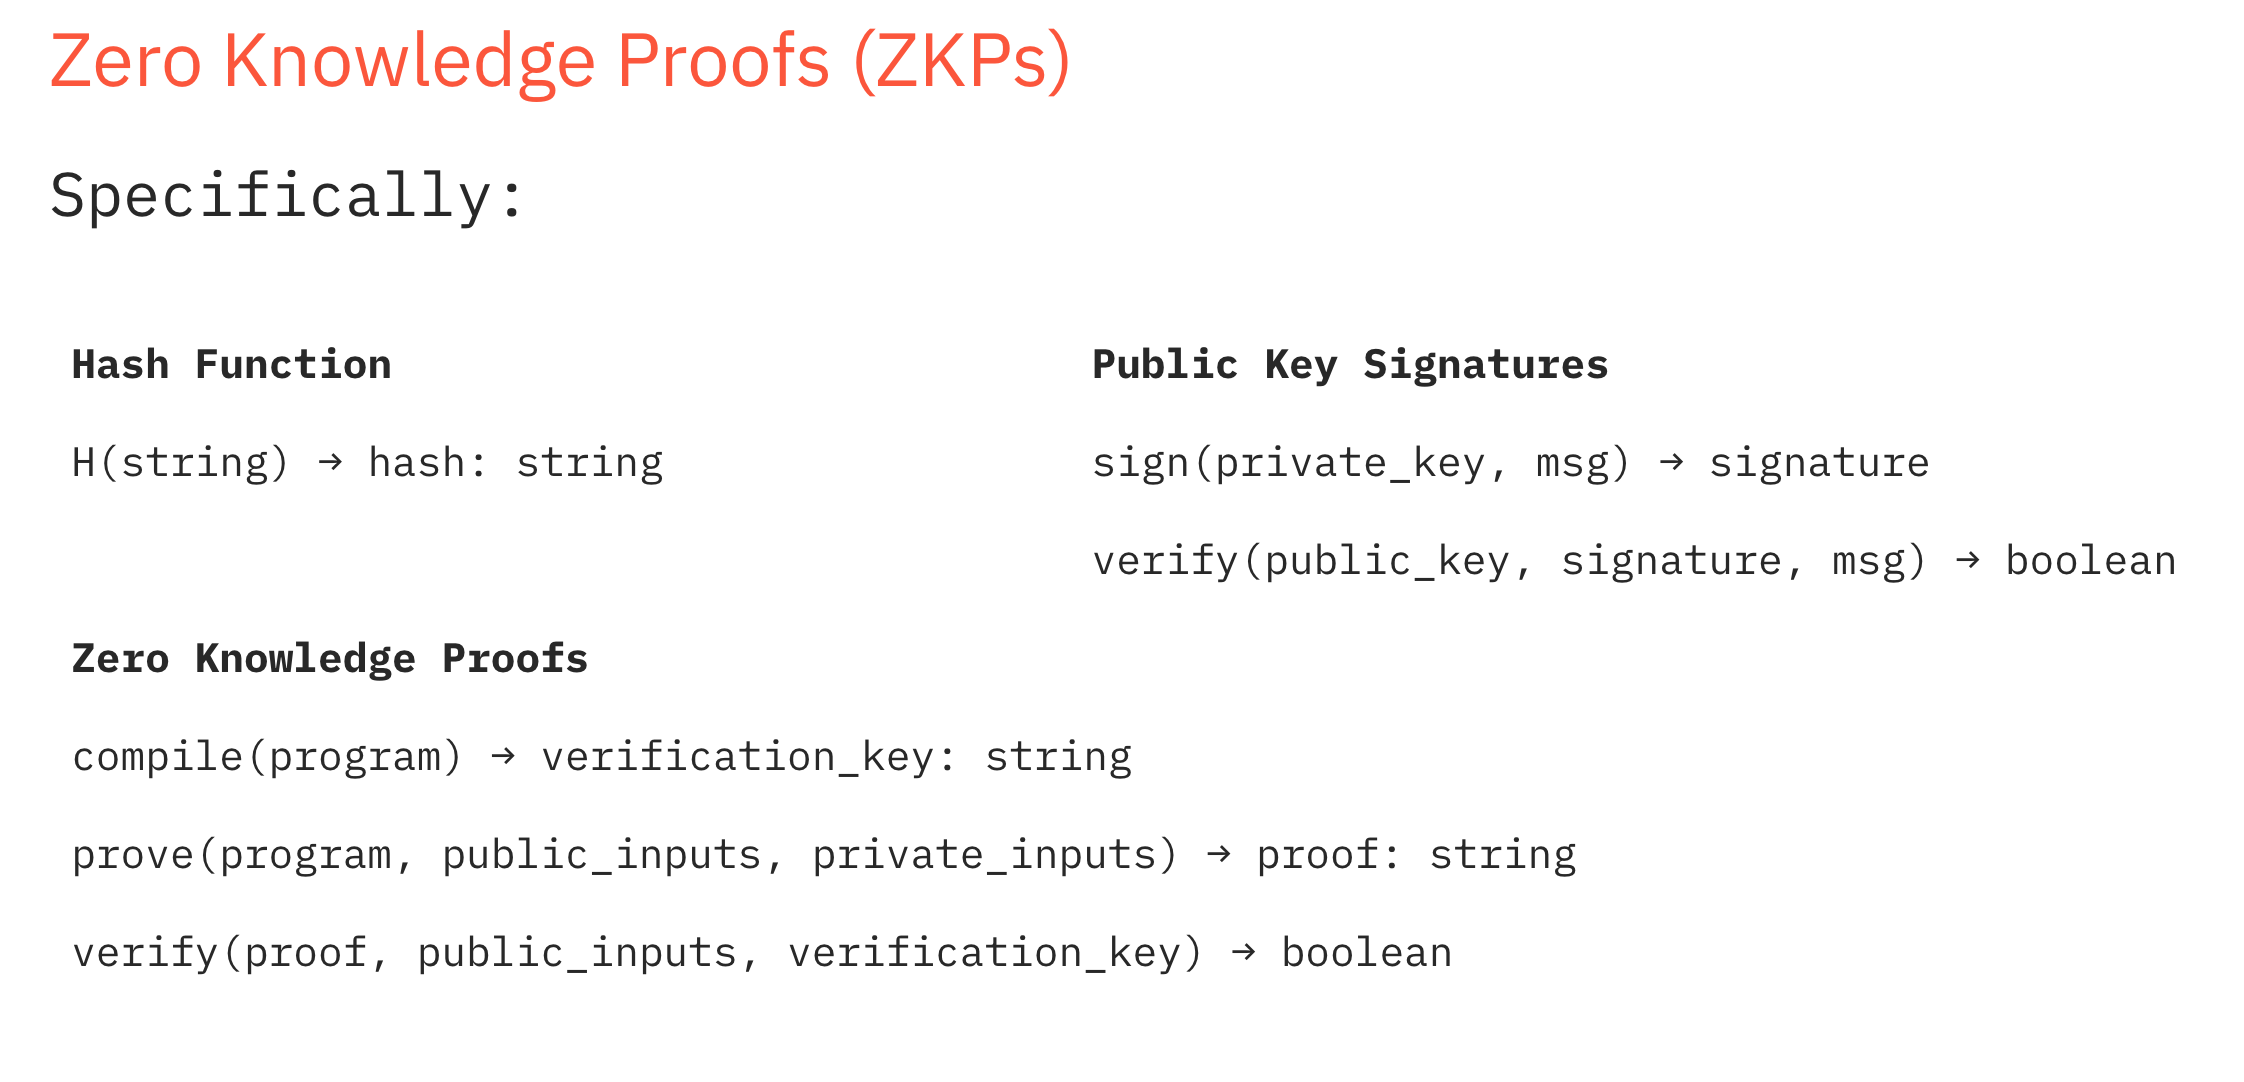
A one-way hash function allows for data integrity verification.
By generating a fixed-length string output when given some data as input, you can check if some data is equivalent to others; if they are, the hash function will give the same output.
Public key signatures are more advanced primitives than hashes because they allow verifying the authenticity in addition to the integrity of data.
They work with public-private key pairs. A private, or secret, key is only known to its creator and comes with a public key that can be publicly available to everyone. The creator can use the private key to sign a message, and anyone can use the corresponding public key to check if the signature belongs to the private key. Since only the key creator knows the private key, nobody else can create a valid signature.
For example, a developer can sign software binaries with their private key, and users can verify the signature using the corresponding public key, ensuring they have authentic software.
Zero knowledge cryptography is more complex than hashing functions and signatures. It allows us to generate proofs not only about data, but also about computation.
As we learned above, ZKPs allow you to prove that you know something without revealing what it is. A ZKP can also show that you have done some computation on some data, without revealing that data.
This can be useful in situations where you do not want to share information, for example, you could prove your age is over some number without having to show your ID and expose your address, full name, or other information.
So, how do they work in practice?
Mina is a layer-1 blockchain network built from the ground up using zero-knowledge proofs (ZKPs). Developers can use the cutting-edge cryptography which powers Mina to build zkApps with SnarkyJS, a TypeScript library.
In a Mina zkApp, there are three steps:
Compile
You, the zkApp developer, build and deploy a zkApp. The build process creates a prover function 🅿️ and a verification key 🔑. The verification key is stored on the Mina network 🔑 ➡️ 🌐
Prove
A user runs your zkApp in their browser, and with it, the prover function 🅿️. This function takes the inputs the user provides to produce a proof 🔒. All this happens on the user's computer and not online 🧑💻. This proof is included (without the user inputs) in a transaction and sent to the Mina network 🔒 ➡️ 🌐
Verify The nodes on the Mina network then verify the proof 🔒 using the zkApp verification key 🔑 stored on the network during the compile stage.
If the proof is valid, the nodes will process the transaction and add it to the chain. If the proof is invalid, the nodes will reject the transaction 🔒 ➕ 🔑 🟰 ✅ OR ❌
To illustrate the concept, consider an example like Sudoku. You can write a zkApp which allows users to prove that they have solved a Sudoku puzzle. The user submits the empty Sudoku puzzle (e.g., the public input) and their filled-in solution (e.g., the private input). If they have a valid solution, the zkApp outputs a proof. The Mina network nodes can verify this proof using the public input (unsolved puzzle) and the verification key.
The solution isn’t needed to verify the proof, only to create the proof. This way, the zkApp will let any user input any Sudoku puzzle and prove they have a solution without revealing it to the network. We can apply this method to thousands of apps that would benefit from privacy and security! 🤯
Now that you know the basics of ZKPs, you're ready to look at some code 👀
There are a few dependencies that you will need to start this tutorial:
NodeJs 16+ (or 14 using --experimental-wasm-threads) with NPM 6+
The first step to becoming a zkApp developer is to install the zkapp-cli. This command line tool will make creating, configuring, and deploying zkApp projects easy.
Install it with NPM:
npm install -g zkapp-cli
Confirm your installation works with the following command:
zk -v
Now that you have installed your tooling navigate to your working directory and create a new project using the zk project command. The example will name the project D_D-tutorial here, but you can name it whatever you like.
zk project D_D-tutorial
The zk project command can also scaffold a UI for your project (more on this later). For now, select none:
? Create an accompanying UI project too? …
  next
  svelte
  nuxt
  empty
❯ none
After the command completes, you should have a new D_D-tutorial directory, which contains scaffolding for your project, including tools such as Prettier (code formatting), ESLint (static code analysis), and Jest (JavaScript testing framework).
You can go ahead and take a look at the contents 👀
cd D_D-tutorial
ls
The output should look like this:
LICENSE
README.md
babel.config.cjs
build
config.json
jest-resolver.cjs
jest.config.js
keys
node_modules
package-lock.json
package.json
src
tsconfig.json
During this tutorial, you will run commands in this directory and work with the code files in the ./src directory. When you build or deploy your zkApp, zkapp-cli will transpile the TypeScript code in these files into JavaScript in the ./build directory.
Note: "Transpile is a specific term for taking source code written in one language and transforming it into another.
You are now at the Compile stage from the explanation above, but before you build and deploy, you need to set some config using the zk config command:
zk config
It will ask you to specify a name (can be anything), URL to deploy to, and fee (in tMINA tokens) to be used when sending your deploy transaction.
The URL is the Mina GraphQL API URL that will receive your deploy transaction and broadcast it to the Mina network. Note that this URL is significant because it determines which network you will deploy to (i.e., QANet, Testnet, Mainnet, etc).
These are reasonable example values:
Name: berkeley
URL: https://proxy.berkeley.minaexplorer.com/graphql
Fee: 0.1
You will now be met with the following prompt:
? Choose an account to pay transaction fees: …
❯ Recover fee payer account from an existing base58 private key
  Create a new fee payer key pair
  NOTE: the private key will be stored in plain text on this computer.
This section allows you to reuse pre-existing keypairs to deploy new zkApps, saving you from making repeat trips to the faucet. Since you're deploying for the first time, select Create a new fee payer key pair. Use dev as the name for the new account.
You should now see the following output:
  ┌──────────────────────────────────┐
  │  Deploy aliases in config.json   │
  ├────────┬────────┬────────────────┤
  │ Name   │ Url    │ Smart Contract │
  ├────────┴────────┴────────────────┤
  │ None found                       │
  └──────────────────────────────────┘

Enter values to create a deploy alias:
✔ Create a name (can be anything): · berkeley
✔ Set the Mina GraphQL API URL to deploy to: · https://proxy.berkeley.minaexplorer.com/graphql
✔ Set transaction fee to use when deploying (in MINA): · 0.1
✔ Choose an account to pay transaction fees: · Create a new fee payer key pair
  NOTE: the private key will be stored in plain text on this computer.
inside create if
✔ Create an alias for this account · dev
✔ Create fee payer key pair at /Users/[username]/.cache/zkapp-cli/keys/dev.json
✔ Create zkApp key pair at keys/berkeley.json
✔ Add deploy alias to config.json

Success!

Next steps:
  - If this is a testnet, request tMINA at:
    https://faucet.minaprotocol.com/?address=[YOUR ADDRESS]&?explorer=minaexplorer
  - To deploy, run: `zk deploy berkeley`
Note: I am using MacOS. Your paths may look different.
You have created a keypair! Woohoo \o/
Now you need testnet tokens to deploy zkApps and send transactions. Fortunately, the zkapp-cli has already printed a convenient link in the terminal to take you to the faucet. You can request tokens for your new account by clicking the big orange "Request" button.
Note: You might need to wait a few minutes for your funding transaction to be included in a block... sounds like a perfect time for a tea break 🫖
/* TEA BREAK */
What a refreshing beverage!
Now, you should be able to deploy from your dev account:
zk deploy berkeley
The command will tell you to use the Add smart contract and ask you to confirm the deployment details. Select yes.
You should see the following output:
> zk deploy berkeley
✔ Build project
✔ Generate build.json
✔ Choose smart contract
  The 'Add' smart contract will be used
  for this deploy alias as specified in config.json.
✔ Generate verification key (takes 10-30 sec)
  Using the cached verification key
✔ Build transaction
✔ Confirm to send transaction

  ┌─────────────────┬─────────────────────────────────────────────────┐
  │ Deploy Alias    │ berkeley                                        │
  ├─────────────────┼─────────────────────────────────────────────────┤
  │ Fee-Payer Alias │ dev                                             │
  ├─────────────────┼─────────────────────────────────────────────────┤
  │ URL             │ https://proxy.berkeley.minaexplorer.com/graphql │
  ├─────────────────┼─────────────────────────────────────────────────┤
  │ Smart Contract  │ Add                                             │
  └─────────────────┴─────────────────────────────────────────────────┘

  Are you sure you want to send (yes/no)? · yes
✔ Send to network

Success! Deploy transaction sent.

Next step:
  Your smart contract will be live (or updated)
  as soon as the transaction is included in a block:
  https://berkeley.minaexplorer.com/transaction/[TRANSACTION HASH]
And that's it! You deployed your first zkApp on the Berkeley Testnet. Well done 🏅
Now, open up ./src/Add.ts to see what your first zkApp does.
import { Field, SmartContract, state, State, method } from 'snarkyjs';

/**
 * Basic Example
 * See https://docs.minaprotocol.com/zkapps for more info.
 *
 * The Add contract initializes the state variable 'num' to be a Field(1) value by default when deployed.
 * When the 'update' method is called, the Add contract adds Field(2) to its 'num' contract state.
 *
 * This file is safe to delete and replace with your own contract.
 */
export class Add extends SmartContract {
  @state(Field) num = State<Field>();

  init() {
    super.init();
    this.num.set(Field(1));
  }

  @method update() {
    const currentState = this.num.getAndAssertEquals();
    const newState = currentState.add(2);
    this.num.set(newState);
  }
}
As you can see, your zkApp smart contract is quite simple. You import a few modules and name your zkApp Add by extending the SmartContract class. Then you declare a state variable called num using the @state decorator. It is of type Field.
The Field type represents the basic unit of data in ZKP programming; all data you use in SnarkyJS proof creation must be either of type Field or composed of several Field types. You can learn more about Field types in the SnarkyJS docs.
Note: Each zkApp has eight 32-byte fields of arbitrary on-chain storage. If your state exceeds this limit, you must express it using Merkle trees or other data structures.
Next, you call the init() function to initialize the zkApp. You can set things like permissions and initial values in this function. In our ' Add ' example, you set the on-chain num state variable to 1.
Now you come to the update method, declared using the @method operator. Methods are the building blocks of zkApps. Methods can take in arguments, do computations, and change the on-chain state (similar to Solidity functions). A proof is generated when someone calls a method and executes it correctly.
Now take a closer look at update:
  @method update() {
    const currentState = this.num.getAndAssertEquals();
    const newState = currentState.add(2);
    this.num.set(newState);
  }
}
This method doesn't take any arguments. When you call it, it gets the value of num and calls the getAndAssertEquals method on it. This sets the value of currentState to the on-chain value of num and does an Assert that currentState and num are consequently equal.
This might seem confusing or unnecessary, but it illustrates an important point when using SnarkyJS:
Only SnarkyJS built-in types and functions define and create ZKPs.
You can use conventional JavaScript code in your methods, but it's not included in your proof. Check the Mina docs for more info.
Therefore, the first line of the method includes in the proof that the zkApp has fetched the on-chain state variable num and then set the constant currentState value to num. If either of these steps is missed or done improperly, the proof produced will not be valid at verification time.
Why do you have to AssertEquals on currentState? If you only included the requirement to get the num value from on-chain, then a user could set the constant to some other value with malicious intent.
The following two lines are much simpler 😅 The second line declares a new constant: the value of currentState plus two.
The third line sets the on-chain value of num to be this new number.
To summarise, the method will increment an on-chain value by two each time it is called.
Look at the included src/interact.ts file, which will simulate user interaction with your newly deployed zkApp.
Note: When you deploy a zkApp, you build it and produce a verification key. The verification key is then uploaded to the Mina network. When users want to use your zkApp, they also build and run your zkApp. They use your zkApp to produce a proof, which is then sent to the Mina network. The network nodes then verify the proof against the verification key you uploaded at deployment time.
The interact script runs locally. It builds and runs our zkApp, and creates a transaction that updates the on-chain state. You aren't going to go through it in detail here but feel free to take a look at the file and the code comments within. It is important to note that it signs the transaction with the dev account private key you created earlier. In production, users would sign the transaction via their wallet.
To run the interact script, use the following command:
node build/src/interact.js berkeley
You should then see the following:
compile the contract...
build transaction and create proof...
send transaction...

Success! Update transaction sent.

Your smart contract state will be updated
as soon as the transaction is included in a block:
https://berkeley.minaexplorer.com/transaction/[TRANSACTION HASH]
Congratulations - you have just sent your first zkApp transaction!
It might take the network a couple of minutes to include the transaction in a block, but you can check its status using the link in the terminal.
While you wait, take a second to think about what is happening.
Your zkApp ran the update method to increment the on-chain state num variable by 2, producing a proof. This proof was then included in a transaction, along with the state updates to be applied. We submitted the transaction to the Mina network, which verifies the proof, and applies the state updates.
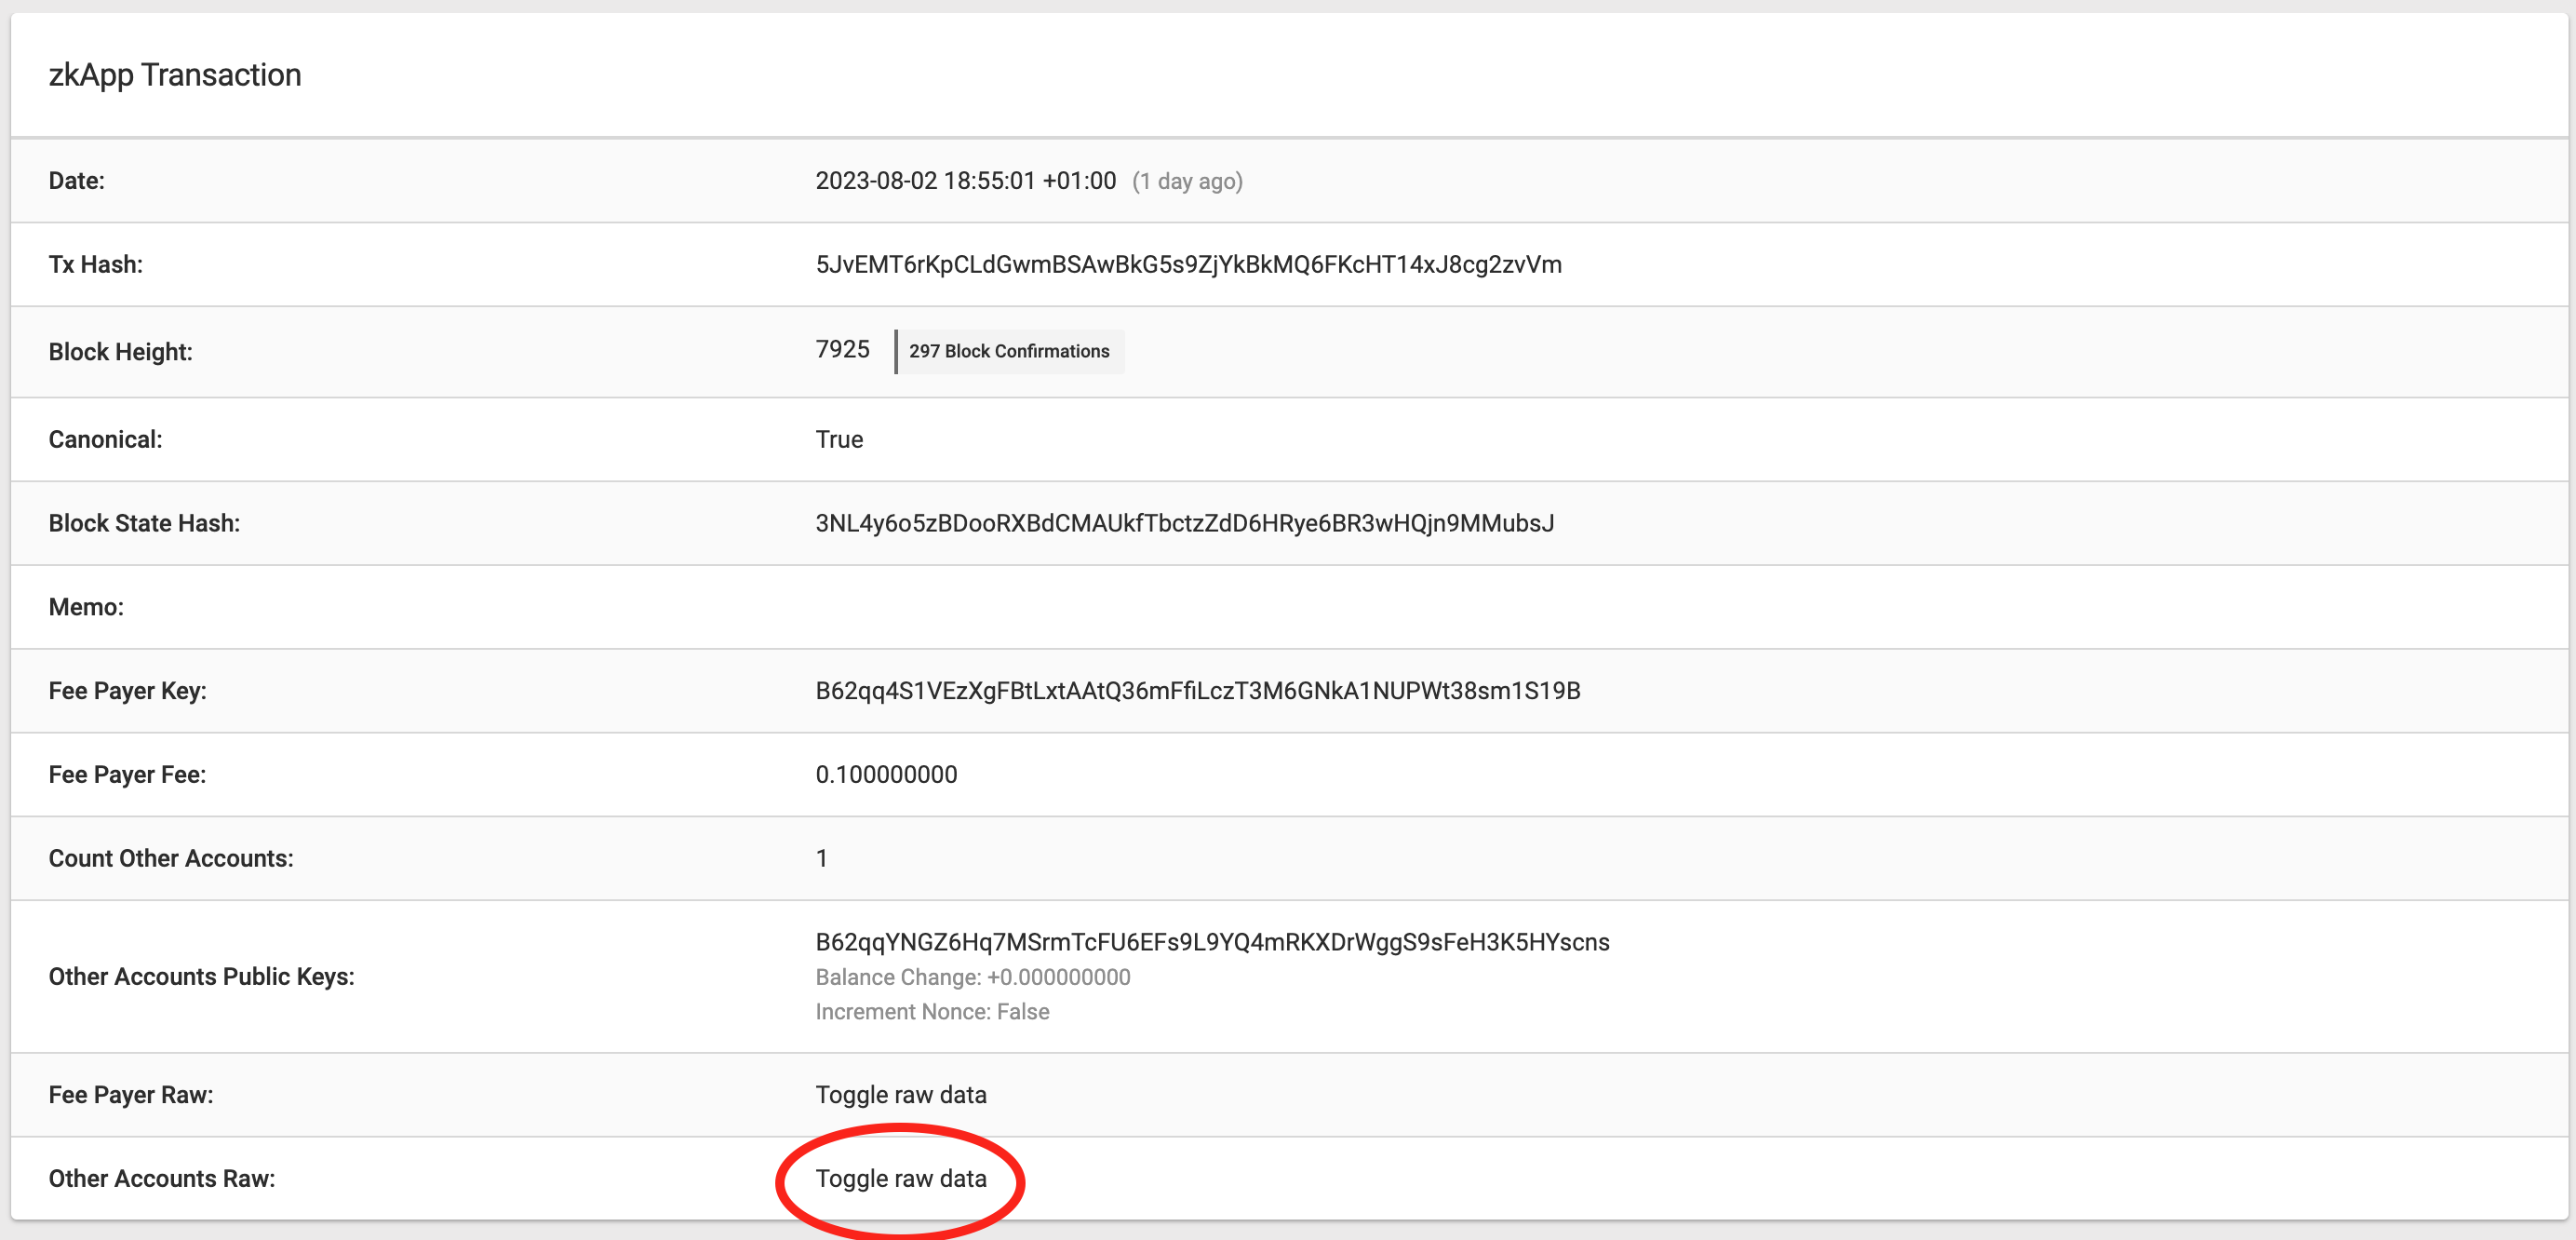
You can look at the zkApp state and state updates when the transaction has been included in a block. First, go to the link printed using the interact script. That will take you to your transaction details on the Mina Explorer block explorer. Find the Other Accounts Raw section and click "Toggle raw data".
Look for the state [8] dropdown and see what the values are:
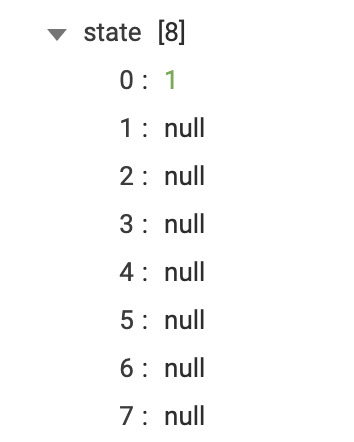
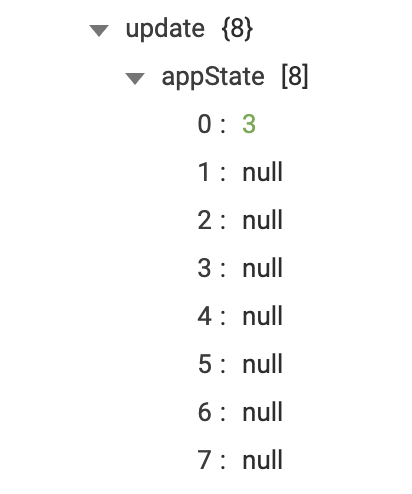
Perfect - the first element in the array is the num variable that you initialized to 1. Next, look at the update (8) dropdown. There you can see appState [8]:
Hooray!
This transaction applied the account update to add 2 to the state, resulting in a num value of 3.
You can also check the updated state by navigating to the account overview page for your zkApp, as well as things like permissions and past transactions. Navigate there by clicking the address on the transaction page's Other Accounts Public Keys row.
So, there you have it. You are now a zkApp developer!
In this blog post, you:
Learnt about ZKPs
Installed the zkapp-cli
Configured and built your first zkApp
Deployed that zkApp on the Berkeley testnet
Understood the Add smart contract step by step
Called the update zkApp method to update the zkApp state
Checked the state of your zkApp and transactions on Mina Explorer
I think you deserve a round of applause 👏👏
Did you enjoy your introduction to ZKPs, Mina, and SnarkyJS?
If you want to continue your journey as a zkApp developer, why not try building a zkApp UI with React in this tutorial?
Other tutorials are available to teach you concepts like custom tokens, oracles, and recursion. You can find them all in the Mina docs.
If you need help, you can ask your questions on Discord too. See you there!