Table of contents
Foundry is a blazing fast, portable and modular toolkit for Ethereum application development written in Rust. It consists of three components:
- Forge: Ethereum testing framework (like Truffle, Hardhat, and DappTools).
- Cast: CLI for interacting with EVM smart contracts, sending transactions, and getting chain data.
- Anvil: local Ethereum node, similar to Ganache or Hardhat Network.
Why Should We Use Foundry?

- It’s speedy; no more wasted time while running tests.
- It allows you to write tests in Solidity, which minimizes context switching.
- Many testing features like fuzzing,
console.log, and cheat codes give you more power and flexibility.
Topics We Are Going to Cover in This Article
- Project setup
- How to install dependencies in Foundry (i.e., OpenZeppelin)
- Integrating Foundry with VSCode
- Writing the contract and test cases using Foundry
- Understanding traces in Foundry
- Generating gas report using Foundry
- Deploying the contract using Foundry
Installation
The Foundry Book explains the installation of Foundry very well. Check out the instructions here:
https://book.getfoundry.sh/getting-started/installation
Setting Up the Project
Once we installed Foundry, we can create a new project using the following command:
forge init foundry-demo // forge-demo is the name of the project
After creating the project, we check if everything is working correctly with this command:
cd foundry-demo && forge build
Installing Dependencies
Forge manages dependencies using Git Submodules by default, which means that it works with any GitHub repository that contains smart contracts.
To use OpenZeppelin, we need to install it as a dependency in our project with this command:
forge install OpenZeppelin/openzeppelin-contracts
// forge install is command which is used for installing  dependencies
// <https://github.com/OpenZeppelin/openzeppelin-contracts>
// use {{username}}/{{repo_name}} from the github url
Integrate Foundry with VSCode
After installing OpenZeppelin, try importing something from it in the contract (your contract is in the src directory); an error will pop up if you are using VSCode.
To fix this error, Run this command:
forge remappings > remappings.txt
What this command does is creates a remappings.txt file inside the root directory of the project.
At this moment, the content in the file might look like this:
ds-test/=lib/forge-std/lib/ds-test/src/
forge-std/=lib/forge-std/src/
openzeppelin-contracts/=lib/openzeppelin-contracts/contracts/
For more details, visit this website: https://book.getfoundry.sh/config/vscode
Implementing the Contract
Rename the file src/Counter.sol to src/FDemo.sol; the code for our ERC721 smart contract is as below:
// SPDX-License-Identifier: UNLICENSED
pragma solidity ^0.8.13;

import "openzeppelin-contracts/token/ERC721/extensions/ERC721URIStorage.sol";
import "openzeppelin-contracts/utils/Counters.sol";

contract FDemo is ERC721URIStorage {
    using Counters for Counters.Counter;
    Counters.Counter private _tokenId;

    constructor() ERC721("FDemo", "FD") {}

    function mint(string memory tokenUri) external returns (uint256) {
        uint256 newTokenId = _tokenId.current();

        _mint(msg.sender, newTokenId);
        _setTokenURI(newTokenId, tokenUri);

        _tokenId.increment();

        return newTokenId;
    }
}
Testing the Contract with Foundry
Let's start by renaming the test file to match the name of our contract Counter.t.sol to FDemo.t.sol.
Forge uses the following keywords in tests:
setUp: An optional function invoked before each test case runs.
function setUp() public {
    testNumber = 42;
}
test: Functions prefixed withtestare run as a test case.
function testNumberIs42() public {
  assertEq(testNumber, 42);
}
testFail: The inverse of the test prefix—if the function does not revert, the test fails.
function testNumberIs42() public {
  assertEq(testNumber, 42);
}
We only have one method, mint, so we will write a test case for this method. This is going to be a pretty simple one.
// SPDX-License-Identifier: UNLICENSED
pragma solidity ^0.8.13;

import "forge-std/Test.sol";
import "../src/FDemo.sol";

contract FoundryDemoTest is Test {
    FDemo instance;

    function setUp() public {
        instance = new FDemo();
    }

    function testMint() public {
        string memory dummyTokenUri = "ipfs://metadata_url";
        uint256 tokenId = instance.mint(dummyTokenUri);

        assertEq(dummyTokenUri, instance.tokenURI(tokenId));
    }

}
Now, to run this test, we can use the command forge test
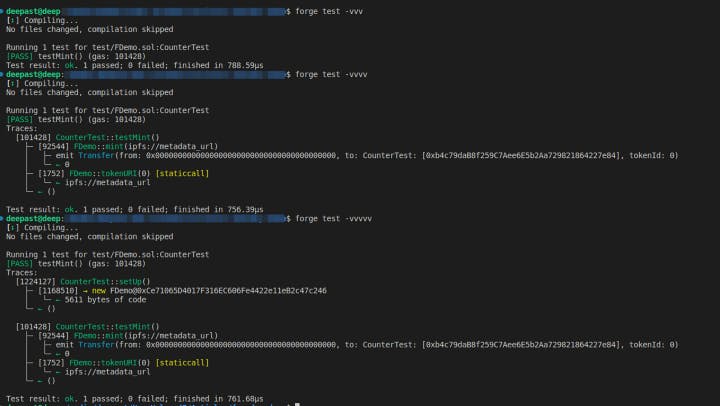
We can use traces if we want to explore more details/events/flow about the test cases. To enable them while running test cases use -vvv or -vvvv
The attached screenshot shows the result of test cases with and without traces.

More details on the Traces: https://book.getfoundry.sh/forge/traces
Generating Gas Report Using Foundry
To generate gas reports, use `--gas-report`` with the test command.
forge test --gas-report
More details on the gas report here: https://book.getfoundry.sh/forge/gas-reports
Deploying and Verifying Contracts with Foundry
Forge can deploy smart contracts to a given network with the forge create command.
Some options we can use with forge create while deploying the contract.
--rpc-url: RPC URL of the network on which we want to deploy our contract. In our case, we will be using the RPC URL of Polygon's Mumbai testnet.--constructor-args: Pass arguments to the constructor.--private-key: Private key of deployers wallet.
We can optionally pass --verify and --etherscan-api-key if we want to verify our contract.
$ forge create --rpc-url <your_rpc_url> \\
    --constructor-args "ForgeUSD" "FUSD" 18 1000000000000000000000 \\
    --private-key <your_private_key> src/MyToken.sol:MyToken \\
    --etherscan-api-key <your_etherscan_api_key> \\
    --verify
Let's deploy, now!
forge create --rpc-url <https://rpc.ankr.com/polygon_mumbai>
--private-key <your_private_key>  src/FDemo.sol:FDemo
--etherscan-api-key <your_etherscan_api_key>
--verify
Complete code: GitHub
💡 Follow me on Twitter for more awesome stuff like this @pateldeep_eth Linkedin


