

How to Integrate Biconomy Into Your DApp
Hi, I am Naman, a blockchain enthusiast who loves building and learning cool stuff. I am also an undergrad student at IIITD of the '25 batch.
Do you want to provide easy Web2-like onboarding to your Web3 app? Imagine if users don't need any wallets or funds to pay for gas fees and deal with complex transaction pop-ups to use your Web3 app 🤯
Biconomy's robust SDK uses account abstraction (EIP 4337) to provide various features. Be it by allowing users to make smart wallets with their Gmail account or by sending transactions with no pop-ups. It has helped countless DApps increase their users by 10x and existing "Web2" apps to provide Web3 features to their users. If you wish to do the same, follow this guide to learn the basics by building a demo DApp!
In this guide, I'll show you how to integrate Biconomy in your Web3 app to simplify UX by creating a simple message board decentralized application (DApp) where people can post anonymous messages and see others' messages.
We'll walk through the following:
A brief introduction to Biconomy
Creating the message board smart contract
Building a frontend web application to interact with the contract
Integrating Biconomy Account Abstraction SDK for gasless transactions
Let's get started!

What is Biconomy?
Biconomy is a one-stop solution to enable an effortless experience in your DApp as it eases onboarding for new users and abstracts away transaction complexities that your users face daily. It provides solutions from onboarding to user engagement for a DApp in a non-custodial way.
Biconomy provides features like -
Social login
Fiat on-ramp and off-ramp
Gasless transactions
Batch transactions
Payment of gas fee in ERC20 token
Create a Message Board Smart Contract
To begin, let's outline the critical functionality. Our smart contract will enable users to input messages, store them, and allow retrieval of all previous messages. We will utilize an array to store the messages.
The contract starts by defining a private array called messages. The addMessage function allows users to input their message, which we then append to the array. We include a check to ensure that the message is not empty. When a user posts a message, we emit an event.
For users to view all the stored messages, getAllMessages function is used, which returns an array with all the stored messages.
We also implement two additional functions:getMessageCount - returns the total number of messages stored in the contractgetMessageByIndex - retrieves a specific message based on its index.
The final MessageBoard.sol looks like this -
// SPDX-License-Identifier: MIT
pragma solidity ^0.8.9;

contract MessageBoard {
    string[] private messages;

    event MessageAdded(address indexed user, string message);

    function addMessage(string memory _message) public {
        require(bytes(_message).length > 0, "Message should not be empty");

        messages.push(_message);
        emit MessageAdded(msg.sender, _message);
    }

    function getMessageCount() public view returns (uint256) {
        return messages.length;
    }

    function getMessageByIndex(uint256 _index) public view returns (string memory) {
        require(_index < messages.length, "Invalid index");

        return messages[_index];
    }

    function getAllMessages() public view returns (string[] memory) {
        string[] memory allMessages = new string[](messages.length);

        for (uint i=0; i < messages.length; i++) {
            allMessages[i] = messages[i];
        }

        return (allMessages);
    }
}
Once the contract is defined, you can deploy it to any EVM chain using tools like Remix or frameworks like Hardhat. Users can then interact with the deployed contract to post messages and access previous ones.
Building a Frontend App for Our Smart Contract Using Biconomy
Now let's create a Message Board web app where users can send anonymous messages and view others' messages!
Setting up the Frontend
Before we begin, you can access the complete source code for this dApp on GitHub. Please refer to the final code and dApp anytime.
We are going to use the Next.js framework for making our App. Using the CLI command, let's create a new Typescript + Next.js + Tailwind CSS App
yarn create next-app
You can now follow the below selections to make your Next.js App similar to mine -
What is your project named? my-app
Would you like to use TypeScript with this project? Yes
Would you like to use ESLint with this project? Yes
Would you like to use Tailwind CSS with this project? Yes
Would you like to use `src/` directory with this project? Yes
Use App Router (recommended)? No
Would you like to customize the default import alias? No
We will also need to add Biconomy packages -
yarn add @biconomy/core-types @biconomy/smart-account @biconomy/web3-auth
Lastly, let's also add React Toastify for better UX.
yarn add react-toastify
Now we have added all the packages we will need. Lastly, for Biconomy to work smoothly with Next.js, we have to do two more things -
Configure
next.config.jslike this/** @type {import('next').NextConfig} */ const nextConfig = { reactStrictMode: true, webpack: (config, { isServer }) => { if (!isServer) { config.resolve.fallback = { "fs": false, "net": false, "tls": false }ne } return config } } module.exports = nextConfigWe must wrap our
index.tsxfile insidenext/dynamicfrom next.js. Move all the logic into a new fileApp.tsxunder the components folder and import it like this:import dynamic from "next/dynamic" import { Suspense } from "react" const Index = () => { const AppDynamic = dynamic(() => import("../components/App").then((res) => res.default), { ssr: false, }) return ( <> <Suspense fallback={<div>Loading...</div>}> <AppDynamic /> </Suspense> </> ) } export default Index
Adding Social Login
Web3 applications often necessitate a Web3 wallet for authentication or login. However, this requirement can pose a barrier to new users who are unfamiliar with wallets. Therefore, integrating traditional social sign-in with Web3 login can significantly enhance user onboarding and experience.
Social login allows users to authenticate themselves using their existing social media accounts, so they don't need to create a wallet first.
The process to add the social login feature is the same as explained in this section of Biconomy docs.
By default, the network is Mainnet. You must change it to the network you deployed your smart contracts to inside the file. We deployed our contracts on the Polygon Mumbai testnet for this demo.
First, we'll set up some state variables and a useEffect hook that will help us with our implementation:
const [smartAccount, setSmartAccount] = useState<SmartAccount | null>(null)
const [interval, enableInterval] = useState(false)
const sdkRef = useRef<SocialLogin | null>(null)
const [loading, setLoading] = useState<boolean>(false)
const [provider, setProvider] = useState<any>(null)

useEffect(() => {
    let configureLogin: any
    if (interval) {
      configureLogin = setInterval(() => {
        if (!!sdkRef.current?.provider) {
          setupSmartAccount()
          clearInterval(configureLogin)
        }
      }, 1000)
    }
  }, [interval])
Now we'll add Login functionality. The login function is an asynchronous function that handles the login flow for the application.
  async function login() {
    if (!sdkRef.current) {
      const socialLoginSDK = new SocialLogin()
      const signature1 = await socialLoginSDK.whitelistUrl("http://localhost:3000/")
      await socialLoginSDK.init({
        chainId: ethers.utils.hexValue(ChainId.POLYGON_MUMBAI).toString(),
        network: "testnet",
        whitelistUrls: {
          "http://localhost:3000/": signature1,
        },
      })
      console.log("socialLoginSDK =>", socialLoginSDK)

      sdkRef.current = socialLoginSDK
    }
    if (!sdkRef.current.provider) {
      sdkRef.current.showWallet()
      enableInterval(true)
    } else {
      setupSmartAccount()
    }
  }
Next, we'll add a function to set up the smart account. We use the setupSmartAccount function to initialize a smart account with Biconomy and connect it with the Web3 provider.
async function setupSmartAccount() {
  if (!sdkRef?.current?.provider) {
    return
  }
  sdkRef.current.hideWallet()
  setLoading(true)
  const web3Provider = new ethers.providers.Web3Provider(sdkRef.current.provider)
  setProvider(web3Provider)
  try {
    const smartAccount = new SmartAccount(web3Provider, {
      activeNetworkId: ChainId.POLYGON_MUMBAI,
      supportedNetworksIds: [ChainId.POLYGON_MUMBAI],
      networkConfig: [
        {
          chainId: ChainId.POLYGON_MUMBAI,
          dappAPIKey: "",
        },
      ],
    })
    const acct = await smartAccount.init()
    setSmartAccount(acct)
    setLoading(false)
  } catch (err) {
    console.log("error setting up smart account... ", err)
  }
}
Finally, we'll add the logout function that handles the logout flow for the application.
const logout = async () => {
    if (!sdkRef.current) {
      console.error('Web3Modal not initialized.')
      return
    }
    await sdkRef.current.logout()
    sdkRef.current.hideWallet()
    setSmartAccount(null)
    enableInterval(false)
  }
That's it! We have successfully added the social login feature in our DApp 🎉
Adding Gasless Transactions
Our next and final and most excellent feature to add is gasless transactions.
What are Gasless Transactions 🤔?
If your DApp supports gasless transactions, your users don't need to have any tokens and pay for the gas fees; it's all free for the user. The DApp creator covers all the gas costs through a paymaster, which we will set up now through Biconomy!
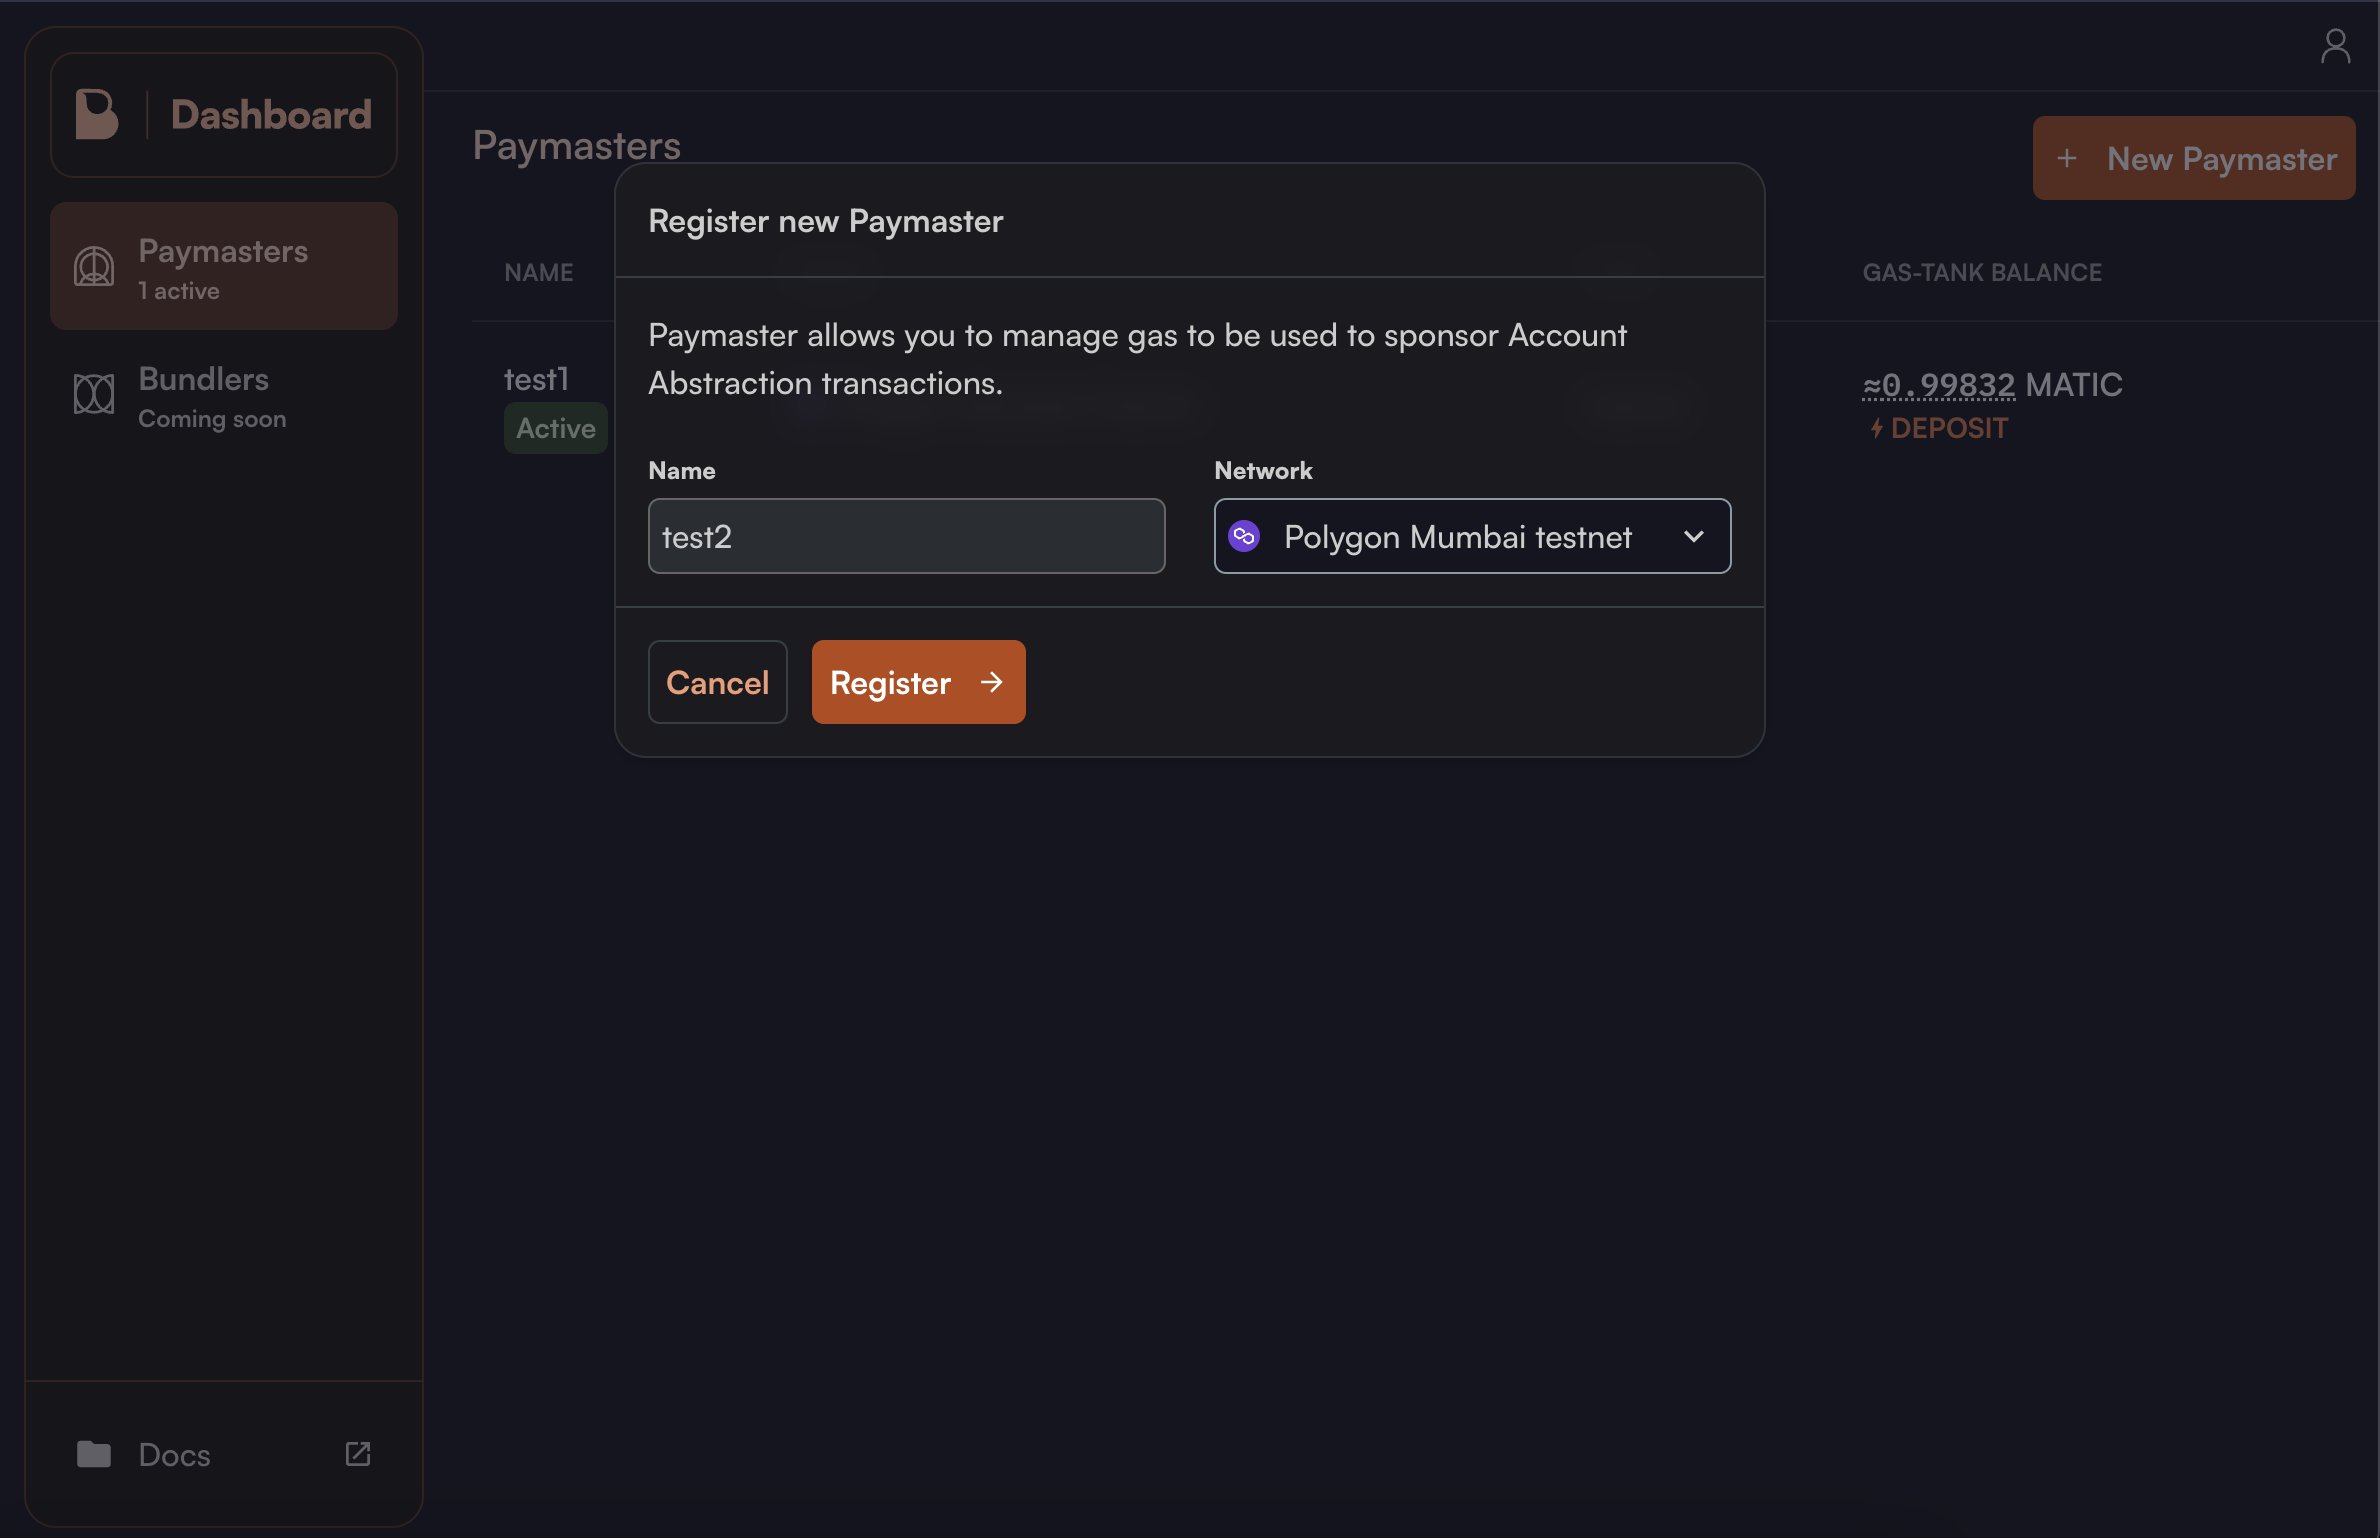
Setup a Paymaster
To set up a paymaster, go to the Biconomy dashboard and create a "New Paymaster". Enter a name and network for your paymaster, and then click "register"!
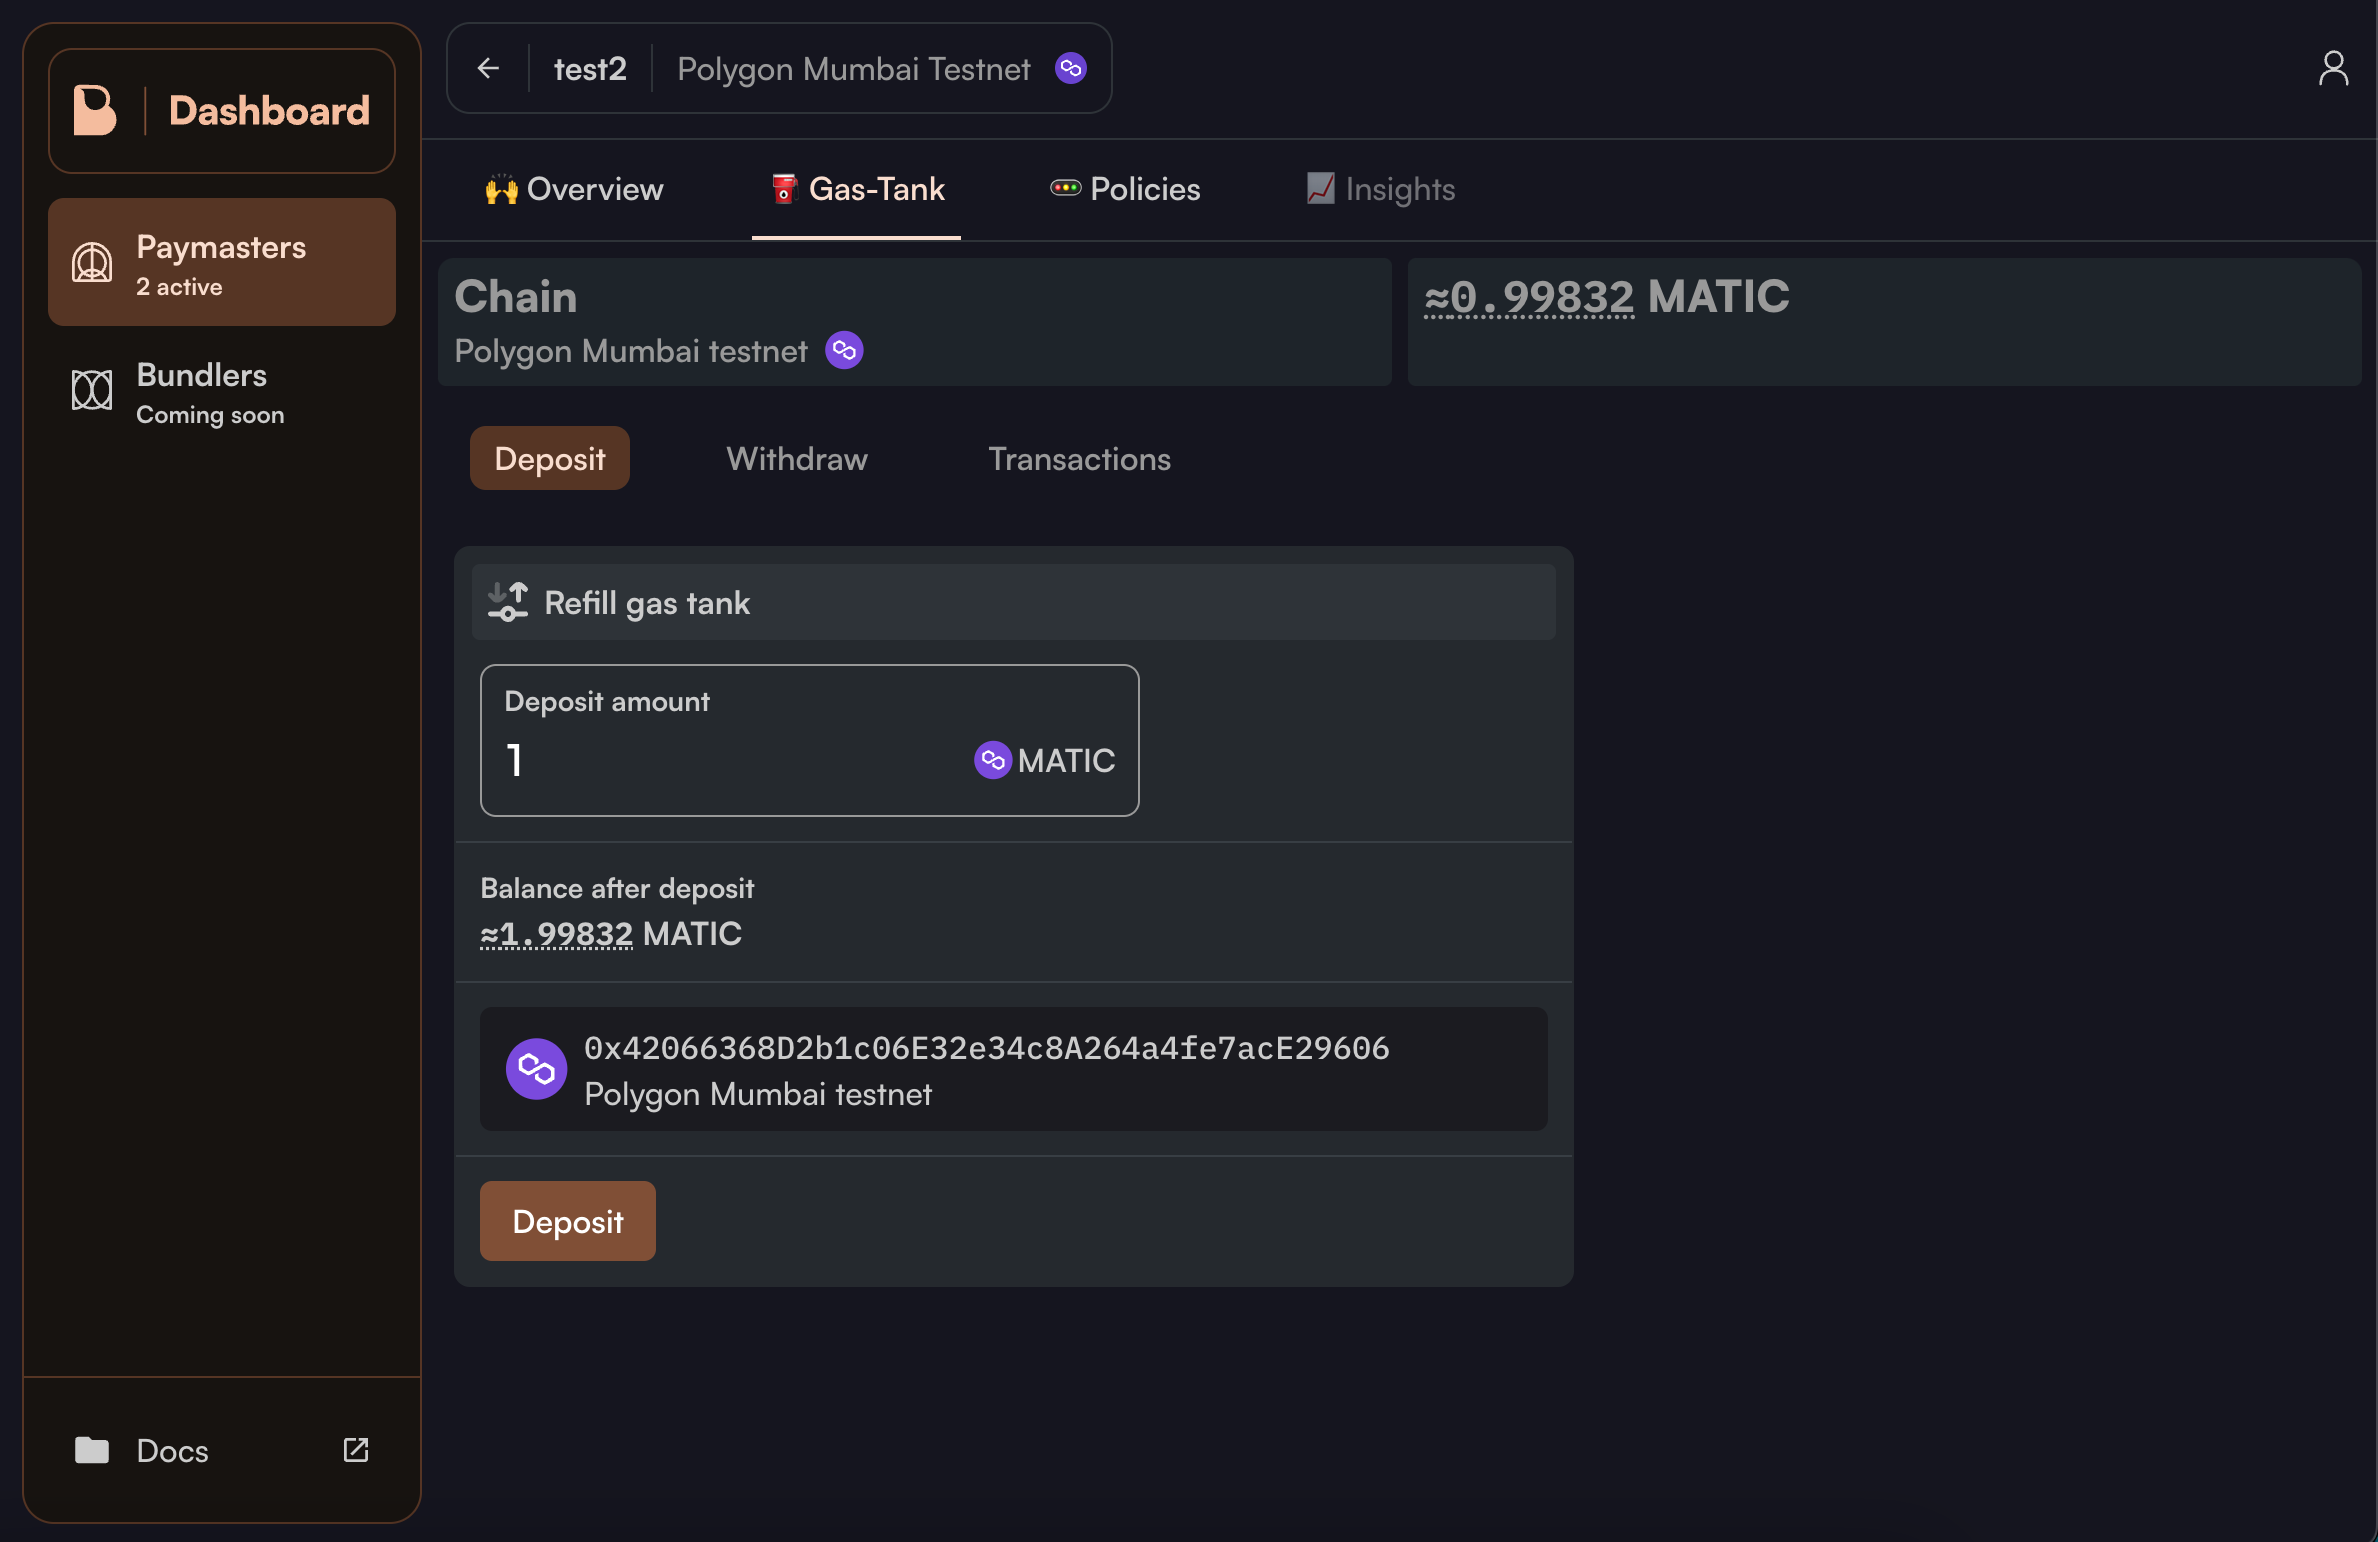
Next, we will set up the gas tank to pay our user's gas fee. Go to the gas tank section and deposit some testnet Matic.
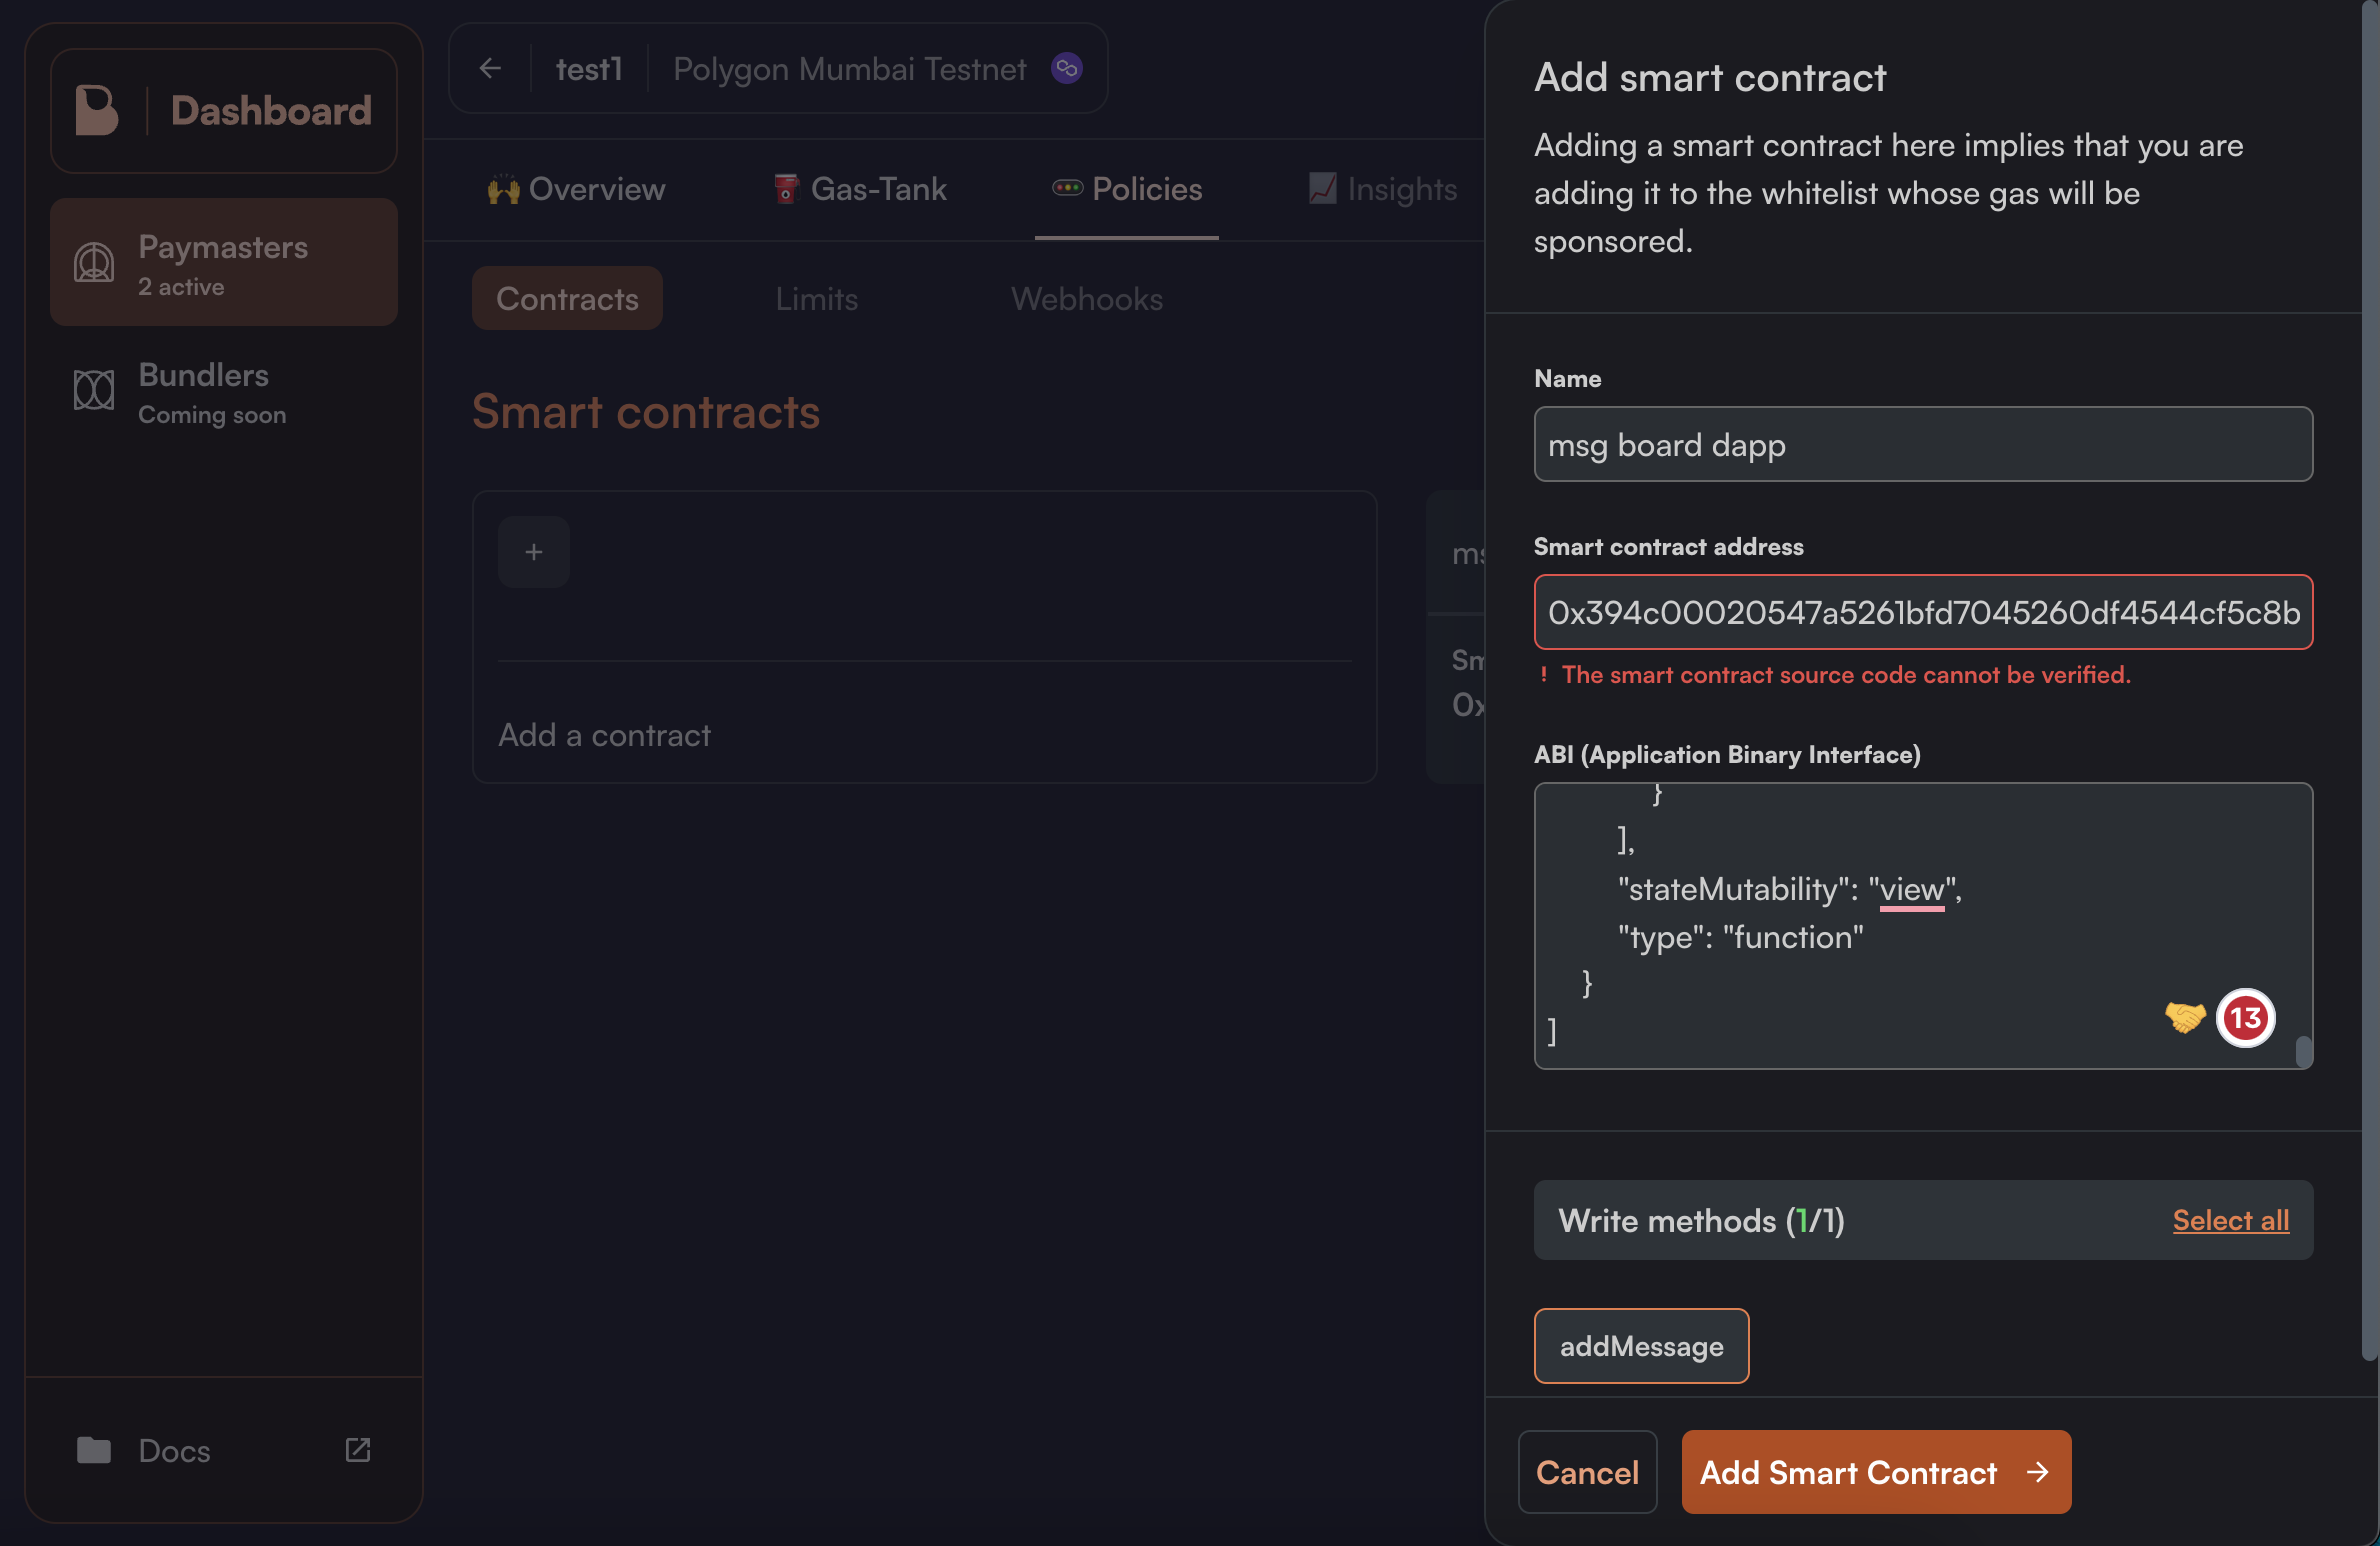
Next, we will add our smart contracts to the allowlist, so only these smart contracts and their selected functions can perform gasless transactions through this paymaster.
Enter the name, smart contract address, ABI (in case it is not auto-detected), and select the functions which you want to make gasless, which in our case, is addMessage. Then click on "Add Smart Contract".
Woohoo 🎉, we have successfully set up our paymaster to allow users to experience gasless transactions!
Creating a Gasless Transaction
Our final step is adding gasless transactions functionality on the frontend.
To make our sendMessage function gasless, we will use our initialized smartAccount to complete a DApp paid transaction. I have also added a toast to notify users of the transaction status resulting in better UX.
Finally, the function will look like this:
const sendMessage = async () => {
  try {
    setLoading(true)

    // Using react toastify to show a "sending" toast
    const infoToast = toast.info("Sending your anonymous message...", {
      position: "top-right",
      autoClose: 25000,
      hideProgressBar: false,
      closeOnClick: true,
      pauseOnHover: false,
      draggable: true,
      progress: undefined,
      theme: "dark",
    })

    // Get the "addMessage" function from the contract
    const addMsgTx = await contract.populateTransaction.addMessage(message)

    // Create a transaction object
    const tx1 = {
      to: msgBoardContract,
      data: addMsgTx.data,
    }

    // Send the dApp paid transaction using Biconomy smart account
    const txResponse = await smartAccount?.sendTransaction({ transaction: tx1 })

    const txHash = await txResponse?.wait()
    console.log({ txHash })

    getMessages()
    toast.dismiss(infoToast)
    toast.success("Your anonymous message has been added!", {
      position: "top-right",
      autoClose: 15000,
      hideProgressBar: false,
      closeOnClick: true,
      pauseOnHover: false,
      draggable: true,
      progress: undefined,
      theme: "dark",
    })
    setLoading(false)
  } catch (error) {
    setLoading(false)
    console.log(error)
    toast.error("Error occured check the console", {
      position: "top-right",
      autoClose: 25000,
      hideProgressBar: false,
      closeOnClick: true,
      pauseOnHover: false,
      draggable: true,
      progress: undefined,
      theme: "dark",
    })
  }
}
We'll also add a function to get all the previous messages. Function getAllMessages from the smart contract returns all the messages.
const getMessages = async () => {
  console.log(provider)
  const tempProvider = new ethers.providers.JsonRpcProvider("https://mumbai.rpc.thirdweb.com")
  const contract = new ethers.Contract(msgBoardContract, msgBoardABI, tempProvider)

  setContract(contract)

  let messages = await contract.getAllMessages()

  messages = [...messages].reverse()
  setAllMessages(messages)
}
Finally, we will use all the above functions and show the UI in the following way:
return (
  <>
    <Head>
      <title>Message Board dApp</title>
      <meta name="description" content="Next.js + TailwindCSS + Typescript + Biconomy" />
      <meta name="viewport" content="width=device-width, initial-scale=1" />
      <link rel="icon" href="/favicon.ico" />
    </Head>
    <div className="bg-fbg border- h-screen overflow-scroll">
      <ToastContainer
        position="top-right"
        autoClose={5000}
        hideProgressBar={true}
        newestOnTop={false}
        closeOnClick
        rtl={false}
        pauseOnFocusLoss
        draggable
        pauseOnHover
        theme="dark"
      />
      <div className="flex flex-col bg-fbox m-16 rounded-lg min-h-full justify-center items-center py-8">
        <h1 className="text-5xl font-bold">Message board dApp</h1>
        <p className="text-md m-10 text-center ">
          This is a message board dApp powered by Account Abstraction <br />
          <br /> Login to send an anonymous message and view other messages as well! <br /> This dApp uses Gasless
          txns so you dont need to worry about any gas fees!
        </p>
        {!smartAccount && !loading && (
          <button className="btn" onClick={login}>
            Login
          </button>
        )}
        {!smartAccount && loading && (
          <div>
            <p>Creating your Smart Account...</p>
            <Spinner />
          </div>
        )}
        {!!smartAccount && (
          <>
            <div className="">
              <h3>Smart account address : {smartAccount.address}</h3>
            </div>

            <div className="flex flex-row w-full justify-center">
              {loading ? (
                <Spinner />
              ) : (
                <>
                  <input
                    className="border-2 rounded-md p-2 bg-black mx-4 w-1/2 mt-2"
                    type="text"
                    placeholder="Enter your message"
                    value={message}
                    onChange={handleChange}
                  />

                  <button className="rounded-lg bg-forange text-white px-4 hover:bg-orange-600" onClick={sendMessage}>
                    Send
                  </button>
                </>
              )}
            </div>
            <button className="btn mt-4" onClick={logout}>
              Logout
            </button>
            {!!allMessages && (
              <div className="bg-fmsg p-4 mt-8 w-1/2 rounded-md">
                <h2 className="text-center text-xl"> All Messages</h2>

                {allMessages.map((msg, key) => (
                  <div key={key} className="text-md border-forange border-b-2 py-2">
                    {msg}
                    <br className=" " />
                  </div>
                ))}
              </div>
            )}
          </>
        )}
      </div>
    </div>
  </>
)
We will make a Spinner.tsx under the components folder to show the loading state for better UX:
export default function Spinner() {
  return (
    <div className="w-full flex justify-center my-2">
      <div className="w-8 h-8 border-4 border-orange-700 border-b-gray-400 rounded-[50%] animate-spin"></div>
    </div>
  )
}
Please make sure your final code of App.tsx looks like this. I have included all the code in the snippets above, but I may have missed some details.
Final Demo
Check out how our final message board DdApp looks like here
Conclusion
That's it! 🥳 Great work.
We have successfully learned how to integrate Biconomy in our DApps to make them more user-friendly by adding functionalities like social login and gasless transactions.
Pat yourself on the back and share your DApp with us on the Biconomy Discord! If you want to look at the code, check out the GitHub Repository.
Next Steps
I will be releasing another guide on how to use other features of Biconomy, like batched transaction and gas payment in ERC20. So meanwhile, try to play around with them yourselves and let me know if you build something your own 🤩
Until next time 🫡


