

Running an Arweave Gateway on Fly.io
A guide that explains how to run AR.IO's Arweave gateway on Fly.io
Last week, I wrote about running an Arweave gateway on GitHub Codespaces for development, but this was just an exercise to get to know AR.IO's gateway node.
Codespaces are short-lived cloud instances that start when we open VSCode in the browser. Nice for development, but not so nice for a real gateway.
Fly.io, or Fly for short, on the other hand, supplies us with short-lived cloud instances that start when someone sends a request to a specific domain - any requests - so it's perfect for a gateway.
But first, we must take a few hurdles to get things up and running.
So, let's dive in!
Target Audience
This article assumes you know how to use the command line on Linux. We will edit Docker, TypeScript, and YAML files, but the article will supply all content.
Prerequisites
We need a Fly account to deploy the gateway; the free tier should be enough to run a gateway.
Make sure you installed fly CLI.
I will use GitHub Codespaces as IDE, but since we will only edit a few files and run the Fly CLI.

Tech Background
Before we start, a bit of background on the technology we will use.
What is Fly.io ?
Fly is a cloud provider like Heroku but more flexible. They allow us to run Docker instances. That's right, they're deploying Docker images on virtual machines instead of containers, giving us the power of Docker with the isolation of VMs.
They're also serverless. This means we pay by usage; the instances are scaled down to zero if no one uses them; the instances start when someone sends a request to their domain, and, by default, an instances filesystem is temporary, just like with serverless functions.
Note: Instances are called "machines" on Fly so we will refer to them as machines from now on in this article.
What is the AR.IO Gateway?
The AR.IO node is an Arweave gateway implementation in Node.js/TypeScript. It caches and indexes Arweave transactions (TXs) and their data for fast retrieval. It has a REST API for downloads and a GraphQL API to interact with TXs.
The AR.IO node doesn't handle chain-related information like blocks, TX anchors, or wallet addresses but relays them to a full Arweave node.
The whole implementation consists of two parts:
The AR.IO node for caching and indexing TXs and their data.
The Envoy proxy for relaying requests to the AR.IO node or a full Arweave node.
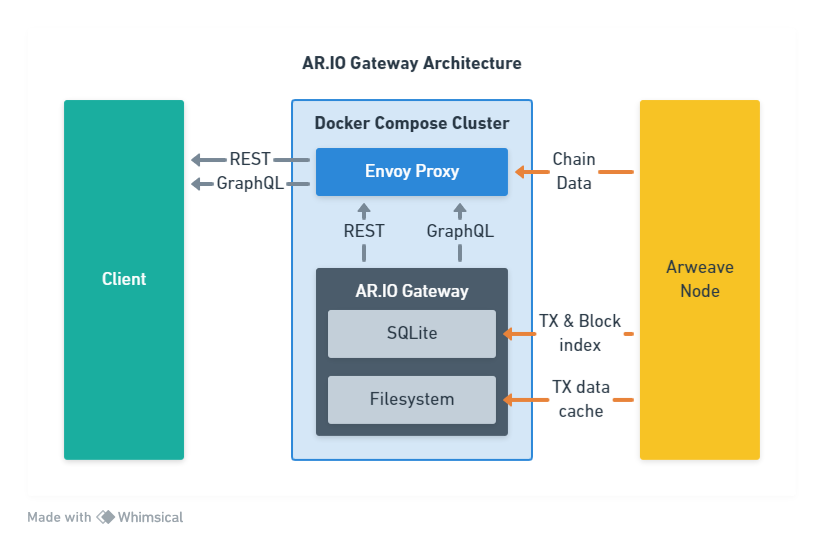
Figure 1: AR.IO gateway architecture
Both run in Docker containers managed by Docker Compose.
Note: There is no token-based incentive mechanism. Node operators are NOT rewarded with tokens. We will be running a gateway on our own bill.
Implementation
Now that we understand the background let's get a node deployed!
Our tasks are:
Switching the cluster management from Docker Compose to Fly Apps.
Deploying the AR.IO node and the Envoy proxy to Fly.
Optional: Adding support for LiteFS, so only one node needs to index TXs.
Cloning the Repository
The first step is to clone the ar-io-node repository from GitHub.
We can either clone it locally with Git:
git clone -b develop https://github.com/ar-io/ar-io-node.git
cd ar-io-node
Note: At the writing of this article, some features haven't landed on the
mainbranch. So we need to clone thedevelopbranch.
Creating the Fly.io Apps
Fly doesn't support Docker Compose. Instead, we need to deploy the node and the proxy each as a separate Fly App. They will use the internal network to communicate with each other.
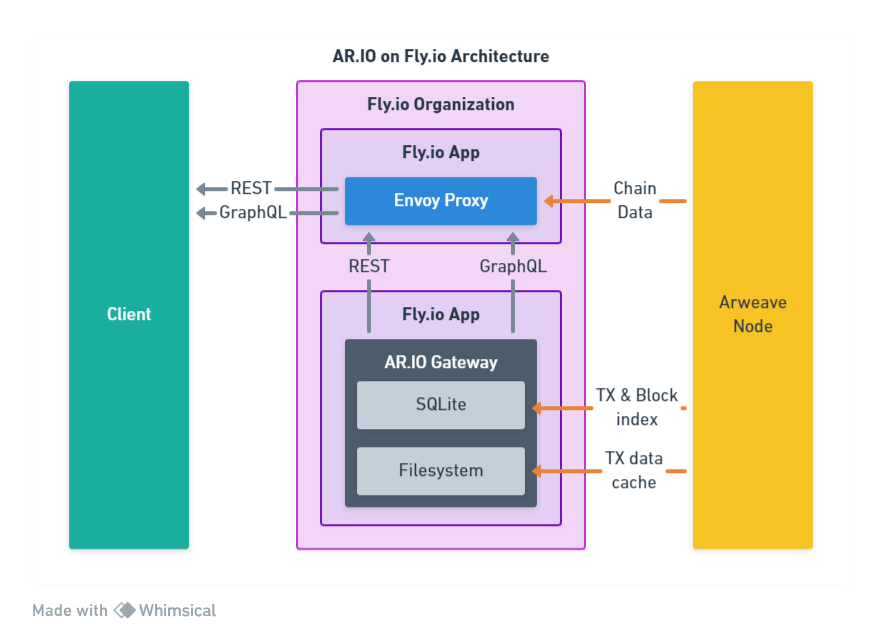
Figure 2: AR.IO gateway on Fly.io Architecture
Creating a Fly.io App for the AR.IO Node
We create a new Fly App by running the following command inside the ar-io-node directory:
fly launch
Choose a primary region and let Fly generate the app name (i.e., This name will become a subdomain of fly.dev, so it has to be unique for all apps of all Fly users.)
The output will look something like this:
Creating app in /workspaces/ar-io-node
Scanning source code
Detected a NodeJS app
? Choose an app name (leave blank to generate one):
automatically selected personal organization: ...
Some regions require a paid plan (bom, fra, maa).
See https://fly.io/plans to set up a plan.

? Choose a region for deployment: ...
App will use '...' region as primary

Created app '<NODE_APP_NAME>' in organization 'personal'
Admin URL: https://fly.io/apps/<NODE_APP_NAME>
Hostname: <NODE_APP_NAME>.fly.dev
Wrote config file fly.toml
Validating /workspaces/ar-io-node/fly.toml
Platform: machines
✓ Configuration is valid

If you need custom packages installed, or have problems with your deployment build, you may need to edit the Dockerfile for app-specific changes. If you need help, please post on https://community.fly.io.

Now: run 'fly deploy' to deploy your NodeJS app.
Note: We need the generated app name later, so save it!
This command created an ar-io-node/fly.toml file we can use to configure our deployment.
We have to delete force_https = true because we will use the internal network of Fly, so our node won't use SSL.
We also have to add the following config to the end of the file:
[env]
  START_WRITERS = "false"
The START_WRITERS = "false" prevents the node from indexing TXs when started, so the GraphQL API won't work!
Note: These writers will index all Arweave TX, which takes about 100GB of storage and a week of constantly indexing. We want to ensure everything is set up correctly before investing all that time and money!
Creating the Fly.io App for the Envoy Proxy
Next, we need to set up our Enovy proxy. For this, we navigate to the ar-io-node/envoy in the CLI and run the launch command again.
fly launch
We choose a primary region and let Fly generate our app name. And again, we need to save it for later!
We need to update the ar-io-node/envoy/fly.toml to tell Envoy where it can find our node.
The proxy is running on port 3000, so we must change the internal_port to 3000 and add the following code at the end of the file:
[env]
  TVAL_AR_IO_HOST = "<NODE_APP_NAME>.flycast"
  TVAL_AR_IO_PORT = "80"
  TVAL_GATEWAY_HOST = "arweave.dev"
  TVAL_GRAPHQL_HOST = "<NODE_APP_NAME>.flycast"
  TVAL_GRAPHQL_PORT = "80"
We replace the <NODE_APP_NAME> with the name Fly generated for our AR.IO node app.
Note: Fly uses
.flycastdomains for internal app communication, so Envoy can relay to our node without a round-trip through the internet. The port is 80 because we already mapped our node's internal port (e.g., 4000) in its respectivefly.toml. Flycast also ensures our node starts on a request.
Updating the Envoy Configuration
Internal communication on Fly uses IPv6, so we must update the ar-io-node/envoy/envoy.template.yaml file.
Replace the content of that file with this code:
#@ load("@ytt:data", "data")
---
admin:
  address:
    socket_address: { address: '::', port_value: 9901, ipv4_compat: true }
static_resources:
  listeners:
    - name: arweave_listener
      address:
        socket_address: { address: '::', port_value: 3000, ipv4_compat: true }
      filter_chains:
        - filters:
            - name: envoy.filters.network.http_connection_manager
              typed_config:
                '@type': type.googleapis.com/envoy.extensions.filters.network.http_connection_manager.v3.HttpConnectionManager
                stat_prefix: ingress_http
                codec_type: AUTO
                route_config:
                  name: local_route
                  virtual_hosts:
                    - name: root_service
                      domains: ['*']
                      routes:
                        - match: { prefix: '/gateway_metrics' }
                          route:
                            cluster: ario_gateways
                            retry_policy:
                              retry_on: '5xx,reset,retriable-status-codes'
                              retriable_status_codes: 404
                              num_retries: 5
                        - match: { prefix: '/healthcheck' }
                          route:
                            cluster: ario_gateways
                            retry_policy:
                              retry_on: '5xx,reset,retriable-status-codes'
                              retriable_status_codes: 404
                              num_retries: 5
                        - match: { prefix: '/graphql' }
                          route:
                            cluster: graphql_gateways
                            #@ if data.values.GRAPHQL_PORT == "443":
                            auto_host_rewrite: true
                            #@ end
                            retry_policy:
                              retry_on: '5xx,reset,retriable-status-codes'
                              retriable_status_codes: 404
                              num_retries: 5
                        - match: { prefix: '/api-docs' }
                          route:
                            cluster: ario_gateways
                            retry_policy:
                              retry_on: '5xx,reset'
                              num_retries: 5
                        - match: { prefix: '/openapi.json' }
                          route:
                            cluster: ario_gateways
                            retry_policy:
                              retry_on: '5xx,reset'
                              num_retries: 5
                        - match: { prefix: '/ar-io' }
                          route:
                            cluster: ario_gateways
                            retry_policy:
                              retry_on: '5xx,reset'
                              num_retries: 5
                        - match:
                            safe_regex:
                              google_re2: { max_program_size: 200 }
                              regex: '^\/raw\/[a-zA-Z0-9_-]{43}$'
                          route:
                            timeout: 0s
                            cluster: ario_gateways
                            retry_policy:
                              retry_on: '5xx,reset'
                              num_retries: 5
                        - match:
                            safe_regex:
                              google_re2: { max_program_size: 200 }
                              regex: '^\/[a-zA-Z0-9_-]{43}\/?$|^\/[a-zA-Z0-9_-]{43}\/.*$'
                          route:
                            timeout: 0s
                            cluster: ario_gateways
                            retry_policy:
                              retry_on: '5xx,reset'
                              num_retries: 5
                        - match: { prefix: '/' }
                          route:
                            cluster: legacy_gateways
                            retry_policy:
                              retry_on: '5xx,reset,retriable-status-codes'
                              num_retries: 5
                            auto_host_rewrite: true
                            internal_redirect_policy:
                              max_internal_redirects: 10
                              allow_cross_scheme_redirect: true
                              redirect_response_codes: [301, 302, 303]
                http_filters:
                  - name: envoy.filters.http.router
                    typed_config:
                      '@type': type.googleapis.com/envoy.extensions.filters.http.router.v3.Router
  clusters:
    - name: ario_gateways
      connect_timeout: 1s
      type: STRICT_DNS
      lb_policy: LEAST_REQUEST
      load_assignment:
        cluster_name: ario_gateways
        endpoints:
          - lb_endpoints:
              - endpoint:
                  address:
                    socket_address:
                      address: #@ data.values.AR_IO_HOST
                      port_value: #@ data.values.AR_IO_PORT
                      ipv4_compat: true
    - name: graphql_gateways
      connect_timeout: 1s
      type: STRICT_DNS
      dns_lookup_family: V4_PREFERRED
      lb_policy: LEAST_REQUEST
      load_assignment:
        cluster_name: legacy_gateways
        endpoints:
          - lb_endpoints:
              - endpoint:
                  address:
                    socket_address:
                      address: #@ data.values.GRAPHQL_HOST
                      port_value: #@ data.values.GRAPHQL_PORT
                      ipv4_compat: true
      #@ if data.values.GRAPHQL_PORT == "443":
      transport_socket:
        name: envoy.transport_sockets.tls
        typed_config:
          '@type': type.googleapis.com/envoy.extensions.transport_sockets.tls.v3.UpstreamTlsContext
          sni: #@ data.values.GRAPHQL_HOST
          common_tls_context:
            validation_context:
              trusted_ca:
                filename: /etc/ssl/certs/ca-certificates.crt
      #@ end
    - name: legacy_gateways
      connect_timeout: 1s
      type: STRICT_DNS
      lb_policy: LEAST_REQUEST
      load_assignment:
        cluster_name: legacy_gateways
        endpoints:
          - lb_endpoints:
              - endpoint:
                  address:
                    socket_address:
                      address: #@ data.values.GATEWAY_HOST
                      port_value: 443
      transport_socket:
        name: envoy.transport_sockets.tls
        typed_config:
          '@type': type.googleapis.com/envoy.extensions.transport_sockets.tls.v3.UpstreamTlsContext
          sni: #@ data.values.GATEWAY_HOST
          common_tls_context:
            validation_context:
              trusted_ca:
                filename: /etc/ssl/certs/ca-certificates.crt
The changes aren't that big but dispersed throughout the file.
The :: lets Envoy listen on IPv6 addresses, and the ipv4_compat ensures it also works with IPv4.
We also removed the ARNS_ROOT_HOST config since it wouldn't work with the fly.dev subdomain.
Deploying the Apps
Now that we have done the setup, we can build and deploy our apps to Fly.
Deploying the AR.IO Node
We start by deploying the node with this command:
fly deploy --vm-memory 1024
This command will:
Build the Docker image inside a free Fly build machine.
Deploy the image to our Fly app.
Start a machine that runs the image.
The default memory of a machine is 256MB, so we use the --vm-memory 1024 argument to ensure the node gets a bit more memory. We don't need that parameter in subsequent deployments.
Note: The AR.IO node needs around 500MB when idling, so 1GB gives it a bit of buffer to work with.
Then, we must remove the public IPs and add a private IP. This way, the gateway node is only accessible by our proxy. This also ensures Flycast will restart our node when an internal request reaches its domain; otherwise, it only resumes when a public request reaches the node's domain.
We run all commands inside the ar-io-node directory:
First, we add a private IP:
fly ips allocate-v6 --private
Then we list all IPs:
fly ips list
And delete all IPs that are marked public:
fly ips release <IP>
Deploying the Envoy Proxy
Next, we need to deploy the Envoy proxy so the whole system is accessible from the outside.
We run the following command inside the ar-io-node/envoy directory:
fly deploy
Testing the Deployment
After successfully deploying everything, we can try out our very own Arweave gateway!
Testing the REST API
This request will GET the Arweave network info:
curl https://<ENVOY_APP_NAME>.fly.dev/info
Envoy will relay it to an Arweave node, so the AR.IO gateway won't process it, but it allows us to check if the proxy works.
This request will GET the UDL TX:
curl https://<ENVOY_APP_NAME>.fly.dev/tx/yRj4a5KMctX_uOmKWCFJIjmY8DeJcusVk6-HzLiM_t8
This is also relayed to an Arweave node.
This request will GET the data associated with the UDL TX:
curl https://<ENVOY_APP_NAME>.fly.dev/yRj4a5KMctX_uOmKWCFJIjmY8DeJcusVk6-HzLiM_t8 -o udl.html
Notice the missing tx/ here. Our gateway node will process it by fetching and caching the data so it's quickly available in the future. Then, CURL handles the download to ar-io-node/udl.html.
Testing the GraphQL API
The GraphQL API is at https://<ENVOY_APP_NAME>.fly.dev/grapql.
We can open the Apollo GraphQL Playground, but it doesn't resolve any requests because we turned off indexing TXs and blocks with START_WRITERS = false in the ar-io-node/fly.toml.
Enabling Transaction Indexing
To get GraphQL working, we have two options.
If we run only one machine, we can add a volume to the gateway node so it can persist its TX indexes between restarts.
If we run multiple (possibly geographically distributed) machines, we can add a volume and enable LiteFS, so only the primary machine has to index TXs, and the others can replicate the finished SQLite database.
Note: Currently, the TX index is around 100GB in size and takes ~1 week to sync up. So, the following steps are outside Fly's free plan and would cost about $23 per month for a single replica.
Enabling Transaction Indexes for a Single Machine
Let's go through the simple scenario first. We have one gateway machine, and we need one volume.
First, we have to update the ar-io-node/fly.toml by replacing the [env] block with this:
[env]
  START_WRITERS = "true"
And adding the following code at the end:
[mounts]
  source="app_data"
  destination="/app/data"
Note: Fly will scale the app to zero machines if no requests happen. This means the indexing will stop, too. To get around this, we can temporarily set
min_machines_running = 1to keep the machine indexing.
Fly would automatically create the volume for this mount if we didn't already deployed the app, but since it's already running, we have to create the volume manually.
We run this command inside the ar-io-node directory:
fly volumes create app_data -s 100
The volume will have 100GB of storage and the name app_data. If we run the command multiple times, all volumes will have the same name but different IDs. Machines will choose from the pool of volumes with the same name as their mount/source definition. We need as many volumes in a region as we want machines to run.
Then, we redeploy the node with the added mount configuration.
fly deploy
If everything works correctly, we should see the log lines like that in the Fly Dashboard:
info: Block imported {"class":"BlockImporter","height":619,"missingTxCount":0,"timestamp":"2023-08-29T12:19:57.396Z","txCount":1,"txsImportedPerSecond":0.7922153629990583}
Which means the gateway has started indexing TXs.
After this, it's time to wait for the indexing to finish, which can take a few days.
Enabling Transaction Indexes for Multiple Machines
One of the awesome Fly features is the horizontal scaling and multi-region deployment. We can deploy one or more machines in one or more regions around the globe, and Fly will take care of scaling them to zero when nobody needs them and scaling them up again when demand rises.
Even better, Fly machines can use LiteFS, a FUSE-based virtual filesystem that allows us to replicate SQLite databases across all our machines. One machine will do the indexing work, and the others just sync the finished database.
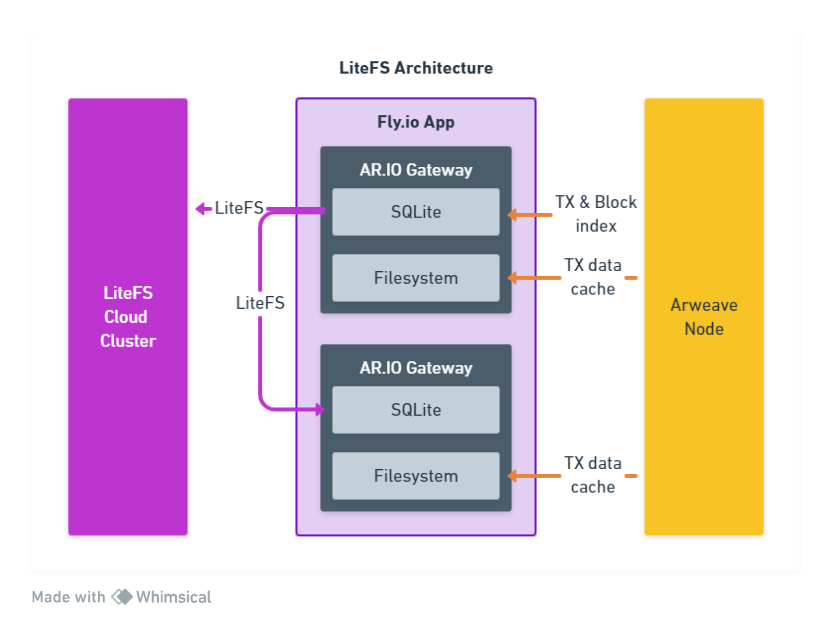
Figure 3: LiteFS Architecture
Updating the Dockerfile of the Node
First, we must update the ar-io-node/Dockerfile because LiteFS needs additional files and packages.
We add the following code above the # CREATE VOLUME section:
# INSTALL LITEFS
RUN apk add --no-cache ca-certificates fuse3
COPY --from=flyio/litefs:0.5 /usr/local/bin/litefs /usr/local/bin/litefs
COPY ./litefs.yml /etc/litefs.yml
And replace the # START section with this:
# START
ENTRYPOINT litefs mount
Docker will call the LiteFS executable, which then takes care of the start of our gateway node.
Creating the litefs.yml File
Next, we need an ar-io-node/litefs.yml file with the following content:
fuse:
  dir: "/app/data/sqlite"

data:
  dir: "/var/lib/litefs"

exit-on-error: false

exec:
  - cmd: "/bin/sh /app/docker-entrypoint.sh"

lease:
  type: "consul"
  advertise-url: "http://${HOSTNAME}.vm.${FLY_APP_NAME}.internal:20202"
  candidate: ${FLY_REGION == PRIMARY_REGION}
  promote: true

  consul:
    url: "${FLY_CONSUL_URL}"
    key: "litefs/${FLY_APP_NAME}"
The
fusepart points to the directory where our node expects the SQLite database.The
datapart points to a directory LiteFS uses for housekeeping.The
execpart was previously handled by Docker.The
leasepart configures everything needed so our machines can elect a primary that will then index the TXs. In this case, the candidate has to be in the primary Fly region of our app.
Updating the fly.toml File
Now, we need to replace the [mount] section of our ar-io-node/fly.toml file:
[mounts]
  source = "litefs"
  destination = "/var/lib/litefs"
Attaching Consul to the Node Machine
We need to tell our machine where it can find the Consul server so it can participate in the election of a primary machine.
We can add the FLY_CONSUL_URL environment variable by executing this command in the ar-io-node directory:
fly consul attach
After that, all machines cloned from this machine will inherit this variable.
Creating the new volume
If we deployed the node the first time with the current configuration, Fly would create a volume automatically, but since our machine is already running, we have to create a new volume.
fly volumes create litefs -s 100
Optional: Creating a LiteFS Cloud Cluster
While not mandatory, we can create a LiteFS Cloud cluster for backup. If anything goes awry, our machines can pull the data from there without doing all the indexing work again.
We create a new cluster in the Fly Dashboard. We choose a name and region and click "Create".
Then, we copy the token to save it to a secret environment variable for our machines.
fly secrets set LITEFS_CLOUD_TOKEN=$(<LITEFS_AUTH_TOKEN>)
We replace the <LITEFS_AUTH_TOKEN> with the copied token and run the command!
Redeploying the Updated Gateway
Now, we have to call the deploy command again. The machine will start LiteFS, which will connect to Consul to check who is the primary and then run our gateway node.
fly deploy
Adding a Region
Now, we add a new region, and the deployed machine will automatically get cloned from our existing one. We must clone before enabling the indexing so the new machines aren't writing to the database.
The following command starts a new machine in Sydney:
fly scale count 1 --region syd
We can also run another Envoy in Sydney by running the same command inside the ar-io-node/envoy directory.
Enabling the Indexing
Now, we have two machines running in two regions, both using LiteFS to sync their indexes, but none is indexing anything right now.
We have to change the START_WRITERS environment variable for our primary machine to change this.
The following command gives us a list of all machines:
fly machines list
The new machine was in Sydney so the non-Sydney one would be the primary. We can enable the indexing by running this command:
fly machines update <MACHINE_ID> --env START_WRITERS=true
After this, the primary machine will restart and run the indexer immediately. The other machine will use LiteFS to sync up what's already in the SQLite database.
If we notice a replica throwing errors because it wants to write, but isn't allowed, we can disable its writers:
fly machines update <MACHINE_ID> --env START_WRITERS=false
Note: Every replica will cost around $23 a month, so $46 for our two machines or $69 if we add the backup.
Summary
AR.IO delivered a solid Arweave gateway implementation, and with Fly, we can run it everywhere in the world for under $30 a month.
The LiteFS integration even allows for easy backups and performance improvements; after the first node did its one-week-long indexing marathon, all subsequent nodes can just replicate the database to get up to speed.


